Most people who build n8n workflows hit the same wall: the automation
works great internally, but they can’t sell it, scale it, or hand it
to a customer without giving them access to their n8n instance.
This guide solves that. You will take the logic from any n8n workflow,
convert it into a proper backend API, wrap a frontend and payments
around it, and deploy a working SaaS — all using AI to generate most
of the code.
No CS degree needed. No agency required. Just a workflow, an AI code
editor, and the 13 steps below.
Time to complete: 2–4 days for a simple workflow. 1–2 weeks for a
full-featured product.
Cost to run after launch: under $10/month.
First, let’s clear a big misconception ❌
Most people think:
“I’ll just connect a frontend to an n8n webhook and call it a SaaS.”
That sounds easy, but it causes real problems:
- ❌ licensing issues
- ❌ no real ownership
- ❌ hard to scale
- ❌ not investor- or customer-friendly
So we’re not doing that.
Instead, we’ll:
- take the logic from n8n
- turn it into a real backend API
- then build a proper web app around it
And yes — AI does most of the work 🤖
What we’re actually building 🧠
A real SaaS app with:
- 🖥️ frontend (what users see)
- ⚙️ backend API (business logic)
- 🔐 authentication (login/signup)
- 💳 payments (Stripe)
- 🗄️ database
- ☁️ deployment & infrastructure
No dependency on n8n at runtime.
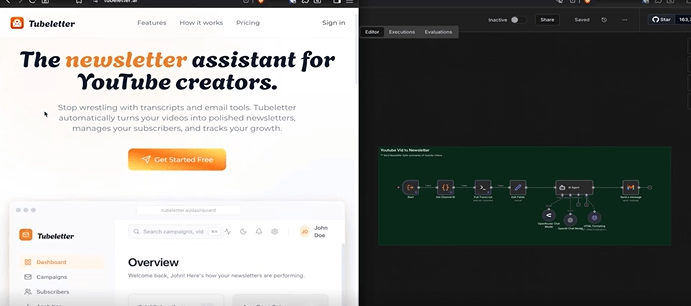
Real example: Tubeletter ✉️
The original idea started as an n8n workflow:
“Turn YouTube videos into newsletters”
The SaaS version (Tubeletter) lets users:
- log in
- add YouTube channels
- pick videos
- schedule newsletters
- invite friends to subscribe
- track email performance
Tubeletter charges $9/month for the basic plan — enough to cover hosting costs with just 3 paying users.
At 50 users, that’s $450/month in recurring revenue from a workflow that started as a free n8n template.
That is the real example. Not a side project. Not a demo. A working SaaS with real pricing, real users, and real recurring income.
All real SaaS behavior.
No fake demo energy.
Step 1: Start from your n8n workflow 🧩
Step 1: Start From Your n8n Workflow
Your n8n workflow already contains the most valuable thing — the logic.
Every node describes an operation: fetch data, transform it, call an API,
send a result. That is exactly what a backend API does.
What you do:
- Open your n8n workflow in the editor.
- Click the three-dot menu (top right) → Download → save as .json.
What to look for in the JSON:
- Each node’s “type” tells you what operation it performs
(HTTP request, data transformation, email send, etc.) - The “parameters” inside each node tell you what inputs it needs
- The connections array shows the order of execution
Example: If your workflow fetches a YouTube transcript, summarizes it
with GPT-4, and emails the result — your API will have one endpoint
(/api/generate) that takes a YouTube URL and returns a newsletter.
The n8n JSON just told you that in 3 nodes.
Why this matters: You are not copying the workflow — you are reading
it like a spec document. The AI will turn that spec into real code.
Step 2: Decide your stack (don’t overthink it) 🧱
Here is the exact stack that works for 90% of n8n-to-SaaS projects.
Do not change it until you have shipped your first version.
AI code editor:
- Cursor (cursor.com) — VS Code with Claude/GPT built in.
Free tier works fine to start.
Backend:
- Node.js with Express (most n8n workflows use JavaScript-style
logic, so this is a natural fit) - Docker — wraps your backend so it runs identically on your
laptop and on a $4 VPS
Frontend:
- React + TypeScript — the most widely supported stack,
meaning AI generates better code for it than anything else
Database + Auth:
- Supabase (supabase.com) — free tier includes PostgreSQL
database + user authentication + API.
Replaces what would take weeks to build manually.
Payments:
- Stripe — industry standard. Handles subscriptions,
trials, invoices, and refunds automatically.
Infrastructure:
- Hostinger VPS ($4–$6/month) — enough for your first
100 paying users - Cloudflare — free DNS + SSL + DDoS protection
- Traefik — reverse proxy that routes traffic to your
Docker containers and handles HTTPS automatically
Total monthly cost for this stack: ~$6–$10/month before
you have a single user.
Step 3: Tell AI how your app should be structured 🧠📐
Before writing a single line of code, create a file called
agents.md (or RULES.md) in your project root. This is the
instruction set AI reads every time it generates code.
Here is a working template you can paste directly:
Project: [Your SaaS name]
Stack: Node.js backend, React + TypeScript frontend, Supabase, Stripe, Docker
Rules:
- Always keep frontend and backend in separate folders (/frontend, /backend)
- All API routes go in /backend/src/routes/
- All business logic goes in /backend/src/services/
- Use environment variables for all API keys — never hardcode
- Every Docker service must have a health check
- Generate a README with curl examples for every new endpoint
– Use LangChain for all AI/LLM calls — never call OpenAI directly
Why this matters: Without this file, every AI prompt starts from
zero. The AI will make different folder decisions each time,
generating inconsistent code that breaks when you try to connect
the pieces. This file makes AI consistent across 100+ prompts.
Step 4: Feed AI your n8n workflow 🧠➡️🤖
Open Cursor. Start a new chat. Paste this prompt (replace the
bracketed parts with your actual workflow):
Here is my n8n workflow JSON: [paste your full JSON here]
This workflow does the following: [describe in 2-3 sentences
what it does from the user’s perspective]
Build a Node.js + Express backend API that replicates this logic.
Follow the rules in agents.md. Create:
- A route file at /backend/src/routes/[feature].js
- A service file at /backend/src/services/[feature].js
- Update the README with a curl example showing how to call
the new endpoint
What AI will generate:
- A POST endpoint (e.g., /api/newsletter/generate)
- A service that runs your workflow logic step by step
- Input validation
- Error handling
- A README curl example you can test immediately
Review the output. If a step is wrong, paste the relevant
n8n node and say: “This node does X — fix the service to
match.” AI will correct it.
Step 5: Replace simple AI calls with LangChain 🔁
When AI generates your first backend, it will probably use
direct OpenAI calls like this:
const response = await openai.chat.completions.create({
model: “gpt-4”,
messages: [{ role: “user”, content: prompt }]
});
This works but creates a tight dependency on one model.
Tell Cursor:
“Replace all direct OpenAI API calls in the services folder
with LangChain. Use ChatOpenAI from @langchain/openai.
Make the model name an environment variable so I can switch
models without changing code.”
After this change:
- You can swap GPT-4 for Claude or Gemini by changing one
line in your .env file - You can add memory, tools, and agents later without
rewriting the service - Your code looks more professional to any developer
who reviews it
Time this takes: 10–15 minutes with AI doing the refactor.
Step 6: Containerize everything with Docker 🐳
Tell Cursor: “Generate a Dockerfile and docker-compose.yml
for this project. The backend runs on port 3000.
Include a health check endpoint at /health.”
AI will generate something like this for docker-compose.yml:
version: ‘3.8’
services:
backend:
build: ./backend
ports:
– “3000:3000”
env_file:
– .env
healthcheck:
test: [“CMD”, “curl”, “-f”, “http://localhost:3000/health”]
interval: 30s
timeout: 10s
retries: 3
Why Docker matters:
- Your app runs identically on your MacBook and a $4 VPS
- Deployment is one command: docker compose up -d
- If the container crashes, Docker restarts it automatically
- Adding a second service (database, Redis) is just
adding a block to docker-compose.yml
No prior Docker knowledge needed — AI handles the config,
you just run the commands.
Step 7: Configure environment variables 🔐
Step 7: Configure Environment Variables
Create a file called .env in your project root.
Never commit this file to Git (add it to .gitignore immediately).
Template .env for most n8n-to-SaaS projects:
App
PORT=3000
NODE_ENV=development
OpenAI
OPENAI_API_KEY=sk-…
Supabase
SUPABASE_URL=https://yourproject.supabase.co
SUPABASE_SERVICE_KEY=eyJ…
Stripe
STRIPE_SECRET_KEY=sk_test_…
STRIPE_WEBHOOK_SECRET=whsec_…
External APIs (add whatever your workflow used)
YOUTUBE_API_KEY=AIza…
Security rules:
Rotate any key that gets accidentally committed to Git immediately
Never paste .env values into AI chat windows
Use sk_test_ Stripe keys during development,
switch to sk_live_ only when deploying to production
Step 8: Run the backend locally 🖥️
In your project folder, run:
docker compose up
You will see logs streaming from your backend container.
Look for a line like:
Server running on port 3000
That means it worked. Test it immediately:
curl http://localhost:3000/health
You should get back: {“status”:”ok”}
Common errors and fixes:
Error: “Port 3000 already in use”
Fix: Change PORT=3001 in your .env and restart.
docker compose down && docker compose up
Error: “Cannot find module ‘langchain'”
Fix: Your Dockerfile is missing the npm install step.
Tell Cursor: “Fix the Dockerfile — npm install is not
running during the build.”
Error: “Connection refused” on Supabase
Fix: Your SUPABASE_URL or SUPABASE_SERVICE_KEY is wrong.
Go to supabase.com → your project → Settings → API →
copy the URL and service_role key again.
Step 9: Test your API like a real product 🔍
Use the README curl example AI generated. For a
YouTube-to-newsletter workflow, it looks like this:
curl -X POST http://localhost:3000/api/newsletter/generate \
-H “Content-Type: application/json” \
-d ‘{“youtubeUrl”: “https://youtube.com/watch?v=dQw4w9WgXcQ”}’
Expected response (after 5–15 seconds):
{
“success”: true,
“newsletter”: {
“subject”: “This week: [Video Title]”,
“html”: “
…
…”,
“wordCount”: 420
}
}
If this works: your n8n workflow is now a standalone API.
The hardest part is done.
If it returns an error: copy the full error response
and move to Step 10.
Also test these edge cases before moving on:
What happens if you send an empty request body?
AI will help you handle all three in under 10 minutes.
What happens with an invalid YouTube URL?
What happens if OpenAI is slow and takes 30+ seconds?
Step 10: Debug using AI (seriously) 🛠️🤖
When something breaks (and it will — once or twice),
do not guess. Copy the exact error from your terminal
and paste it to Cursor with this prompt:
“Here is the error I am getting: [paste error]
Here is the relevant code: [paste the file]
Fix the issue and explain what caused it.”
AI will identify the problem, generate the fix, and
explain why it happened — so you learn as you go.
The most common errors at this stage:
- Async/await missing on a function that calls OpenAI
- Wrong JSON key name between the route and the service
- Environment variable name typo (.env says OPENAI_KEY
but code reads OPENAI_API_KEY)
None of these take more than 2 minutes to fix with AI.
Step 11: Build the frontend with AI 🎨
Tell Cursor: “Build a React + TypeScript frontend for
this SaaS. It needs:
- A landing page with headline, 3 feature bullets,
and a ‘Get Started’ CTA button - A /dashboard page where logged-in users can submit
a YouTube URL and see their generated newsletter - A /pricing page with two plans: Free (3 newsletters/month)
and Pro ($9/month, unlimited) - Login and signup pages connected to Supabase Auth”
AI generates all of this. Your job is to:
- Change the headline to describe your actual product
- Set your real pricing amounts
- Replace the placeholder color scheme with your brand colors
The frontend connects to your backend via the API endpoints
from Step 9. AI wires this up automatically — you just
confirm the endpoint URLs match.
Time to generate initial frontend: 20–40 minutes.
Time to customize copy and colors: 30–60 minutes.
Step 12: Add auth, payments, and subscriptions 💳🔐
Tell Cursor: “Build a React + TypeScript frontend for
this SaaS. It needs:
- A landing page with headline, 3 feature bullets,
and a ‘Get Started’ CTA button - A /dashboard page where logged-in users can submit
a YouTube URL and see their generated newsletter - A /pricing page with two plans: Free (3 newsletters/month)
and Pro ($9/month, unlimited) - Login and signup pages connected to Supabase Auth”
AI generates all of this. Your job is to:
- Change the headline to describe your actual product
- Set your real pricing amounts
- Replace the placeholder color scheme with your brand colors
The frontend connects to your backend via the API endpoints
from Step 9. AI wires this up automatically — you just
confirm the endpoint URLs match.
Time to generate initial frontend: 20–40 minutes.
Time to customize copy and colors: 30–60 minutes.
Step 13: Deploy to the internet 🌍
- Get a VPS
Hostinger KVM 1 ($4.99/month) is enough for your
first 50–100 users. Any Ubuntu 22.04 VPS works. - Point your domain to the VPS
In Cloudflare: add an A record pointing your domain
(e.g., app.yoursaas.com) to your VPS IP address.
Enable Cloudflare proxy (orange cloud) for free SSL. - SSH into your VPS and install Docker
ssh root@your-vps-ip
curl -fsSL https://get.docker.com | sh - Copy your project files to the VPS
Use git (push to GitHub, pull on VPS) or scp. - Set your production .env
Create the .env file on the VPS with your live API keys
(sk_live_ Stripe key, production Supabase keys, etc.) - Start everything
docker compose up -d - Set up Traefik for HTTPS
Tell Cursor: “Generate a Traefik reverse proxy config
that routes app.yoursaas.com to my backend container
and handles SSL via Let’s Encrypt.”
Your app is now live. Anyone in the world can sign up,
pay, and use it. You are officially running a SaaS.
Total deployment time: 45–90 minutes on your first attempt.
What should you charge?
Start with two plans only:
Free: Limited usage (3–5 uses/month). No credit card.
Lets people try before buying.
Pro: $9–$19/month. Unlimited usage + any premium features.
Why $9–$19? Because it is under the “impulse buy” threshold
for most professionals. They do not need budget approval.
They just pay.
Real numbers from this approach:
- Stack costs: ~$7/month (VPS + Supabase free tier +
Cloudflare free tier) - Break-even: 1 paying user at $9/month
- Cover all costs: 1 user
- $1,000 MRR: 112 users at $9/month or 53 users at $19/month
When to raise prices: After 30 paying users, introduce
an annual plan (2 months free = 17% discount).
After 100 users, add a Team plan at $49/month for
5 seats. Never lower prices — add a cheaper plan below
if needed.
One rule: do not obsess over pricing before you have
10 paying users. Validate demand first, optimize
revenue second.
The big lesson most people miss 💡
n8n is amazing for:
- automation
- internal workflows
- fast experiments
But SaaS needs:
- APIs
- ownership
- structure
- separation
Once you decouple logic from n8n:
- 🚫 no licensing stress
- 📈 easier scaling
- 💰 real monetization
Final mindset shift 🧠
You’re not “coding”.
You’re:
- designing systems
- guiding AI
- reviewing outputs
- shipping products
This is how AI + automation + n8n turn into real businesses.
If you want more learnings like this, then follow:
on LinkedIn
