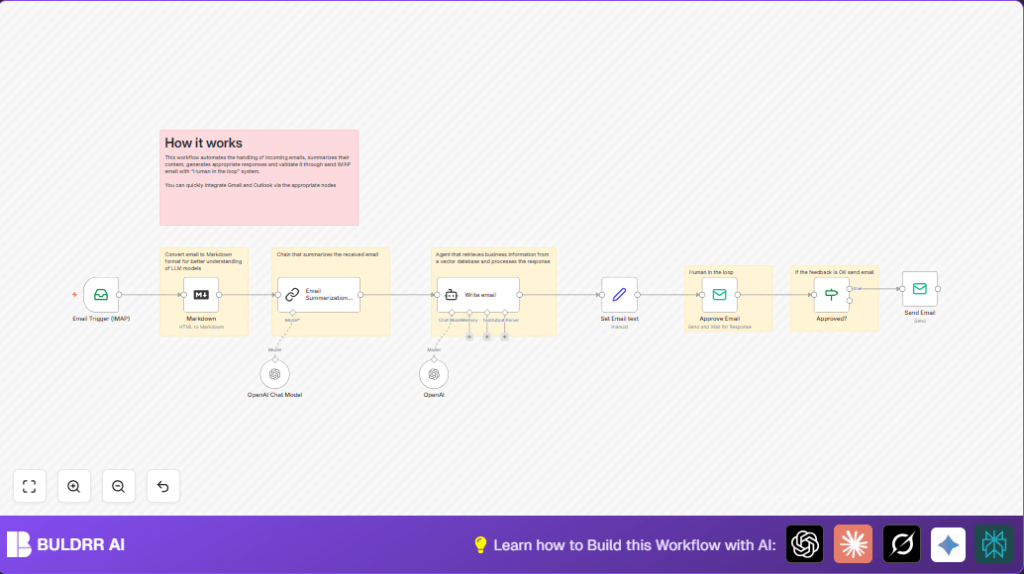
What this workflow does
This workflow reads new emails from an inbox using IMAP.
It makes a short summary of each email using AI.
Then it writes a clear and professional reply draft.
Users get a message asking to approve the reply.
Once approved, the reply sends automatically back to the sender.
This helps save time handling many emails and keeps control over messages sent.
Who should use this workflow
This is good for small business people or anyone with many customer emails.
People who want to reply fast but want to check answers first will find it useful.
No heavy tech skills needed, but some experience with n8n helps.
Tools and services used
- n8n workflow automation platform: Handles the email processing steps.
- IMAP email account: Reads incoming emails.
- SMTP email account: Sends approval requests and replies.
- OpenAI API (GPT-4o-mini, DeepSeek): Creates email summaries and drafts replies using AI.
Inputs, processing, and output
Inputs
- New emails arrive in an IMAP inbox.
Processing steps
- Convert the email body from HTML to Markdown for better AI understanding.
- Use AI to summarize the email into 100 words.
- Use another AI step to write a professional reply based on the summary.
- Send an approval email including the original message and AI draft.
- Wait for a yes/no approval from a person.
- If approved, send the reply email automatically.
Output
- Professional replies sent only after human approval.
- Saved time and reduced mistakes in email responses.
Beginner step-by-step: How to use this workflow in n8n production
Step 1: Import the workflow
- Download the workflow file using the Download button on this page.
- Go to the n8n editor (either cloud or self-host n8n).
- Use the Import from File option to load the workflow into n8n.
Step 2: Add your credentials
- In n8n, open the IMAP email trigger node, enter your IMAP email server details with username and password.
- Open the SMTP sending node and enter your SMTP server credentials, verified from your email provider.
- Add your OpenAI API key in the LangChain nodes used for summarization and reply generation.
Step 3: Update workflow settings if needed
- Change the approval email address to your own mailbox, e.g., [email protected].
- Check and update email folder names or IDs if you use custom folders.
Step 4: Test the workflow
- Send a test email to the configured inbox.
- Run the workflow manually in n8n to check if it triggers and processes the email.
- Make sure the approval email arrives in the approval mailbox with the AI draft.
- Reply with approval (like a “Yes”) to trigger the sending of the reply email.
Step 5: Activate the workflow
- Once tests are successful, switch the workflow to active to run automatically.
- Monitor workflow executions in the dashboard for errors or successes.
Step-by-step workflow explanation
Step 1: Email input via IMAP trigger node
Workflow starts when a new email arrives in the monitored IMAP inbox.
IMAP node fetches emails continuously and triggers the following steps.
Step 2: Convert email HTML to Markdown
The email body in HTML is converted to Markdown format.
This helps AI models read the email text clearly without HTML markup noise.
Step 3: Summarize email content
An AI call uses OpenAI with a prompt to write a summary in max 100 words.
=Write a concise summary of the following in max 100 words:

"{{ $json.data }}"

Do not enter the total number of words used.
This produces a short and easy to understand summary of the email.
Step 4: Generate reply using LangChain agent
The AI writes a professional reply based on the summary, also max 100 words.
=Write the text to reply to the following email:

{{ $json.response.text }}
This reply text is business-appropriate and keeps it short to save time.
Step 5: Save generated reply text
A Set node stores the reply text into a variable called email.
This ensures the text is easy to access in later nodes for sending or reviewing.
Step 6: Request human approval
An email is sent to a specified approval inbox with the original message and AI reply draft.
The subject is prefixed with “[Approval Required]” to catch attention.
Step 7: Wait for approval decision
The workflow checks a boolean flag data.approved from the approval reply.
Only if true, the workflow continues to sending the reply.
Step 8: Send approved reply email
The email reply sends to the original sender using SMTP server credentials.
Subject line stays the same for conversation context.
Common problems and fixes
- Workflow does not start on new emails: Check IMAP credentials carefully and test connection outside n8n if possible.
- AI replies are missing or strange: Make sure the Markdown node outputs to the summarization correctly and API keys for AI are valid.
- Emails do not send after approval: Review SMTP node settings and confirm email addresses and fromEmail fields match verified senders.
Customization ideas
- Change the approval email subject prefix to any text by editing the approval email node.
- Choose different OpenAI models in LangChain to adjust tone or length of replies.
- Add filters to auto-respond to simple questions without approval to save time.
- Connect Slack or Microsoft Teams to get notified when an approval is waiting.
Summary
✓ Saves hours weekly by automating email reading and replying.
✓ Keeps humans in control with approval before sending.
→ Turns long, complex customer emails into quick summaries.
→ Creates clear, professional reply drafts ready to send.
→ Integrates easily with existing email accounts and OpenAI AI models.
✓ Helps reduce errors and missed emails.
