What this workflow does
This workflow turns text into spoken audio automatically. It solves the common problem of wasting time copying or reading text aloud into a recorder. The final output is a natural-sounding audio file sent directly back to the user.
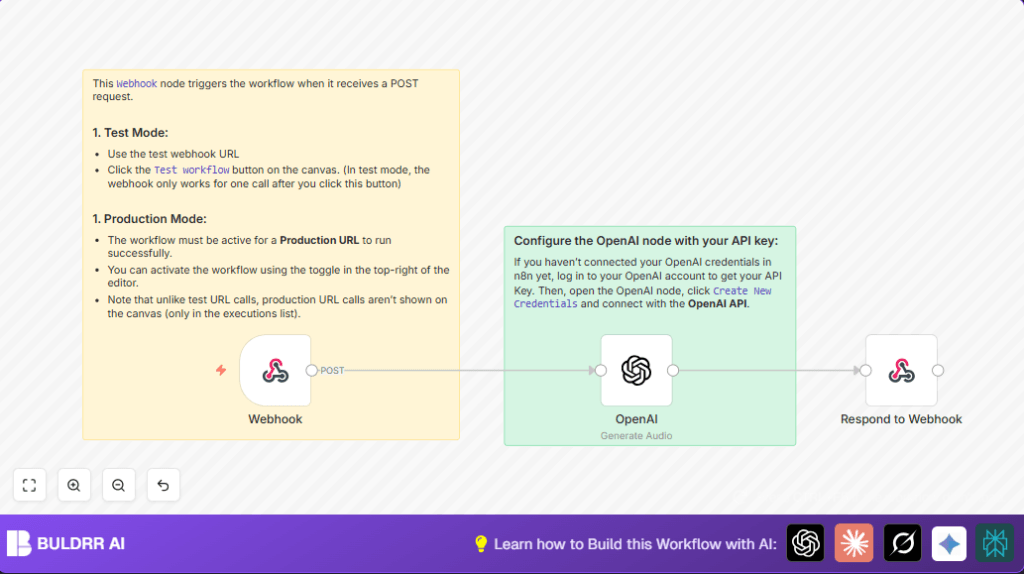
It works by accepting text sent through a secure Webhook node. Then, it uses an OpenAI node set to create audio using a “fable” voice. Lastly, it sends the audio back via a response node. This saving you hours and giving steady, high-quality audio files every time.
Who should use this workflow
This is for people who want quick and easy text-to-speech without running many tools. If you publish blogs, podcasts, or customer messages and want audio versions, this helps. It works well for those who use n8n and have access to OpenAI API keys.
No deep coding skills needed. Just use HTTP POST calls to send text and get audio back. It fits simple automation needs or linking to other apps.
Tools and services used
- n8n: Workflow automation platform hosting the workflow.
- OpenAI API: Converts text to speech using the “fable” voice preset.
- HTTP client or app: Sends POST requests to the webhook with input text.
Inputs, processing, and outputs
Inputs
The workflow takes a POST request to the Webhook node. The JSON body must include the key text_to_convert with the text you want to change to audio.
Processing steps
- Receive text in Webhook node.
- The OpenAI node reads
{{$json.body.text_to_convert}}and generates an audio file using the “fable” voice. - The resulting audio is sent in binary form to the Respond to Webhook node.
Output
The workflow returns an audio file as binary data directly in the HTTP response. Users get a ready-to-use audio file without delays or extra copying.
Beginner step-by-step: How to use this workflow in n8n production
1. Import the workflow
Download the workflow JSON file using the Download button on this page.
In your n8n editor, choose “Import from File” and load the downloaded JSON.
2. Configure settings
Go to your imported workflow:
- Set your OpenAI API Key in the OpenAI node credentials.
- Check if any IDs, email addresses, or folder names need updating based on your use case.
3. Test the workflow
Turn the workflow active by toggling the switch in the top-right.
Send a POST request to the Webhook node URL with JSON like:
{
  "text_to_convert": "Hello there, this is a test for audio generation."
}
Check if you receive the audio file in response.
4. Activate for production
Once tests pass, keep the workflow active. Use the webhook URL in your other apps or services to get audio from text anytime.
For hosting needs, see self-host n8n options if you want control over your environment.
How to customize this workflow
- Change the voice style in the OpenAI node by selecting different voice presets like “narrator” or “child”.
- Add a language parameter in the webhook JSON to support multiple languages and pass it to the OpenAI node.
- Insert cloud storage nodes like Google Drive or AWS S3 after audio generation to save audio files automatically.
- Add speech-to-text nodes after audio creation to produce transcripts or subtitles for the audio.
Common problems and fixes
- Issue: Webhook URL not working or trigger not firing.
Cause: Workflow is off or webhook node was not saved.
Fix: Activate workflow and save webhook node, then copy URL again. - Issue: OpenAI API key rejected.
Cause: Wrong or expired API key.
Fix: Re-check and update OpenAI API credentials in the node. - Issue: Empty audio or no file received.
Cause: Incorrect JSON path to input text.
Fix: Make sure{{$json.body.text_to_convert}}is the exact input path.
Summary of benefits
✓ Save hours by automating text-to-audio conversion.
✓ Get natural, steady voice audio every time.
✓ Use easily with simple POST requests to the webhook.
✓ Customize voice and workflows for special needs.
✓ Works inside n8n with minimal setup.
