What This Workflow Does
There are two ways to generate FLUX images with n8n. This
workflow uses the low-level approach — here’s why that matters
and who it’s built for:
This workflow (HTTP Request approach):
→ Uses raw HTTP Request nodes to call the Fal Flux API directly
→ Full control over every API parameter — headers, polling
intervals, retry logic, payload structure
→ Works even if the fal.ai n8n node is unavailable or outdated
→ Lets you swap to any other image API without rebuilding the
workflow — just change the endpoint URL
→ Better for developers, agencies, or anyone building
production-grade image pipelines
The GUI-based approach (fal.ai node):
→ Uses n8n’s built-in fal.ai node — simpler setup, fewer nodes
→ Better for beginners or one-off image generation
→ Less flexible when you need custom parameters or error handling
If you want maximum control over how images are requested,
polled, and stored — this HTTP-based workflow is the right one.
If you just want the fastest setup with fewer steps, use the
fal.ai node version instead.
Who This Developer-Level Approach Is For
This is the right workflow if any of these apply to you:
→ You want to call the Fal Flux API directly without relying
on a third-party n8n node that could change or break
→ You’re building an image generation pipeline for clients
and need full control over retry logic and error handling
→ You want to understand exactly what’s being sent to the API
so you can debug, extend, or replicate it in other tools
→ You need to swap image providers in the future — just change
the endpoint URL and payload, nothing else breaks
→ You’re comfortable with HTTP requests and want the most
flexible, production-ready setup
If you’re a beginner who just wants images saved to Drive
with the least setup possible, the fal.ai node version
is faster to get running.
Who Should Use This Workflow
This is for freelancers, designers, or anyone who wants to save time making AI images.
People who use Fal Flux AI services and want to avoid manual copying, pasting, and checking.
Tools and Services Used
- n8n automation platform: Runs the workflow and coordinates the process.
- Fal Flux API: Generates images based on given text prompts.
- Google Drive: Stores the final images in a chosen folder.
- HTTP Request nodes: Send and receive data to Fal Flux API.
Inputs, Processing Steps, and Output
Inputs:
- Text prompt describing the desired image.
- Image parameters like width, height, inference steps, guidance scale.
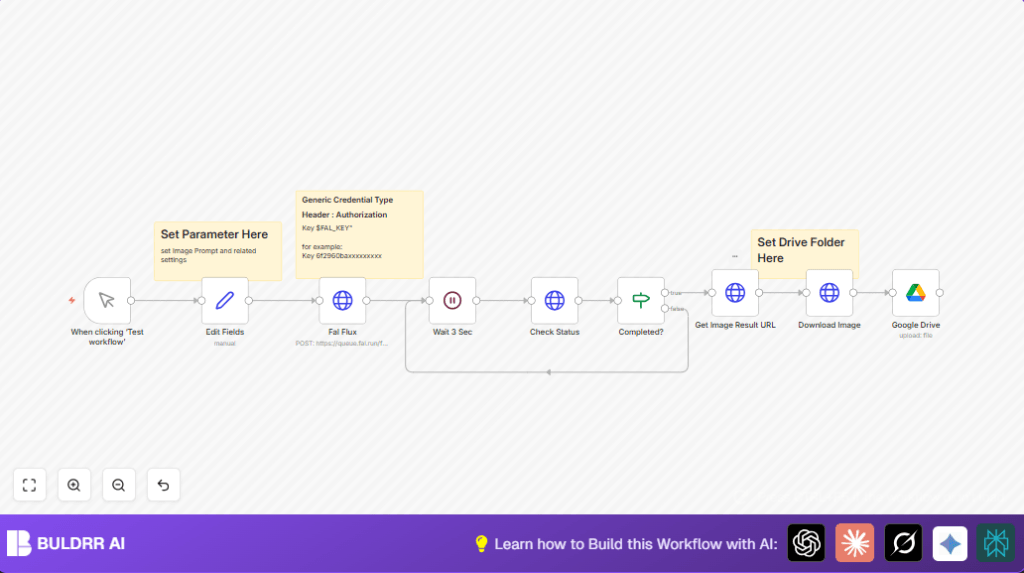
Processing Steps:
- Send a POST request with prompt and parameters to Fal Flux to start image generation.
- Wait 3 seconds to let the server start working.
- Poll the generation status by sending GET requests repeatedly.
- Repeat waiting and checking until status shows “COMPLETED”.
- Retrieve the generated image URL with a GET request.
- Download the image data from the URL.
- Upload and organize the image file on Google Drive.
Output:
Binary image file stored safely on Google Drive.
Beginner Step-by-Step: How to Use This Workflow in n8n
Step 1: Import the Workflow into n8n
- Download the provided workflow file using the Download button on this page.
- Open your n8n editor, and go to “Import from File” option.
- Select and import the downloaded workflow JSON.
Step 2: Configure Credentials and Settings
- Add the Fal Flux API Key in the HTTP Header Authentication credentials.
- Connect or update the Google Drive OAuth2 credentials with permission to upload files.
- Update any folder IDs in the Google Drive node to your desired folder (for example, “Flux Image” folder ID).
- Review and adjust the fields in the Set node named “Edit Fields” for your image prompt and parameters.
Step 3: Test and Activate the Workflow
- Manually trigger the workflow using the Manual Trigger node to test it.
- Check the logs and output for successful image creation and upload.
- Once confirmed, toggle the workflow’s active switch to enable it for production use.
For more privacy or control, consider running self-host n8n on a server.
Inputs and Outputs Summary
- Input: Text detailed prompt and image settings.
- Output: AI-generated image saved automatically on Google Drive.
Customization Ideas
- Change the prompt or image size in the Set node to create different images.
- Adjust the wait time node for faster or slower status checking.
- Switch Google Drive node for other cloud storage like Dropbox or AWS S3 if needed.
- Add more images per request by increasing “num_images” in the Fal Flux POST body.
Handling Errors and Edge Cases
- 401 Unauthorized errors means wrong or missing API Key — recheck header authentication.
- Infinite waiting loops means image status isn’t changing — add max retries or timeout in the IF node.
- Image not saved on Google Drive means folder ID or permissions are wrong — verify folder ID and connection.
Conclusion and Next Steps
This workflow helps users automate AI image creation from prompt input to Google Drive storage.
It cuts out manual copying, waiting, and downloading work.
Users get timely images stored neatly and ready to use.
Future upgrades may include notifications or frontend interfaces to enter prompts more easily.
Code Samples for Easy Setup
Example payload sent to Fal Flux API:
{
  "prompt": "{{ $json.Prompt }}",
  "image_size": { "width": {{ $json.Width }}, "height": {{ $json.Height }} },
  "num_inference_steps": {{ $json.Steps }},
  "guidance_scale": {{ $json.Guidance }},
  "num_images": 1,
  "enable_safety_checker": true
}
This JSON is sent in the POST request in the Fal Flux HTTP Request node.
Summary of Workflow Benefits and Outcomes
✓ Saves manual work creating AI images
✓ Automatically tracks image generation status
✓ Downloads and stores images on Google Drive
✓ Easy to configure prompts and image size
✓ Reduces delays, helps focus on creative work
✓ Allows scaling with multiple images per request
