What this workflow does
This workflow lets you enter a creative text prompt and pick an art style. It then sends the prompt to an AI image generator, uploads the image to Cloudflare R2 storage, and shows a webpage with the new image and recent ones. It solves the problem of doing all these steps by hand, saving time and preventing mistakes.
You will get a simple way to make styled images, host them online, and display them in a clean gallery automatically.
Who should use this workflow
This is good for independent artists who want to quickly create AI art with consistent style. It helps people without much tech skill because it does many steps automatically. It is also useful if you want to quickly share your images online with clients or fans.
Tools and services used
- n8n: Runs the workflow and connects all parts.
- HuggingFace Flux API: Generates images from text prompts.
- Cloudflare R2 S3 Storage: Hosts the images with public URLs.
- HTTP Header Auth in n8n: Secures the API requests with your API Key.
- Optional – self-host n8n: For full control without usage limits, use self-host n8n.
How this workflow works
Inputs
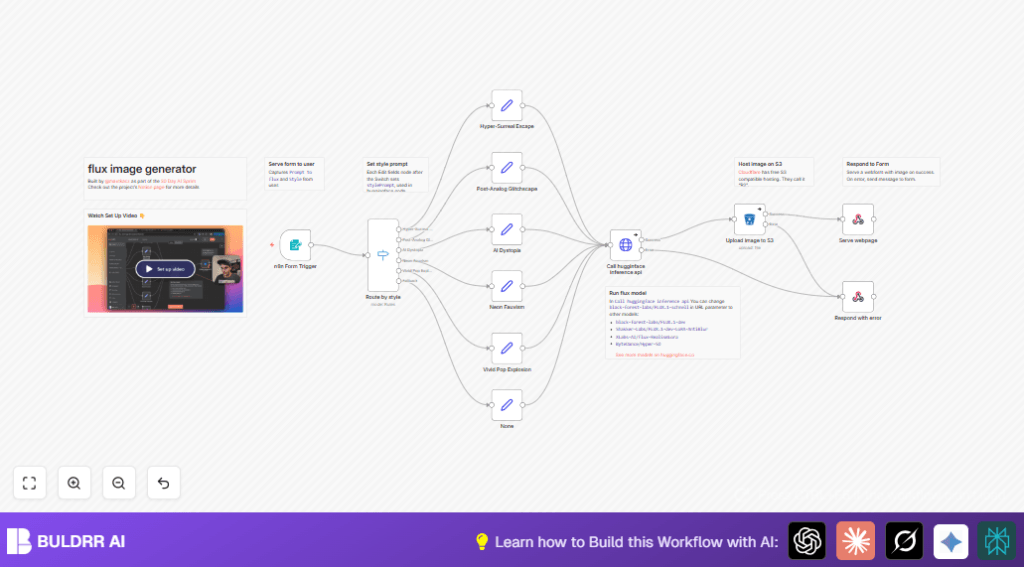
You start by sending a text prompt and selecting an art style using the Form Trigger node. The style choices include five unique art modes.
Processing Steps
The workflow uses a Switch node to pick the right style path. Each path adds extra style details by a Set node that makes the full prompt for the AI.
The combined prompt goes to the HuggingFace Flux API via an HTTP Request node. The API returns the generated image.
Next, the image is uploaded to your Cloudflare R2 bucket using the S3 node. This step saves and hosts the picture online.
Finally, a Respond to Webhook node sends a webpage back to the user. This page shows the newly created image and the last 4 images in a nice gallery. The page style matches the chosen art style.
If errors happen at any step, another Respond to Webhook catches them and shows simple error messages.
Outputs
The user sees a beautiful web page with their AI art and recent images. The images are accessible through Cloudflare R2 URLs.
Beginner step-by-step: How to use this workflow in n8n
Step 1: Download and import the workflow
- Download the workflow file using the Download button on this page.
- Inside the n8n editor, click “Import from File” and select the downloaded file.
Step 2: Add your credentials
- Go to Credentials and add your HuggingFace API Key with HTTP Header Auth.
- Set up your Cloudflare R2 S3 storage credentials in the S3 node.
- Check the bucket name and access permissions to ensure uploads will work.
Step 3: Update settings if needed
- If styles or prompts need changes, edit the Set nodes with the stylePrompt values.
- Change the HTTP Request node URL if you want to try a different HuggingFace Flux model.
Step 4: Test the workflow
- Copy the webhook URL from the Form Trigger node.
- Submit a prompt and choose a style using a simple form or API tool.
- Watch the generated image appear in the webpage response.
Step 5: Activate the workflow
- Once tests work well, toggle the workflow activation switch to enable it for production.
- Make sure the webhook endpoint is accessible over HTTPS for live use.
Inputs and outputs in detail
Inputs
- Text prompt describing the desired image.
- Art style selection from five distinct choices.
Outputs
- AI-generated image in JPG format.
- Public URL for the hosted image on Cloudflare R2.
- Dynamic webpage showing the current and recent images.
Handling errors and edge cases
Errors from the AI API or image upload show simple JSON messages so users know what went wrong.
Common issues include API rate limits or wrong credentials. Adding retries in the HTTP Request node can help reduce failures.
The S3 upload might fail if bucket names or access keys are incorrect. Double-checking credentials and bucket permissions is important.
If images don’t load on the webpage, verify the Cloudflare R2 bucket allows public read access and URLs are formatted right.
Customization ideas
- Change the AI model by updating the HTTP Request node URL to any alternate Flux model from HuggingFace.
- Add new art styles by duplicating a Set node with your own style prompts and adding matching rules in the Switch node.
- Use a different storage provider by replacing the S3 node with another compatible option supported by n8n.
- Modify the webpage design by editing the HTML in the Respond to Webhook node to change layout, colors, or branding.
- Adjust the number or size of recent images shown by changing the HTML gallery section accordingly.
Summary of results
✓ Saves many hours from manual prompt styling, generation, upload, and sharing.
✓ Provides a user-friendly way to make consistent AI art and display it online.
✓ Easy to update with new styles, models, or storage options.
✓ Improves reliability with clear error handling.
✓ Suitable for artists or anyone wanting quick AI-generated images shared publicly.
