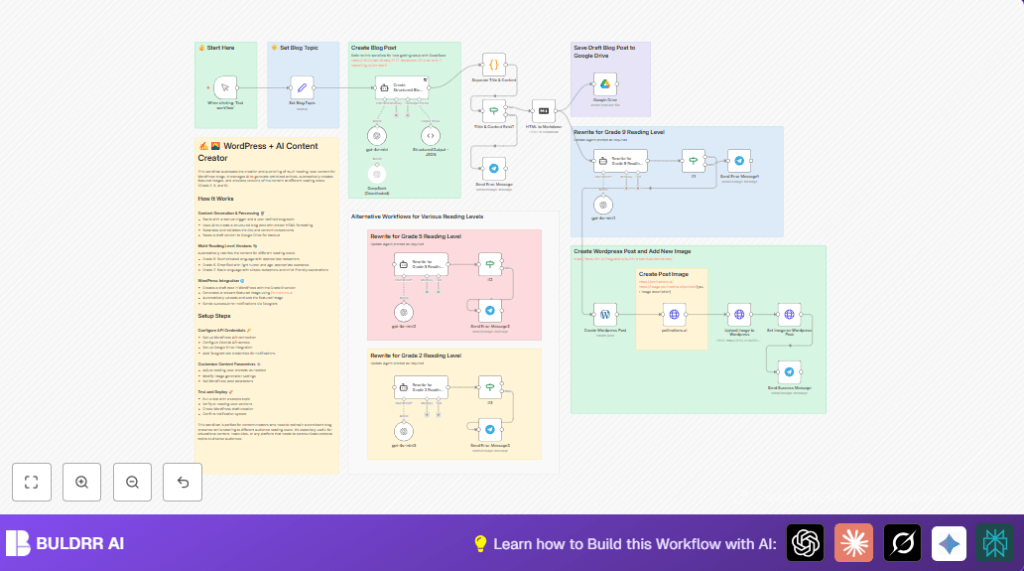
What this workflow does
This workflow helps you create WordPress blog posts fast using AI.
It solves the problem of spending many hours writing and editing posts for different readers.
The workflow makes a blog post in three reading levels and adds a nice image automatically.
You get ready drafts in WordPress that save you time and keep content good for many readers.
Tools and services used
- OpenAI API: Creates and rewrites blog content in HTML and Markdown.
- Google Drive: Saves original draft backups as text files.
- WordPress REST API: Creates and manages blog posts and media.
- Pollinations.ai HTTP service: Generates featured images from the blog title.
- Telegram Bot API: Sends notifications about workflow success or errors.
Inputs, processing steps, and outputs
Inputs
- User provides a blog topic through the Set Blog Topic node.
Processing steps
The Create Structured Blog Post node asks OpenAI to write an HTML blog with title and content in JSON.
The Structured Output – JSON and Separate Title & Content nodes extract and clean the title and content.
The Tiltle & Content Exist? node checks if title and content are present.
The HTML to Markdown node changes the blog into Markdown for easier rewriting.
Three AI Agent nodes rewrite the blog at Grade 9, Grade 5, and Grade 2 reading levels.
Each rewritten version is validated again by If nodes.
The Google Drive node saves the original draft as a backup.
The Create WordPress Post node makes a draft post using the Grade 9 version.
The pollinations.ai HTTP Request node creates a featured image from the blog title.
The Upload Image to WordPress node uploads the image.
The Set Image on WordPress Post node sets the featured image for the post.
The Telegram nodes send messages on success or if errors happen.
Outputs
- WordPress draft posts at Grade 9 reading level with featured images.
- Three blog content versions for different reading skills.
- Original draft backup saved on Google Drive.
- Telegram notifications for workflow results.
Who should use this workflow
Blog writers who spend too long writing posts for many readers.
People who want to save time while still making good, safe backups.
Those who want images for posts without needing extra design skills.
Users who want to keep track with Telegram messages for success or problems.
Beginner step-by-step: How to build this in n8n
Download and Import
Download the workflow file using the Download button on this page.
Open the n8n editor where you want to use the workflow.
Use the “Import from File” option to add the workflow to n8n.
Configure Credentials and Settings
Add your OpenAI API key to the OpenAI nodes.
Add your Google Drive credentials and select the folder for backups in the Google Drive node.
Set WordPress credentials and correct site URL in Create WordPress Post, Upload Image to WordPress, and Set Image on WordPress Post nodes.
Enter your Telegram bot token and the chat ID in the Telegram notification nodes.
Update any IDs, emails, channels, or folder paths shown in the nodes if needed.
Change the blog topic value in the Set Blog Topic node to test content creation.
Test the Workflow
Click the trigger node labeled “When clicking ‘Test workflow’” and press Execute Workflow.
Look at each node’s output to check for errors or missing data.
Verify the draft post appears in WordPress, the image uploads, and Telegram sends success notifications.
Activate for Production
After testing, turn on the workflow so it runs when triggered.
You can add other triggers or schedulers inside n8n as needed.
Monitor workflow runs from n8n dashboard for issues.
If hosting yourself, see self-host n8n for hosting options.
Customizations
Change blog topic dynamically: Link Set Blog Topic to external data like RSS or Google Sheets.
Tweak AI rewriting prompts: Edit text in the Rewrite for Grade X Reading Level nodes to change tone or style.
Adjust WordPress post status: Set the Create WordPress Post node to “publish” to auto-publish drafts.
Customize featured image prompt: Edit prompt in pollinations.ai HTTP Request node to change image style.
Add notification points: Use Telegram nodes to send updates at other steps like content generation done.
Troubleshooting
Missing title error: The AI might not return a title. Check and fix prompts in the Create Structured Blog Post node.
No WordPress posts created: Check WordPress API credentials and permissions in n8n settings.
Image not set: Verify authentication and API calls in WordPress image upload and update nodes.
Telegram not sending messages: Confirm Telegram bot token and chat ID are correct and tested.
Google Drive backup fails: Check API access, folder settings, and try manual upload test.
Pre-production checklist
Make sure OpenAI API keys are valid and enough quota exists.
Verify WordPress API credentials with write permissions.
Test Google Drive access and correct folder usage.
Confirm Telegram bot token and chat ID are accurate.
Run workflow once with example topics to generate all reading levels.
Check WordPress drafts appear with correct status.
Ensure images upload and are set as featured images.
Check Telegram messages arrive for success and errors.
Deployment guide
Activate the workflow inside n8n after testing.
Add triggers like webhooks or time schedules if you want automatic runs.
Watch logs in the n8n dashboard in case of errors or delays.
Set retry options for nodes where available for temporary failures.
When you run self hosting n8n, check the self-host n8n link for server options.
Monitor API limits or failures from OpenAI or pollinations.ai carefully.
Summary
✓ Saves hours by automating blog posts for different reading levels.
✓ Automatically creates featured images without extra work.
✓ Keeps original drafts safe on Google Drive.
✓ Sends Telegram alerts for success and errors.
✓ Helps non-experts manage content quickly with n8n automation.
