What This Workflow Does
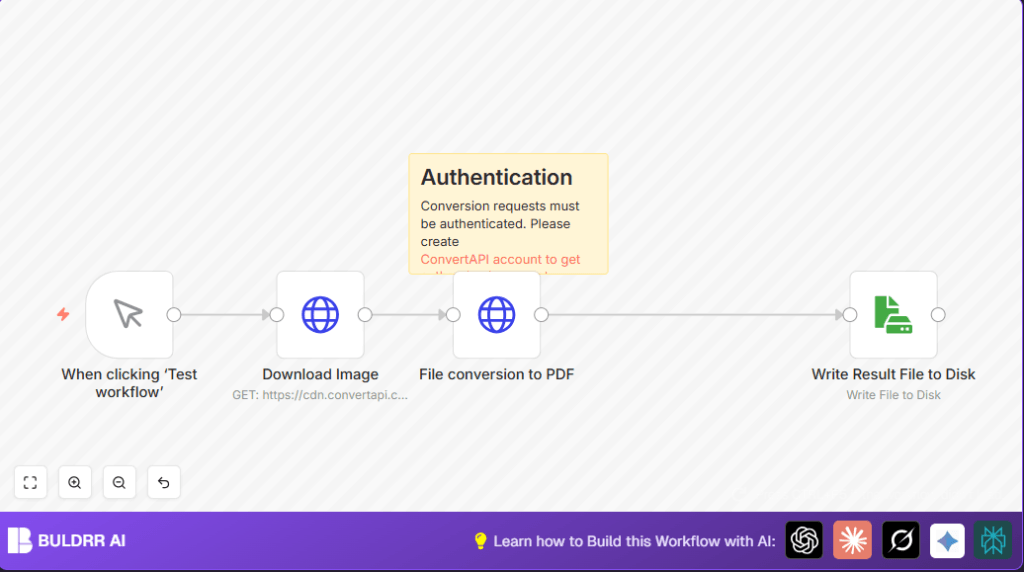
This workflow gets a JPG image from the web and turns it into a PDF file automatically.
It helps fix the problem of spending too much time converting images manually into PDF files.
At the end, you get a saved PDF file ready to use or share.
The workflow downloads, converts, and saves the file with little or no manual work.
Tools and Services Used
- n8n: Automation builder where the workflow runs.
- Manual Trigger node: Starts the workflow when clicked.
- HTTP Request node: Downloads the JPG and sends it to ConvertAPI.
- ConvertAPI: A service that does the JPG to PDF conversion using a secure API.
- Read/Write File node: Saves the PDF file on your device.
- Sticky Note node: Shows reminders about API key needs.
Inputs, Processing Steps, and Output
Input
The input is a JPG image URL set in the HTTP Request node that downloads the file.
Processing
- Download the JPG image as a file.
- Send the file to ConvertAPI with proper authentication.
- Receive the converted PDF file back from the API.
- Write and save the PDF file locally on disk.
Output
A PDF file named as assigned in the Read/Write File node, saved on your system.
Beginner Step-By-Step: How to Use This Workflow in Production
Step 1: Download and Import the Workflow
- Click the Download button on this page to get the workflow file.
- Open the n8n editor where you want to use the workflow.
- Use the Import From File option and select the downloaded file to add it.
Step 2: Configure Credentials and Settings
- Add your ConvertAPI API Key in the HTTP Request node used for conversion.
- Check and update any IDs, emails, channels, or folder paths as needed.
- Confirm the source image URL in the download node is correct if using a new image.
- Set the filename and location in the Read/Write File node where the PDF will save.
Step 3: Test the Workflow
- Click Execute Workflow to run the setup and check for any errors.
- Ensure the PDF file is correctly saved to the chosen location.
Step 4: Activate Workflow for Production
- Turn on Active mode for the workflow to run on demand.
- Use the manual trigger button to start the process when needed, or replace it later with a Cron node for automation.
For users running self-host n8n, make sure local storage permissions allow the PDF file saving.
Common Customizations
- Change the image URL in the HTTP Request node to convert different JPG files.
- Rename the output PDF file or change its save path in the Read/Write File node.
- Switch the conversion type from JPG to PNG by changing API endpoint to
/convert/png/to/pdf. - Replace Manual Trigger with Cron node for regular automatic runs.
Edge Cases and Troubleshooting
Authentication Errors
If the ConvertAPI key is incorrect, the conversion fails.
Fix by verifying and updating API Key in the conversion HTTP Request node.
Download Node Issues
Fails if Response Format is not set to File in the download HTTP Request node.
Set Response Format to File and run again.
Saving PDF Failures
Could happen if file paths or data mappings are wrong or if write permission is missing.
Check the Read/Write File node mapping and folder write rights.
Pre-Production Checklist
- Confirm the ConvertAPI credentials are active.
- Manually test the workflow with sample JPG image.
- Verify each node processes data correctly without errors.
- Ensure PDF saves to correct folder and is accessible.
- Back up important files to avoid overwrite loss.
Deployment Guide
Save and activate the workflow in n8n.
Execute workflow manually via the Manual Trigger node anytime a PDF conversion is needed.
Switch to a Cron trigger for scheduled automatic operation if preferred.
Use n8n workflow logs to monitor for errors and performance updates.
Summary of Benefits and Results
✓ Save hours of manual file conversion work.
✓ Stop mistakes caused by manual file handling.
✓ Get converted PDF files saved automatically.
→ Workflow runs when you want or on schedule.
→ Makes creating professional PDF catalogs easier.
