What This Workflow Does
This workflow handles OpenID Connect client login automatically in n8n.
It solves the hard parts of token handling and getting user info from the identity provider.
When you use it, users can log in via your OIDC server without writing code.
Who Should Use This Workflow
This is for people who want to add secure login using OIDC without deep coding.
It works well for developers who run n8n workflows and want an easy OIDC client setup.
Tools and Services Used
- n8n Workflow Editor: To build and run the automation.
- OIDC Identity Provider: Like Keycloak, Auth0, or Okta to authenticate users.
- HTTPS Endpoints: For secure token and user info requests.
- HTML and Code Nodes in n8n: To handle cookies, logic, and respond with web pages.
How This Workflow Works – Inputs, Processing, Output
Inputs
- User browser sends request to Webhook node after OIDC login redirect.
- Authorization code and cookies come in the request query and headers.
- OIDC provider details and client credentials set in a variable node.
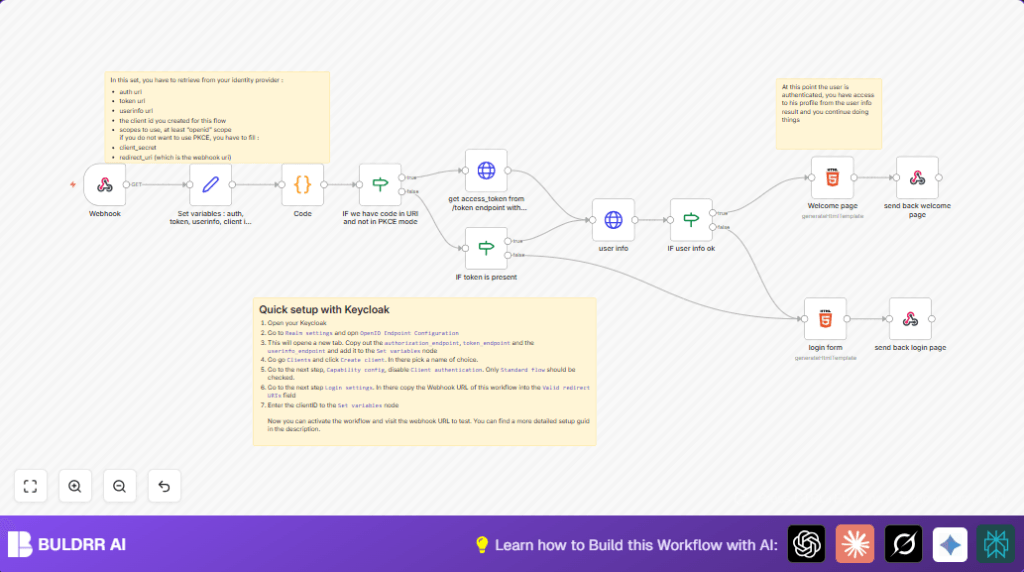
Processing Steps
- Parse cookies using the Code node.
- Check if authorization code is present and if PKCE authentication is off with an If node.
- Exchange authorization code for access token using the HTTP Request node.
- Check if access token exists with an If node.
- Use the access token to get user profile info from the userinfo endpoint via HTTP GET.
- Check the user info response for valid email with an If node.
- Prepare either a personalized welcome HTML page or login form HTML depending on validation results.
Output
- The workflow responds to the user browser with dynamic HTML: a welcome message or a login form.
- The user sees login success or is asked to log in again.
Beginner Step-by-Step: How to Use This Workflow in n8n
Step 1: Import Workflow into n8n
- Download the workflow file from this page.
- Open your n8n editor where you want to run the workflow.
- Click “Import from File” in n8n and upload the downloaded workflow file.
Step 2: Update Credentials and Settings
- Set up OIDC client credentials: client ID, client secret, and endpoints in the Set variables node.
- Update redirect URI to match the URL of the Webhook node in n8n.
- Fill in any extra IDs, emails, or channels if your workflow has them.
Step 3: Test the Workflow
- Run the workflow once manually, or trigger a login flow by visiting your OIDC provider login URL.
- Watch the execution to make sure tokens and user info are fetched correctly.
Step 4: Activate Workflow for Production
- Turn on the workflow by toggling it active in n8n.
- Make sure your OIDC client in the provider points to the Webhook node URL as redirect URI.
Now the login flow is running live with no need to write extra code.
Consider using self-host n8n if you want your own domain and more control.
Customization Ideas
- Switch PKCE authentication on or off by toggling the boolean in the variable node.
- Edit the login page HTML node to change style, text, or add brand logos.
- Add more scopes like “profile” to request extra user information during login.
- Extend the workflow to save user info in a database or send alerts after login.
Handling Common Issues
- Access token missing: Check client ID, secret, redirect URI, and token endpoint in variable node to fix credentials issues.
- User email missing: Make sure userinfo endpoint is correct and scope includes “openid”.
Summary of Benefits and Outcomes
✓ Saves time by removing manual token handling steps.
✓ Provides clear login flow with dynamic user feedback.
✓ Easily adaptable for different OIDC providers.
→ Lets users log in securely through OIDC inside n8n workflows.
→ Gives developers a ready-made, working client that reduces errors.
