What this workflow does
This workflow automatically gets all files from a folder in an AWS S3 bucket.
It downloads every file, bundles them into a ZIP file, and makes that ZIP easy to get.
This stops the need to download files one by one and zip them by hand.
Who should use this workflow
This is for anyone who has many files in an AWS S3 bucket folder that need to be collected regularly.
It is useful when manual file download and compression take too long or cause mistakes.
No deep technical knowledge is needed to run this after setup.
Tools and services used
- AWS S3: To store and provide access to files.
- n8n automation platform: To create the workflow and run the automation.
- AWS S3 nodes in n8n: For listing and downloading files.
- Aggregate and Compression nodes in n8n: To combine files and create ZIP archive.
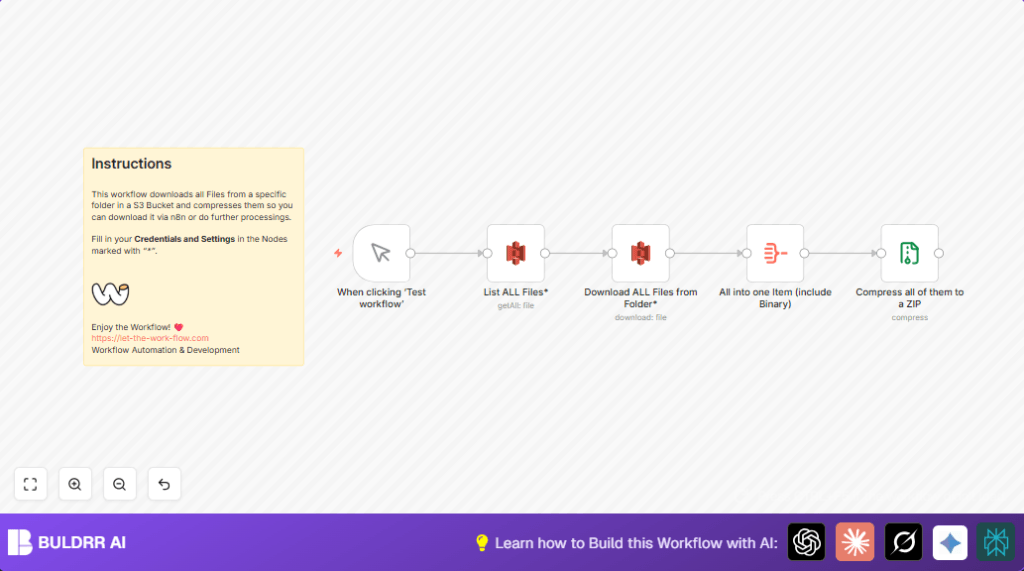
How the workflow works
Inputs
The workflow starts by using the AWS S3 bucket name and folder path to find files.
Processing Steps
- The workflow lists all files inside the chosen folder.
- It downloads each file as binary data into the workflow.
- All files’ data and binaries get combined into one item.
- The workflow compresses all files into a ZIP archive called “s3-export.zip.”
- Finally, the ZIP file is ready to download or use in other automations.
Output
The output is one ZIP file containing all files from the S3 folder.
This makes it fast and easy to get many files bundled at once.
Beginner step-by-step: How to use this workflow in n8n
Step 1: Import the workflow
- Download the workflow file using the Download button on this page.
- Open your n8n editor where you create workflows.
- Click Import from File and select the downloaded file.
Step 2: Configure the imported workflow
- Add your AWS S3 credentials in the AWS S3 nodes.
- Update the bucket name and folder key to match your AWS S3 setup.
- If needed, change the ZIP file name in the Compression node.
Step 3: Test the workflow
- Run the workflow using the Manual Trigger node.
- Check that files download and ZIP file is created with the expected content.
Step 4: Activate for production use
- Enable the workflow to run whenever needed.
- Optional: Replace Manual Trigger with a Cron node for scheduled runs.
- Monitor for any errors in workflow runs inside n8n.
If requiring more control or hosting options, consider using self-host n8n.
Inputs and outputs details
- Input: AWS S3 bucket name and folder path to get files.
- Output: ZIP file containing all files from the selected folder.
Common issues and fixes
- Access denied error: Check AWS credentials and IAM permissions for listing and getting files.
- Empty ZIP file: Make sure Aggregate node combines binary data and Compression node uses correct binary keys expression.
- Wrong folder path: Verify folder path matches the target S3 folder to avoid missing files.
Ways to customize
- Change ZIP file name in the Compression node to a personal name.
- Add a Filter node before listing to get only files with certain extensions (like .csv or .jpg).
- Use a Cron node as trigger to automate runs on a set schedule.
- Upload ZIP back to S3 by adding an AWS S3 upload node after Compression.
Summary
✓ Saves time by automating S3 file downloads and compression.
✓ Reduces errors from manual work.
→ Creates one ZIP file with all folder files.
→ Easy to schedule or trigger manually inside n8n.
