What This Automation Does
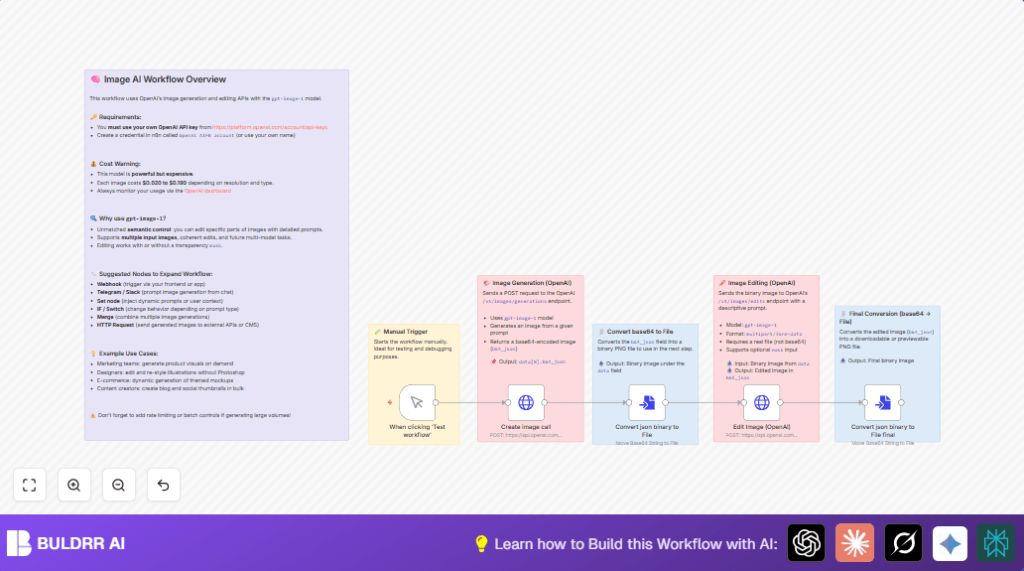
This workflow creates and edits images automatically using OpenAI’s gpt-image-1 model.
It stops designers from spending long time doing small repeated edits.
You get new images made from text, then the workflow changes them as asked.
It works by sending prompts to OpenAI, turning base64 data into real files, then sending those back for editing.
The final output is a PNG image ready to use.
Tools and Services Used
- OpenAI API: For generating and editing images.
- n8n: Automation platform to build and run the workflow.
Inputs, Processing, and Outputs
Inputs
- Manual trigger to start the workflow.
- Text prompts describing the image to create and how to edit it.
Processing Steps
- Send a POST request to OpenAI image generation endpoint with a prompt.
- Convert the returned base64 image data into a binary PNG file.
- Send that PNG file with a new prompt to OpenAI’s image editing endpoint.
- Convert edited base64 data into a downloadable PNG.
Outputs
- Final edited PNG image file, ready for download or use.
Who Should Use This Workflow
Designers or creators who need quick edits to images made from text.
Anyone spending too much time on small changes like adding masks or details.
This helps save time and makes editing less technical.
Beginner Step-by-Step: How to Use This Workflow in n8n
Step 1: Importing the Workflow
- Download the workflow file using the Download button on this page.
- Open your n8n editor.
- Click “Import from File” and choose the downloaded workflow.
Step 2: Set Up Credentials and Configurations
- Add your OpenAI API Key credentials in n8n.
- Check if there are IDs, emails, channels, or table names to update for your needs.
- Review text prompts inside nodes and change them if you want different images or edits.
Step 3: Test the Workflow
- Run the workflow manually using the Manual Trigger node to check it works.
- Look at the output image file in the last node.
Step 4: Activate for Production
- When tests succeed, switch the workflow ON to run when triggered.
- Consider using webhooks or chat triggers for automatic start.
If you want to host n8n yourself, see self-host n8n for options.
Customization Ideas
- Change the image prompt to any description to make different images.
- Update the editing prompt to add different details like hats, smiles, or accessories.
- Change the image size for smaller or bigger images.
- Add a mask file if you want to edit only parts of an image.
- Use other triggers like chat bots to create images from user input.
Common Problems and Fixes
- 401 Unauthorized error: Check your OpenAI API Key in n8n credentials.
- No binary file found in editing step: Confirm the base64-to-file node uses correct property
data[0].b64_json. - Edited image looks the same as original: Use clear detailed text in the edit prompt.
Pre-Production Checklist
- Verify OpenAI API Key and available quota.
- Run manual tests to ensure smooth node execution.
- Check file conversions output proper PNG binary.
- Review prompts for clear generation and editing instructions.
- Save a backup of workflow JSON before big changes.
Deployment Guide
After test success, toggle the workflow ON.
Replace the manual start with webhooks or chat triggers for real user use.
Watch OpenAI usage and n8n logs to avoid errors or high costs.
Summary of Benefits and Results
→ Saves hours by automating repeated image edits.
→ Reduces errors caused by manual file handling.
→ Lets users create and edit images using simple text.
→ Outputs ready-to-use PNG files.
→ Can extend to automatic triggers for more uses.
