What This Workflow Does
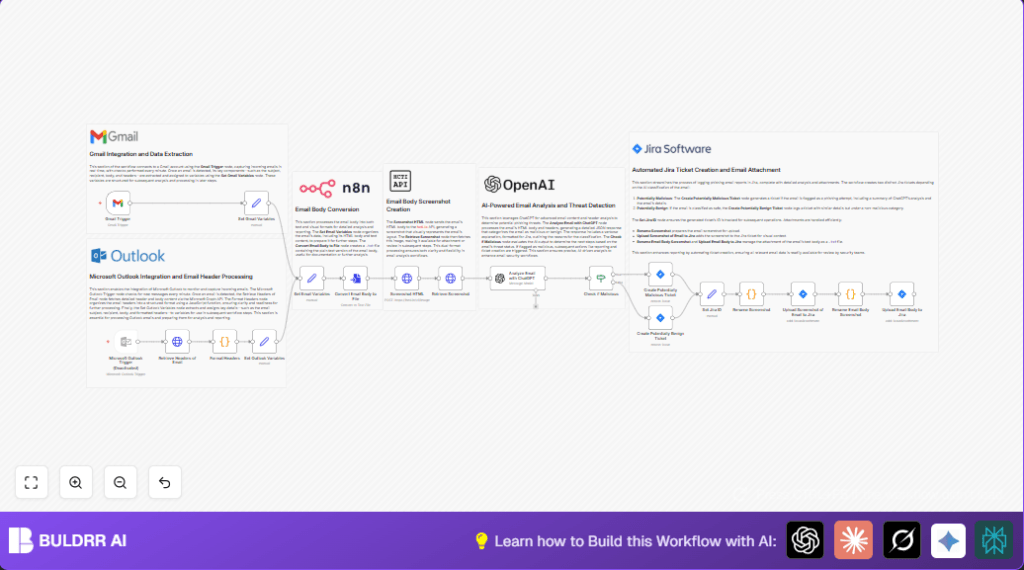
This workflow watches new emails in Gmail every minute.
It finds parts of each email like subject, recipient, body, and headers.
It makes a picture of the email using hcti.io API.
Then, it asks ChatGPT to check if the email might be phishing.
Based on ChatGPT’s answer, it creates a ticket in Jira.
The Jira ticket gets the email picture and text file attached.
This saves time and helps spot phishing emails faster.
Who Should Use This Workflow
This workflow is good for security teams that get many suspicious emails daily.
It helps people who want to stop phishing attacks without checking each email by hand.
It suits teams using Gmail, ChatGPT (OpenAI), hcti.io, and Jira.
Users who want quick, automatic email threat checks will benefit most.
Tools and Services Used
- Gmail: To watch for new incoming emails every minute.
- hcti.io API: To turn the HTML email body into a screenshot image.
- OpenAI ChatGPT (GPT-4o): To analyze email content and headers for phishing risks.
- Jira Software Cloud: To create and track tickets about suspicious or safe emails.
- n8n workflow platform: To connect and run all these steps automatically.
How the Workflow Works: Inputs, Processing, and Outputs
Inputs
- New emails from Gmail inbox.
- Email HTML body, text body, headers, subject, and recipient
- API keys and credentials for Gmail, hcti.io, OpenAI, and Jira.
Processing Steps
- Gmail Trigger checks for new emails every minute.
- Extract email parts using a Set node for HTML, headers, subject, recipient, and text.
- Send the HTML body to hcti.io API to create an image of the email.
- Fetch the screenshot image from hcti.io using another HTTP request.
- Prepare consistent email variables in another Set node.
- Convert the email text body into a .txt file.
- Use ChatGPT with GPT-4o model to analyze email body and headers. It outputs JSON with a “malicious” boolean and explanation.
- Check the ChatGPT result with an If node. Branch workflow based on if email is malicious or not.
- Create a Jira ticket for potentially malicious or benign email.
- Attach the email screenshot and the text email file to the Jira issue.
Outputs
- Jira tickets with detailed phishing analysis.
- Email screenshots and text files attached to Jira tickets.
- Faster and more accurate phishing email detection and reporting.
Beginner Step-by-Step: How to Use This Workflow in n8n
Step 1: Import the Workflow
- Download the workflow file using the Download button on this page.
- Open the n8n editor where your instance runs.
- Use the menu option Import from File to load the downloaded workflow.
Step 2: Add Credentials and Settings
- Add your Gmail OAuth2 credentials in the Gmail Trigger node.
- Enter your hcti.io API username and password in the HTTP Request nodes for screenshots.
- Set your OpenAI API key in the OpenAI (ChatGPT) node.
- Configure Jira API credentials and project keys in the Jira nodes.
- Update any email addresses, project IDs, or folder names if needed.
Step 3: Test the Workflow
- Send a test email to your monitored Gmail inbox.
- Run the workflow in manual mode or trigger it to check it runs and creates Jira tickets.
Step 4: Activate for Production
- Enable the Gmail Trigger node to start automatic checking.
- Monitor the workflow executions in n8n to catch any errors.
- Consider [self-host n8n](https://buldrr.com/hosting/) to run this workflow on a server for better control and uptime.
Common Issues and Troubleshooting
- “401 Unauthorized” errors from hcti.io mean the API username or password is wrong.
Double-check credentials in HTTP Request nodes. - ChatGPT node not returning results or failing may mean prompt variables are incorrect or JSON output is not enabled.
Review prompt content and node settings. - Jira ticket creation errors usually come from wrong project keys or missing API permissions.
Check Jira credentials and permissions for creating issues. - Missing email parts or broken node flows often happen if variables are not mapped correctly between nodes.
Verify all email data fields exist where used.
Customization Ideas
- Enable Microsoft Outlook support by activating disabled Outlook Trigger and related nodes.
- Change ChatGPT prompt to look for other threats like ransomware or business email compromise.
- Set Jira project keys and issue types to match your team’s preferences.
- Rename screenshot attachments or change file types (like .jpeg) in code nodes.
- Adjust email polling frequency in Gmail or Outlook triggers to fit email volume.
Result and Benefits
✓ Saves hours by automating phishing email reviews.
✓ Detects phishing quickly using AI analysis.
✓ Creates clear Jira tickets with screenshots and email text.
✓ Helps security teams prioritize threats faster.
✓ Reduces human errors in email threat detection.
