

What This Workflow Does
This workflow keeps Jira issues and their updates synced with a Notion database automatically.
It stops the user from doing manual copy-and-paste between Jira and Notion.
The result is the Notion workspace always shows the latest Jira issues, their details, and statuses.
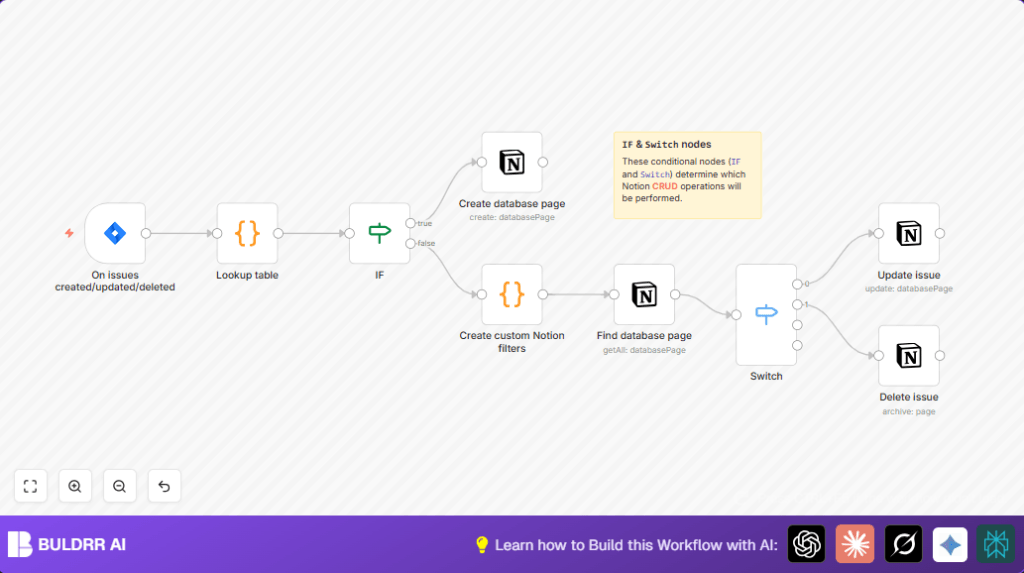
The workflow listens for Jira issue events: creation, updates, and deletions.
It then either makes a new Notion page, updates an existing page, or archives the page if the issue is deleted.
The Jira statuses get converted properly into Notion select options to keep the status consistent.
Who Should Use This Workflow
This is for anyone who tracks Jira tasks but wants stakeholders or teams to see updates inside Notion.
It helps product managers, project managers, or any team using both Jira and Notion.
It is good for people tired of repeating work and wanting more accurate, real-time syncing.
No deep technical skills are needed after setup here.
Tools and Services Used
- n8n: Automation workflow platform.
- Jira Software Cloud API: For listening to issue events.
- Notion API Integration: To create, update, or delete pages.
Inputs, Processing, and Outputs
Inputs
- Webhook event data triggered from Jira when issues are created, updated, or deleted.
- Jira issue data including issue key, summary, status, and ID.
Processing
- Status conversion using a lookup table from Jira status names to Notion select values.
- Branching in the workflow based on event type (create/update/delete).
- Filter and find the right Notion page by Issue ID using JSON filter.
- Perform the correct Notion API action depending on event type.
Outputs
- New Notion pages for new Jira issues.
- Updated properties on existing Notion pages for issue changes.
- Archived (soft deleted) Notion pages when Jira issues are deleted.
Beginner Step-By-Step: How to Use This Workflow in n8n
Download and Import
- Download the workflow file from this page using the Download button.
- Open the n8n editor interface where workflows are built.
- Use the Import from File option to load the downloaded workflow.
Setup Credentials and Configurations
- Add Jira API credentials in the credential section to connect to Jira Cloud.
- Add Notion API integration credentials to allow page creation and updates.
- Update IDs, emails, channels, or database IDs in the nodes if needed to fit your workspace.
- If there is any code in the workflow (like status lookup), check and update to fit your Jira status values.
Test the Workflow
- Create, update, or delete a test issue in Jira that your webhook listens to.
- Trigger the workflow and watch if Notion pages get created, updated, or archived properly.
Activate for Production Use
- Once tests are successful, turn on the workflow switch to make it active.
- Monitor the first live runs to ensure smooth operation.
- If using your own infrastructure, consider self-host n8n for stability and uptime.
Key Workflow Description
The workflow starts with a Jira Trigger node that listens to Jira Cloud issue events: creation, updates, and deletions.
This node receives JSON payloads with issue data and event type.
A Code node named “Lookup table” maps Jira status names like “To Do” or “In Progress” into Notion select option strings.
This ensures status consistency between Jira and Notion.
Next, an IF node checks the event type to decide if a new Notion page should be created or if the issue details need updating or deletion.
For new issues, a Notion node creates a new database page with the issue summary as the title, links, issue key, and translated status.
The mapping must be correct to prevent errors.
For updates and deletions, a Code node builds a filter JSON to find the exact Notion page by Issue ID.
This filter is used by another Notion node to fetch the corresponding page.
A Switch node branches the flow based on update or delete event.
The update path leads to a Notion node that edits the page’s title and status.
The delete path leads to a Notion node that archives the page.
Common Edge Cases and Failures
- Notion API 404 error on update often means wrong or missing page ID.
- If the webhook is not triggering, the Jira webhook URL may not be registered or events not subscribed.
- Status names changed in Jira but not updated in the Lookup table cause mismatches.
- Incorrect Notion filter JSON formatting or Issue ID data type causes no pages found.
Customization Ideas
- Add more Jira statuses in the Code node Lookup table to extend status options.
- Add syncing comments from Jira issues to Notion page comments using additional triggers.
- Filter Jira events to listen only to specific projects by changing node settings.
- Notify stakeholders about issue changes using Slack or email nodes after Notion updates.
Summary and Results
✓ Save time by automating Notion updates based on Jira issue events.
✓ Keep issue details and statuses consistent across Jira and Notion.
✓ Reduce errors from manual updates and copying.
✓ Provide stakeholders with current info in their preferred workspace.
Code Node: Lookup Table Sample
The code below maps Jira statuses to Notion select options.
It must be placed in the Code node used after the trigger.
Check that status names match the Jira configuration.
var lookup = {
    "To Do": "To do",
    "In Progress": "In progress",
    "Done": "Done"
};

new_items = [];
for (item of $items("On issues created/updated/deleted")) {
  var issue_status = item.json["issue"]["fields"]["status"]["name"];
  if (issue_status in lookup) {
    new_items.push({
      "Status ID": lookup[issue_status]
    });
  }
}
return new_items;
Example Expression for Notion Title Property
Use this expression in Notion node property to set the page title using Jira summary:
= {{$node["On issues created/updated/deleted"].json["issue"]["fields"]["summary"]}}
Example Custom Notion Filter JSON
Use this filter to find a Notion page by Issue ID number:
{
  "or": [
    {
      "property": "Issue ID",
      "number": {
        "equals": 12345
      }
    }
  ]
}
Deployment Guide
Enable the workflow by switching it live in the n8n interface.
Monitor first executions for errors in the execution panel.
Set up alerts for failures if needed.
Use stable hosting for production, such as self-host n8n.
