What This Automation Does
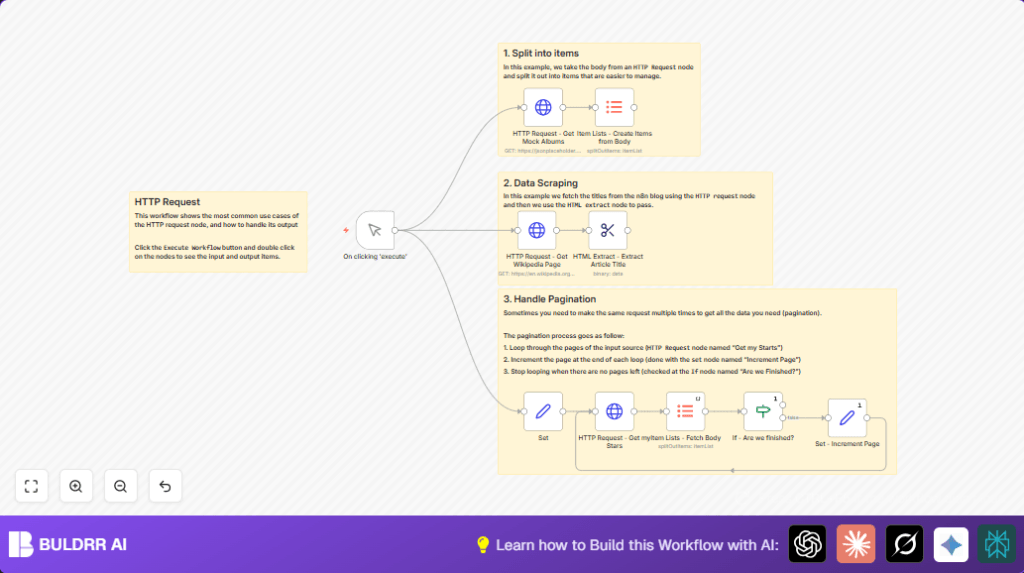
This workflow is a hands-on demonstration of the four most common HTTP Request patterns you’ll encounter in real n8n projects.
Part 1 — Fetching and splitting a JSON array The workflow starts by making a GET request to JSONPlaceholder, a free test API that returns realistic mock data. It requests a list of album records, then passes the response through an Item Lists node to split the array into individual items. This is the standard pattern for any API that returns a list — you almost always want individual items flowing through your workflow, not one large array.
Part 2 — Web scraping with CSS selectors Next, the workflow fetches a random Wikipedia article page — raw HTML. The HTML Extract node then uses a CSS selector to pull just the article title out of the page. This teaches you how to treat any webpage as a data source, not just structured APIs.
Part 3 — Paginated API calls with the GitHub API The third section hits the GitHub API to retrieve a user’s starred repositories. GitHub returns results in pages — 30 items per request by default. The workflow handles this automatically: it checks after each request whether the returned data is empty, and if not, increments the page number and loops. This pagination pattern applies to virtually every API that returns large datasets.
Part 4 — Conditional logic with the IF node An IF node acts as the pagination controller. It evaluates whether the current page returned any data. If yes, it loops back and fetches the next page. If the response is empty, it stops. This is cleaner than guessing how many pages exist upfront.
Understanding the n8n HTTP Request Node
Before importing the workflow, it helps to know what you’re working with. The HTTP Request node is n8n’s generic connector to the internet. You configure it with a URL, a method, optional headers, and optional body — and it makes the request and returns the response as n8n data.
The four HTTP methods you’ll use most:
GET — Fetches data from a URL. No body needed. Use this for reading from APIs, checking endpoints, or scraping pages. Most public APIs start here.
POST — Sends data to a URL. Requires a body, usually JSON. Use this when you’re creating something on the remote service — submitting a form, creating a record, triggering an event.
PUT / PATCH — Updates an existing resource. PUT replaces the entire record; PATCH updates only the fields you send. Use these for edit operations in CRM or project management APIs.
DELETE — Removes a resource by ID. Use carefully — most APIs require authentication for this.
Key node settings you’ll configure in this workflow:
- URL — The full endpoint address including query parameters if needed
- Method — GET, POST, PUT, PATCH, or DELETE
- Authentication — Where you attach API keys, Bearer tokens, or Basic Auth credentials
- Response Format — Set to
JSONwhen the API returns structured data; set toStringwhen scraping HTML - Query Parameters — Key-value pairs appended to the URL (like
?page=1&per_page=30) - Headers — Required by some APIs, especially those needing
Content-Type: application/jsonor custom auth headers
Who Should Use This Workflow
This is good for people who need to gather and organize data from APIs and HTML sources. It fits developers and beginners wanting to avoid repetitive data copying and parsing.
You do not need deep coding skills but some knowledge of internet data requests helps.
The workflow works best for retrieving lists, handling pagination, and extracting HTML content cleanly.
Tools and Services Used
- jsonplaceholder.typicode.com: Supplies sample JSON album data.
- Wikipedia Random Page URL: Source for fetching article HTML pages.
- GitHub API: Provides user star data with pagination parameters.
Beginner Step-by-Step: How to Use This Workflow in n8n Production
How to Set Up This Workflow in n8n
Step 1 — Download and import Click the Download button at the top of this page to get the workflow .json file. In your n8n editor, click the menu icon in the top-right corner and select Import from File. Upload the file. All nodes will appear pre-connected on the canvas.
Step 2 — Set up GitHub authentication The GitHub API section of this workflow calls a public endpoint, so no token is required for public starred repos. However, if you want to test with a private account or increase your rate limit (GitHub’s unauthenticated limit is 60 requests/hour), you’ll need a Personal Access Token. Go to GitHub → Settings → Developer Settings → Personal Access Tokens → Generate New Token. In n8n, open the GitHub API HTTP Request node, set Authentication to Header Auth, use Authorization as the header name, and Bearer YOUR_TOKEN_HERE as the value.
Step 3 — Update the GitHub username Open the Set node near the start of the workflow. Find the github_username field and replace the placeholder value with any GitHub username you want to pull starred repos for. You can use torvalds, sindresorhus, or any public GitHub account to test.
Step 4 — Understand the CSS selector for Wikipedia The HTML Extract node is configured to pull the article title from a Wikipedia page using the CSS selector h1#firstHeading. This works for Wikipedia’s current HTML structure. If you ever adapt this node for a different website, use your browser’s DevTools (right-click any element → Inspect) to find the right selector for that page.
Step 5 — Run the test Click the Manual Trigger node and press Execute Workflow. Watch the execution panel on the right. Each node should show a green checkmark and a count of items processed. Click any node to see exactly what data came through at that point.
Step 6 — Read the execution output After the run completes: the first branch returns a list of album items from JSONPlaceholder; the second branch returns the Wikipedia article title as a plain text string; the third branch returns a complete list of the user’s GitHub starred repositories, with each repo as its own item.
Inputs, Processing, and Outputs Explained
Node-by-Node Breakdown
Manual Trigger — Starts the workflow on demand. Swap with a Schedule or Webhook trigger for automated runs.
Set Node — Stores config variables: GitHub username, starting page (1), and items per page (30). One place to update, no hunting across the canvas.
HTTP Request — JSONPlaceholder — GET request to jsonplaceholder.typicode.com/albums. Returns 100 mock album records as JSON. No auth needed.
Item Lists — Split Albums — Splits that 100-item array into individual items. Standard practice for any API that returns a list.
HTTP Request — Wikipedia — GET request to en.wikipedia.org/wiki/Special:Random. Response Format must be String, not JSON — because the response is raw HTML.
HTML Extract — Pulls the article title from the HTML using CSS selector h1#firstHeading. Add more rules here to extract multiple elements from the same page.
HTTP Request — GitHub Stars — Calls the GitHub starred repos endpoint with page and per_page pulled from the Set node. Add a Header Auth credential here if you need a token.
Item Lists — Split Stars — Same split pattern — breaks the repos array into individual items for downstream processing.
IF Node — Are We Finished? — Checks if the GitHub response is empty. Empty = stop. Has data = loop back, fetch next page. Condition: {{$json["body"].length}} equals 0.
Set Node — Increment Page — Adds 1 to the page counter ({{$node["Set"].json["page"] + 1}}), then feeds it back into the GitHub request for the next loop.
Edge Cases and Failures
- Empty or error HTTP responses: Can happen with bad URLs, missing query parameters, or no internet. Verify correct settings and connectivity.
- No data from HTML extraction: Usually due to wrong CSS selectors or HTML structure changes. Update the selector in the extraction node.
- Pagination loops forever: Happens if the empty check is incorrect. Fix the If – Are we finished? node condition so it stops at the right time.
Customization Ideas
- Change GitHub usernames in the Set node to get stars for different users.
- Adjust
perpagenumber to speed up or slow down data retrieval size.
- Adjust
- Pick other Wikipedia elements by changing the CSS selector, like paragraphs or infoboxes.
- Add new HTTP request nodes for other APIs and process their results in the same workflow.
Summary and Results
✓ Manual HTTP data fetching is replaced by automated workflow steps.
✓ JSON and HTML data are split into smaller, usable items.
✓ Pagination handled without manual reruns.
✓ Data from multiple different sources is cleaned and ready fast.
→ Results can feed reports, dashboards, or further workflows.
→ Ease of use helps both beginners and pros to save time.
