
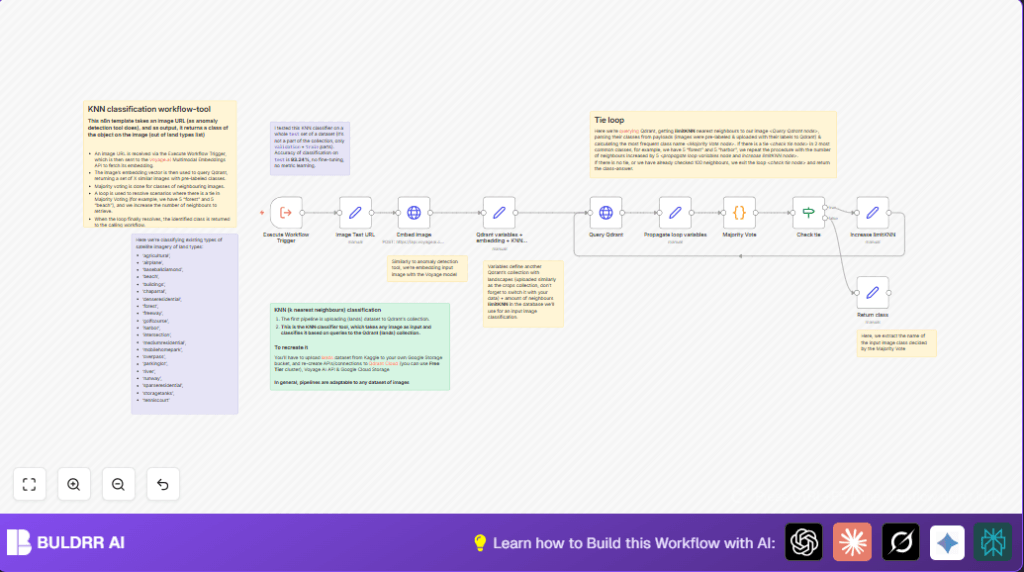

What This Automation Does ⚙️
This workflow takes a satellite image URL and finds out what type of land it shows, like forest or beach.
It works fast and stops mistakes that happen when people do this by hand.
The system uses image vectors and looks for close matches in a special database to make a reliable choice.
If it cannot decide easily, it asks for more neighbors to help.
The final answer is the land use class it gives back for that image.
How the Workflow Works: Input → Process → Output
Input: A URL linking to a satellite image.
Process: The image travels through several steps.
First, it changes into numbers (embedding) with Voyage AI API.
Then, the workflow searches Qdrant database for the closest matches.
Next, it counts which land classes appear most among those matches.
If two classes tie, it asks for more neighbors until one wins or hits a max.
Output: The workflow gives the best land use class name.
Tools and Services Used
- Voyage AI Multimodal Embeddings API: Changes images into vector numbers.
- Qdrant Cloud Vector Search Database: Stores many labeled image vectors and finds nearest neighbors.
- n8n Automation Platform: Controls the workflow steps and logic.
Beginner Step-by-Step: How to Use This Workflow in n8n Production
Step 1: Download and Import Workflow
- Find the workflow file here on this page and click the Download button.
- In your open n8n editor, go to “Workflows” then choose “Import from File”.
- Load the downloaded file into n8n.
Step 2: Add Credentials and Update Settings
- Enter your Voyage AI API Key in the authentication part of the Embed image node.
- Fill in your Qdrant Cloud URL and collection name in the “Qdrant variables + embedding + KNN neighbours” node.
- If needed, update any IDs, emails, or channels used in other parts of the workflow.
Step 3: Test the Workflow
- Run the workflow once using a sample satellite image URL.
- Check that it outputs a land use class without errors.
Step 4: Activate for Production Use
- Turn on the workflow so it runs automatically when a new image URL comes in.
- Use API calls or other n8n workflows to send image URLs to the workflow.
- If hosting n8n yourself, be sure your server has internet access to the APIs.
Consider using self-host n8n for better control.
Step-by-Step Guide to Build This Classifier
Step 1: Understand the Data and Collect Image URL
Start by preparing your test image URL. This should point to a satellite image you want to classify. For example, “https://storage.googleapis.com/n8n-qdrant-demo/land-use/images_train_test_val/test/buildings/buildings_000323.png”.
This URL is fed into the initial node that triggers the workflow execution.
Common mistake: Using an invalid or inaccessible image URL will cause the process to fail early.
Step 2: Execute Workflow Trigger Node
In n8n, click Workflows → New Workflow. Add the Execute Workflow Trigger node.
This node receives the image URL input JSON and initiates the classification workflow.
Check the example input from previous step is present in the node execution data.
Outcome: Workflow is ready to process image URLs in real-time.
Step 3: Set Image Test URL
Add a Set node named “Image Test URL”. Navigate to it and under Assignments, add a new field “imageURL” of type string. Set its value to {{$json.query.imageURL}}.
This correctly extracts the image URL from the initial input for use in further steps.
Visual: You should see your test image URL appearing in the node output JSON data under “imageURL” field.
Step 4: Embed Image Using HTTP Request Node
Add an HTTP Request node named “Embed image”. Set the method to POST and URL https://api.voyageai.com/v1/multimodalembeddings.
Under authentication, set your generic HTTP header auth to use your Voyage AI API key.
For the Body enter the following JSON template:
{
 "inputs": [
 {
 "content": [
 {
 "type": "image_url",
 "image_url": "$json.imageURL"
 }
 ]
 }
 ],
 "model": "voyage-multimodal-3",
 "input_type": "document"
}
Common mistake: Forgetting to replace $json.imageURL dynamically will break requests.
Outcome: You will receive a vector embedding representing the image content.
Step 5: Define Qdrant Collection Variables
Add a Set node called “Qdrant variables + embedding + KNN neighbours”. Assign variables:
- ImageEmbedding: from previous HTTP Request node data
$json.data[0].embedding - qdrantCloudURL: your Qdrant cloud base URL, e.g. “https://your-qdrant-instance.cloud.qdrant.io”
- collectionName: set to your lands dataset collection name in Qdrant, e.g. “land-use”
- limitKNN: set initial number of neighbors to query, e.g. 10
This prepares variables for the nearest neighbors search.
Step 6: Query Qdrant for Nearest Neighbors
Add an HTTP Request node named “Query Qdrant”. Set method to POST. URL should be {{$json.qdrantCloudURL}}/collections/{{$json.collectionName}}/points/query.
The JSON Body is constructed dynamically as:
{
 "query": $json.ImageEmbedding,
 "using": "voyage",
 "limit": $json.limitKNN,
 "with_payload": true
}
Use QdrantApi as authentication with proper credentials.
This node fetches the nearest neighbor points along with their land use labels.
Step 7: Propagate Loop Variables
Add a Set node called “Propagate loop variables” to hold and update limitKNN and query results.
Assignments include:
- =limitKNN from $json.result.points.length
- result object from $json.result
This allows dynamic adjustment in the loop.
Step 8: Calculate Majority Vote Using Python Code Node
Add a Code node named “Majority Vote” using Python language.
Paste this code snippet:
from collections import Counter

input_json = _input.all()[0]
points = input_json['json']['result']['points']
majority_vote_two_most_common = Counter([point["payload"]["landscape_name"] for point in points]).most_common(2)

return [{
 "json": {
 "result": majority_vote_two_most_common
 }
}]
This code tallies the two most common neighbor classes.
Step 9: Check for Tie Using IF Node
Add an IF node named “Check tie” with these conditions:
- If result length is more than 1,
- AND the counts of top two classes are equal,
- AND limitKNN less than or equal 100
If true, loop back to increase neighbor count.
Else, proceed to finalize output.
Step 10: Increase limitKNN Setting Node to Resolve Ties
Add a Set node named “Increase limitKNN”. Set limitKNN to current limitKNN + 5.
This increases neighbors used to break ties.
Step 11: Return the Final Class
Add a Set node called “Return class” to extract the class name from majority vote results.
Set property ‘class’ to {{$json.result[0][0]}}.
This is the classification result output.
Customization Ideas ✏️
- Change the start number of neighbors (limitKNN) in “Qdrant variables + embedding + KNN neighbours” to try faster or more precise results.
- Make the tie break step bigger or smaller by changing the increase amount in “Increase limitKNN” node.
- Try different embedding models by changing the model name in the “Embed image” node API call.
- Add extra data from Qdrant like region info and update the Python code to use it for better votes.
Troubleshooting ????
Problem: “HTTP Request to Voyage API fails with unauthorized error.”
Cause: API Key wrong or expired.
Solution: Change the API Key in the “Embed image” node Authentication section.
Problem: “Qdrant query returns zero neighbors or empty result.”
Cause: Wrong collection name or cloud URL.
Solution: Check and update the Qdrant variables in “Qdrant variables + embedding + KNN neighbours” node.
Try the same query in Postman to confirm.
Problem: “Tie loop does not end as limitKNN passes 100.”
Cause: Dataset may be too small or too uniform.
Solution: Increase maximum neighbors or check dataset variety.
Pre-Production Checklist ✅
- Make sure your Voyage AI API Key works by testing embeddings.
- Confirm Qdrant collection has correct vectors and labels.
- Test your KNN queries with sample data outside n8n.
- Run the full workflow with sample images to see no errors.
- Backup your Qdrant database and n8n workflow before real use.
Deployment Guide
Enable the workflow inside n8n.
Send satellite image URLs to the Execute Workflow Trigger node using API calls or other workflows.
Check the run logs and timing for any issues.
When self hosting n8n, use self-host n8n with good internet access to API services.
Summary
✓ Finds land use class from satellite image URL automatically.
✓ Uses Voyage AI to embed images into vectors.
✓ Queries Qdrant vector DB for nearest neighbors.
✓ Uses majority vote to classify with tie handling.
✓ Saves hours of manual work with over 93% accuracy.
✓ Easy to set up and run inside n8n with minimal coding.
