What This Workflow Does
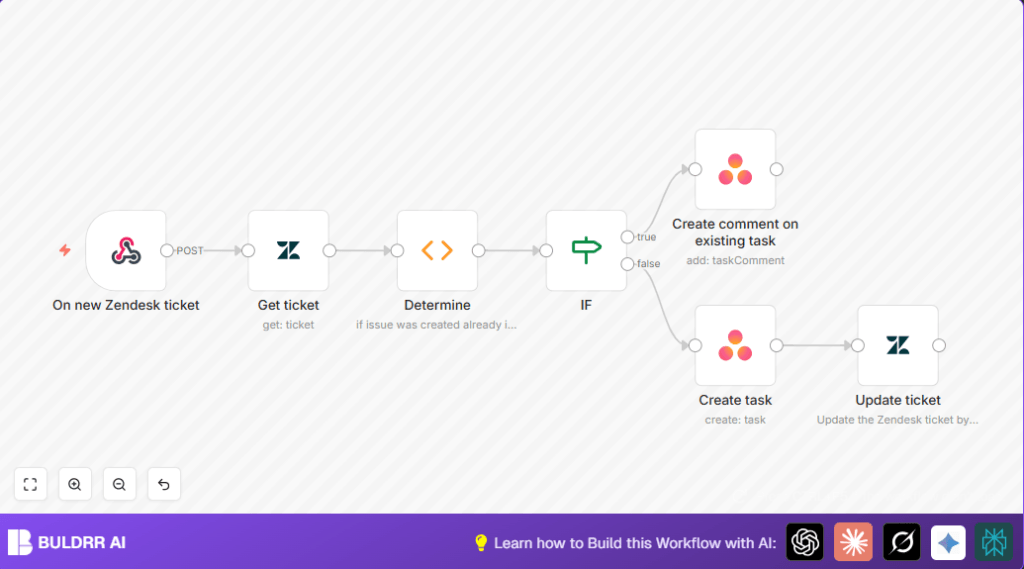
This workflow connects Zendesk and Asana to save time. It stops manual copying of support tickets into tasks. When a new ticket appears in Zendesk, it checks if an Asana task exists linked to it. If yes, it adds a comment to that task. If no, it creates a new task with the ticket’s details. Then, it updates the Zendesk ticket with the Asana task ID. This helps teams avoid errors and work faster.
Who Should Use This Workflow
Anyone who handles support tickets in Zendesk and tracks tasks in Asana can use this. It suits teams with repeated steps to copy ticket data. It is good for customer support managers and agents who want to spend less time doing manual work and more time solving problems.
Tools and Services Used
- n8n: Automates connections and workflow.
- Zendesk: Source of new support tickets with API access.
- Asana: Target workspace for managing tasks and comments.
- Webhook: Receives new ticket alerts in real-time.
For advanced control, users can consider self-host n8n.
Inputs, Processing Steps, and Output
Inputs
- New Zendesk ticket ID from webhook event.
- Zendesk ticket details including custom fields.
Processing Steps
- Fetch full ticket information using the ticket ID.
- Extract stored Asana task ID from ticket custom fields.
- Check if the Asana task ID exists.
- If no task ID, create new Asana task named after ticket subject.
- If task exists, add latest Zendesk comment to Asana task.
- Update Zendesk ticket with Asana task ID if a new task is created.
Output
- New or updated Asana task linked with Zendesk ticket.
- Zendesk ticket updated with Asana task ID.
Beginner Step-by-Step: How to Use This Workflow in n8n
Step 1 – Import the Workflow
- Download the workflow file using the Download button on this page.
- Open the n8n editor and select Import from File.
- Choose the downloaded workflow file to add it to your workspace.
Step 2 – Configure Credentials and Settings
- Add your Zendesk API credentials to the Zendesk nodes.
- Add your Asana API credentials to the Asana nodes.
- Update the Zendesk custom field ID in the Function node named “Determine” if your field ID is different from
6707064637597. - Check and update the workspace and assignee details in the Asana node called “Create task”.
Step 3 – Test the Workflow
- Simulate a new Zendesk ticket or use a test ticket to trigger the Webhook node.
- Watch for the workflow execution in n8n to verify tasks get created or updated in Asana.
Step 4 – Activate for Production
- Toggle the workflow switch to “ON” inside n8n.
- Configure Zendesk to send webhook events to the URL provided by the Webhook node.
- Monitor initial runs for errors and fix any issues by adjusting nodes or credentials.
Customization Ideas
- Change the assignee in the “Create task” node to route tasks to different team members.
- Add due dates by including the
due_onfield in the Asana task creation. - Add priority tags from Zendesk tickets to Asana tasks for better tracking.
- Add notifications (Slack or Email) to alert assignees when tasks are created or updated.
- Modify comment creation to add all new Zendesk comments instead of just one.
Handling Problems and Edge Cases
- If Zendesk custom field ID is wrong, update it in the “Determine” Function node.
- For Asana task creation or comment errors, check API credentials and permissions.
- Ensure Zendesk webhook URL is correctly set to trigger events on ticket creation.
- Always test the workflow with sample tickets before full deployment.
Summary and Results
✓ Stops manual entry by linking Zendesk tickets to Asana tasks automatically.
✓ Saves hours every day by removing repetitive work.
✓ Reduces errors from copying data manually.
✓ Keeps both Zendesk and Asana in sync with up-to-date information.
→ Faster team response to support tickets.
→ Clear tracking of tickets as tasks with added comments.
