What this workflow does
This workflow automatically manages data tables in Snowflake using n8n without writing SQL every time.
It creates a table, adds rows, reads the table schema, and updates data when needed.
This helps avoid manual database work and reduces errors in reports.
The result is a faster, low-error way to keep data correct and ready in Snowflake.
Who should use this workflow
This workflow fits users who manually manage Snowflake tables often.
If working with data reports but not strong in SQL, this can save time and stress.
It works well for data analysts, small teams without dedicated IT, or anyone needing fast table updates.
Tools and services used
- n8n: to create and run the automation workflow.
- Snowflake: cloud data warehouse where tables are created and updated.
- n8n Snowflake node: specialized node to run queries and do insert or update operations.
- Manual Trigger node: start the workflow manually for easy testing.
Inputs, processing steps, and output
Inputs
- Manual trigger click to start automation.
- Configured Snowflake credentials inside n8n for database access.
- Data set in Set node preparing id and name values.
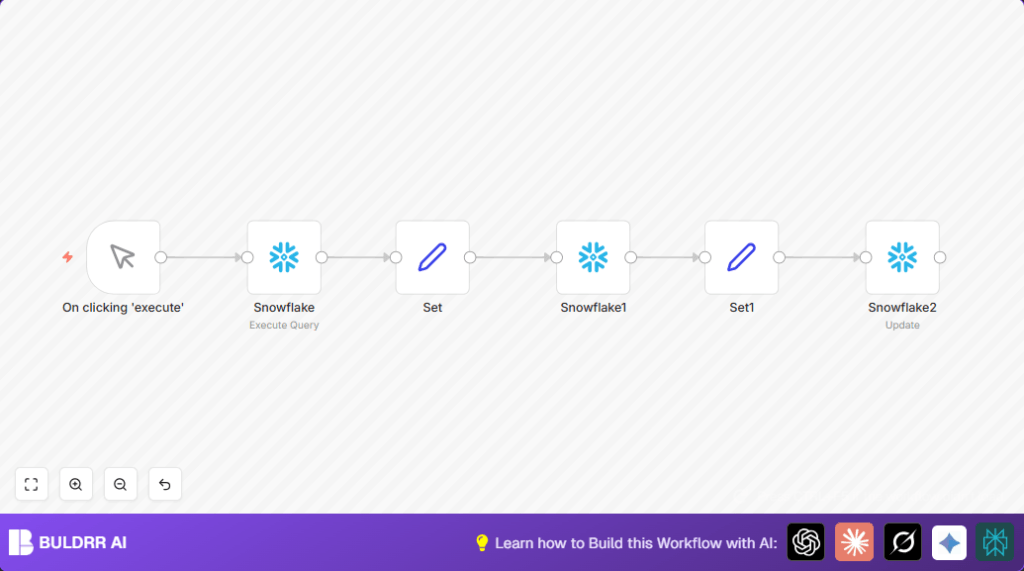
Processing steps
- Create a new table using SQL (if not exists).
- Prepare rows (id and name) in Set node.
- Insert these rows into the Snowflake table.
- Prepare updated data in another Set node.
- Update existing rows based on id.
Output
The Snowflake table “docs” holds new and updated data correctly.
The workflow shows the success or errors after each operation.
Beginner step-by-step: How to use this workflow in n8n production
Step 1: Download and import the workflow
- Click the Download button on this page to get the workflow file.
- In the n8n editor, click “Import from File” and choose the downloaded workflow.
Step 2: Set up needed credentials
- Open the imported workflow and add Snowflake credentials if missing.
- Make sure API keys or credentials are valid.
Step 3: Update workflow data if needed
- Change IDs, names, or table names in the Set nodes or Snowflake nodes if your project uses different data.
- If SQL queries use table names, adjust them to match your Snowflake setup.
Step 4: Test the workflow once
- Click the manual trigger node and run the workflow.
- Watch the execution to confirm steps run without errors.
Step 5: Activate for production
- Set the workflow status to active.
- Add a Cron node if automatic scheduled runs are wanted.
- Save and close the workflow.
Optionally, for better performance and safety, consider self-host n8n.
Edge cases and possible failures
- Table creation gives error if table exists already.
Fix: UseCREATE TABLE IF NOT EXISTSor add a check before creation. - Insert fails if Set node fields do not match table columns.
Fix: Make names exact and keep only needed fields. - Update does nothing if ID or table name is wrong.
Fix: Use correct dynamic table names and set WHERE conditions properly.
Customization ideas
- Add columns by changing the SQL create statement (like adding timestamps).
- Insert multiple rows at once by setting arrays in the Set node.
- Replace manual trigger with Cron node for scheduled runs.
- Expand update logic to modify more columns or adjust criteria dynamically.
Summary of benefits and results
✓ Saves time by avoiding manual SQL work.
✓ Decreases errors by automating data insertion and updates.
✓ Keeps Snowflake tables accurate and ready for reports.
✓ Easy to test and activate inside n8n.
✓ Flexible for different data and update needs.
