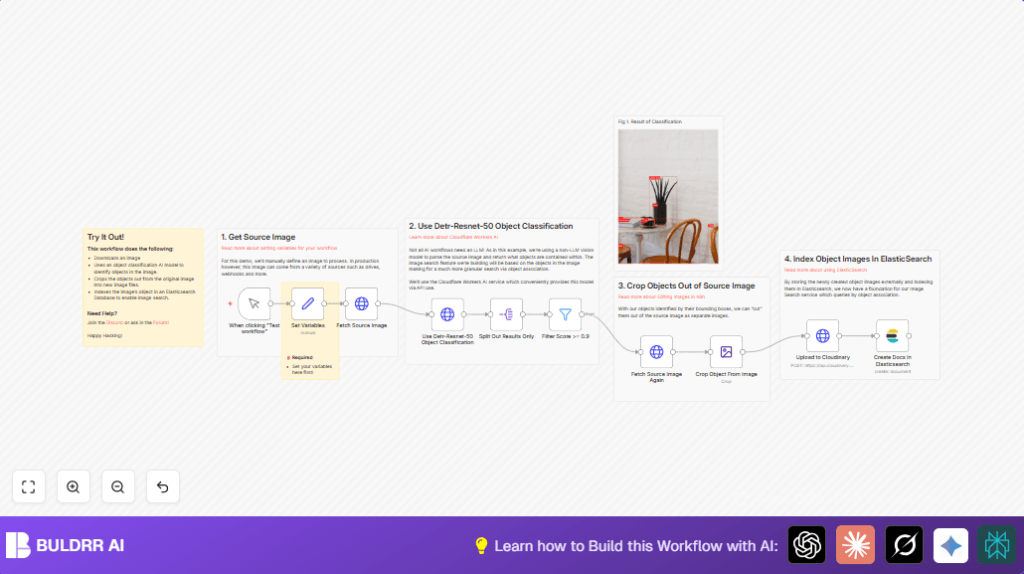
What This Workflow Does
This workflow processes images by detecting objects inside them automatically. It takes an image URL as input, finds objects in the image with high confidence, cuts out each object into a new image, uploads those images to Cloudinary, and saves detailed records in Elasticsearch. The main goal is to save time and reduce errors when managing and searching large collections of product photos.
The workflow uses Cloudflare’s Detr-Resnet-50 AI model to recognize objects and crops them using bounding box data. Only objects with confidence above 90% are kept for better accuracy. This makes searching for specific products easy by their appearance later in the Elasticsearch index.
Tools and Services Used
- Cloudflare AI API: For object detection using the Detr-Resnet-50 model.
- Cloudinary: Hosting cropped images securely in the cloud.
- Elasticsearch: Indexing and searching cropped image metadata and URLs.
- n8n Automation Platform: Runs the workflow and connects all steps.
Inputs, Processing Steps, and Output
Inputs
- Image URL to be processed.
- Cloudflare API credentials.
- Cloudinary credentials and upload preset.
- Elasticsearch credentials and index name.
Processing Steps
- Download the given image from the URL.
- Send the image to Cloudflare’s AI for object detection.
- Split detected objects into individual items.
- Filter objects to only those with confidence of 90% or higher.
- Fetch the original image again to have fresh binary data.
- Crop each object out of the image using the bounding box coordinates.
- Upload each cropped image to Cloudinary.
- Create searchable documents in Elasticsearch with the cropped image link, original image URL, object label, and metadata.
Output
Indexed image records in Elasticsearch with cropped object images hosted on Cloudinary, making fast object-based image searches possible.
Who Should Use This Workflow
This is good for people managing large sets of images, like e-commerce managers or catalog curators, who need to find and organize photos by what’s inside them. No need for coding skills, but some basic understanding of API keys and cloud accounts helps.
Beginner Step-by-Step: How to Use This Workflow in n8n
Step 1: Download the Workflow File
- Use the Download button on this page to get the workflow file.
- Save it locally where it can be found easily.
Step 2: Import Workflow into n8n Editor
- Open your n8n editor, either cloud or self-host n8n instance.
- Click on the calendar menu and choose Import from File.
- Select the downloaded workflow file and import it.
Step 3: Configure Credentials and Variables
- Open the Set Variables node and enter your Cloudflare account ID.
- Ensure the Cloudflare API credential is set in the Use Detr-Resnet-50 Object Classification node.
- Enter your Cloudinary API keys and upload preset under the Upload to Cloudinary node.
- Set Elasticsearch credentials and index name in the Create Docs In Elasticsearch node.
- Replace or confirm the
source_imageURL in the Set Variables node for the image you want to process.
Step 4: Test the Workflow
- In n8n editor, trigger the workflow manually by clicking the When clicking “Test workflow” node.
- Check each node’s output to confirm images and object data pass correctly.
Step 5: Activate Workflow for Production
- Toggle the workflow from draft to active mode.
- Optionally connect triggers like webhooks, schedules, or file uploads to automate processing.
- Regularly monitor executions and errors within the n8n dashboard.
Edge Cases and Troubleshooting
- If the Cloudflare API shows authentication failure, check and update the API Key in credentials.
- If HTTP 404 error happens when fetching images, verify that the image URL is accessible and correct.
- No objects pass the confidence filter? Lower the confidence threshold temporarily and confirm the correct field name is used in the filter.
- Uploads to Cloudinary fail? Ensure the correct upload preset name and API keys are set.
- Elasticsearch document creation errors can come from wrong index names or missing required fields.
Customization Ideas
- Change the confidence threshold in the Filter Score >= 0.9 node to meet quality needs.
- Use a different AI model in the Set Variables node by changing the model variable.
- Switch out the source image input for webhooks or storage trigger nodes to automate image processing.
- Replace the Cloudinary upload step with AWS S3 or Google Drive nodes if preferred.
- Add extra metadata fields like timestamps or user tags in the Elasticsearch document creation to improve search features.
Summary of Results
✓ Automatic image analysis reveals objects without manual tagging or cropping.
✓ Cropped object images stored safely with Cloudinary for easy access and display.
✓ Fast, object-based image search in Elasticsearch helps find products quickly.
→ Saves hours of work and reduces mistakes when managing many product images.
→ Enables scalable and accurate image organization for marketing or catalogs.
