What this workflow does
This workflow goes beyond images. Any file your team works
with daily — images, PDFs, Word documents, Excel sheets,
PowerPoint decks, CSV exports, ZIP archives — can be uploaded
to SharePoint automatically using Microsoft Graph API.
The workflow solves the exact problem Microsoft 365 teams
face most: files live in too many places (email attachments,
Dropbox, local drives, Google Drive) and someone has to
manually move them into SharePoint.
Here’s what happens automatically:
→ Gets a Microsoft 365 access token via Azure AD OAuth2
→ Downloads or receives the file from any source URL
→ Uploads it directly to the correct SharePoint folder
→ Returns confirmation with the file’s SharePoint location
Works with any file type — just change the Content-Type
header in the upload node to match:
→ image/jpeg or image/png for images
→ application/pdf for PDFs
→ application/vnd.openxml formats-office document for Word/Excel
→ application/octet-stream for any binary file
Who should use this workflow
This workflow is for anyone who uploads images often to SharePoint and wants to save time. It helps content managers, marketers, or IT teams who want fewer errors and less manual work. No coding skills are needed to run this in n8n.
Tools and services used
- Microsoft Graph API: To handle authentication and file upload via API.
- Microsoft Azure Active Directory app: To get access credentials (tenant ID, client ID, client secret).
- SharePoint Online: The file storage location where images are uploaded.
- n8n automation platform: To build and run the workflow without coding.
- Public image URL: Source to download an image file for uploading.
1 Barrier: Setting Up Microsoft 365 Authentication
Most people get stuck before even touching n8n — the Azure
AD app registration. Here’s the exact setup so you’re not
searching through Microsoft documentation.
Step 1 — Register an App in Azure AD
1. Go to portal.azure.com → Azure Active Directory
2. Click “App Registrations” → “New Registration”
3. Name it anything (e.g. “n8n SharePoint Upload”)
4. Supported account types: Single tenant (your org only)
5. Redirect URI: leave blank for now
6. Click Register
Step 2 — Get Your Credentials
From the app overview page, copy:
→ Application (client) ID → this is your CLIENT_ID
→ Directory (tenant) ID → this is your TENANT_ID
Step 3 — Create a Client Secret
1. Left menu → “Certificates & Secrets”
2. Click “New Client Secret”
3. Set expiry: 24 months recommended
4. Copy the VALUE immediately — it only shows once
→ This is your CLIENT_SECRET
Step 4 — Set API Permissions
1. Left menu → “API Permissions”
2. Click “Add a permission” → Microsoft Graph → Application permissions
3. Add: Sites.ReadWrite.All
4. Click “Grant admin consent for [your org]” — this is required
Step 5 — Get Your SharePoint Site ID
In your browser, go to:
https://[yourtenant].sharepoint.com/sites/[yoursite]/_api/site/id
Copy the GUID returned — this is your SharePoint Site ID
used in the Graph API upload URL.
Once you have TENANT_ID, CLIENT_ID, CLIENT_SECRET, and
Site ID — paste them into the Set config node and the
workflow is ready to run.
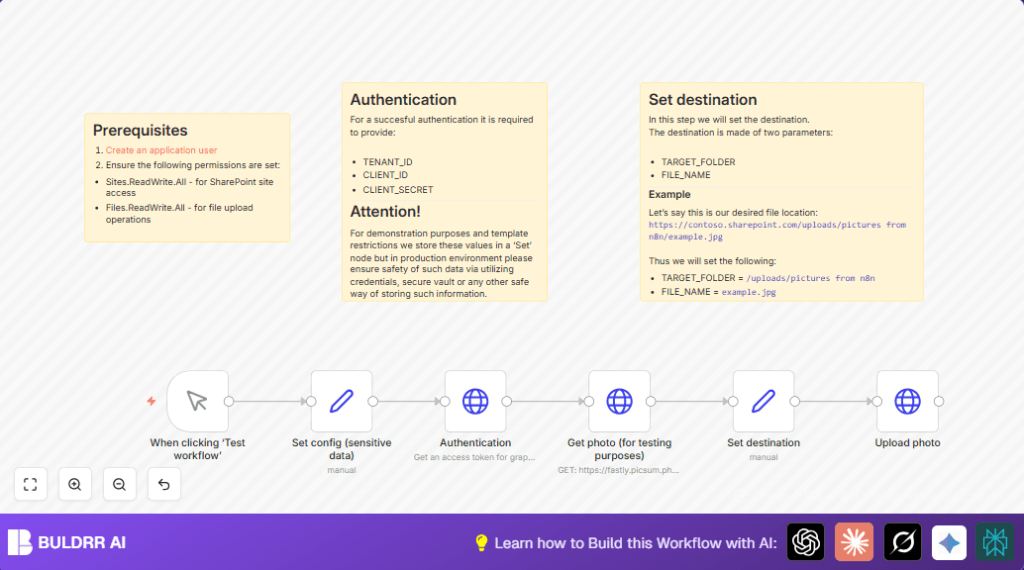
How the workflow works (Inputs → Processing → Output)
Inputs
- Azure AD app credentials: TENANT_ID, CLIENT_ID, CLIENT_SECRET
- Image URL to download (e.g., a public picsum.photos link)
- Target SharePoint folder path
- Filename to save the image as
Processing
- Manual Trigger: Starts the workflow.
- Set config (sensitive data): Stores tenant ID, client ID, client secret securely in the workflow.
- Authentication: Sends POST request to Microsoft OAuth2 endpoint to get access token.
- Get photo (for testing purposes): Downloads image binary data from the URL.
- Set destination: Sets the folder path and file name for the upload.
- Upload photo: Sends PUT request to Microsoft Graph API to upload the image binary into SharePoint folder.
Output
The workflow outputs the upload response JSON. It contains file details confirming the image saved correctly. User can check the SharePoint folder manually as well.
Beginner step-by-step: How to use this workflow in n8n
1. Import the workflow
- Download the workflow file using the Download button on this page.
- In the n8n editor, click on “Import from File” and select the downloaded file.
2. Configure credentials
- Open the Set config (sensitive data) node.
- Enter your Azure app’s
TENANT_ID,CLIENT_ID, andCLIENT_SECRET.
- Enter your Azure app’s
- Update the
TARGET_FOLDERandFILE_NAMEfields in the Set destination node as needed.
- Update the
3. Test the workflow
- Click the Manual Trigger node and then select “Execute Workflow”.
- Check the nodes run successfully and the final upload response shows success.
4. Activate for production
- Turn on the workflow to enable automatic runs.
- Optionally, replace the manual trigger with a webhook or scheduled trigger for automation.
If self hosting n8n, explore self-host n8n for setup and management.
Common errors and edge cases
- 401 Unauthorized: Usually from wrong tenant ID, client ID, or secret. Double-check app registration.
- 404 Not Found on upload: URL path error or missing permissions. Verify folder path and API permissions.
- Image download fails: Image URL invalid or blocked. Test URL separately first.
What File Types Work With This Microsoft 365 SharePoint Workflow
This workflow is designed for image uploads by default, but the same Microsoft Graph API endpoint supports almost any file type.
The only change required is updating the Content-Type header in the upload node.
| File Type | Content-Type Header Value |
|---|---|
| JPEG Image | image/jpeg |
| PNG Image | image/png |
| PDF Document | application/pdf |
| Word Document | application/vnd.openxmlformats-officedocument.wordprocessingml.document |
| Excel Spreadsheet | application/vnd.openxmlformats-officedocument.spreadsheetml.sheet |
| PowerPoint | application/vnd.openxmlformats-officedocument.presentationml.presentation |
| CSV File | text/csv |
| ZIP Archive | application/zip |
| Any Binary File | application/octet-stream |
The upload node structure remains the same for every file type — only the Content-Type value changes.
This makes the workflow highly flexible and reusable across your entire Microsoft 365 document system, not just for image uploads.
Ways to customize
- Change the image source URL in Get photo (for testing purposes) to any valid image.
- Use n8n expressions to create dynamic filenames, like adding timestamps.
- Modify
Content-Typein Upload photo for other file types like PDFs.
- Modify
- Store sensitive values in n8n Credentials for better security instead of Set node.
- Switch to webhook triggers for automatic uploads from external apps.
Summary of benefits and results
✓ Saves several hours weekly by removing manual uploads.
✓ Avoids errors caused by manual file handling.
✓ Gives easy automatic uploads into SharePoint using simple n8n setup.
✓ Supports changing image sources and filenames flexibly.
✓ Suitable for non-technical users once set up.
