

What this workflow does
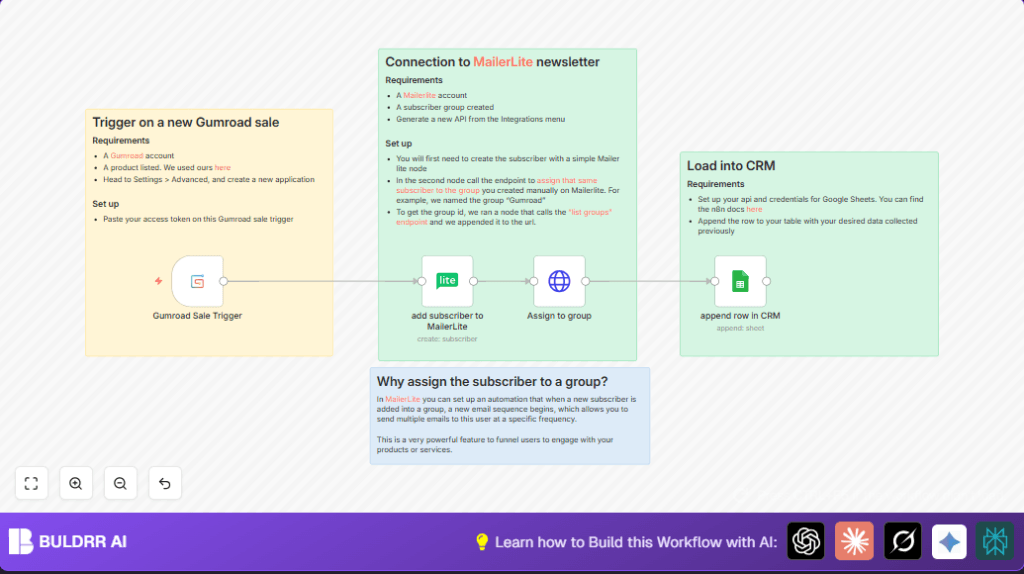
This workflow automates adding new Gumroad buyers to MailerLite mailing lists and logs their sale details in Google Sheets automatically.
It solves the problem of manual data export and entry that wastes time and causes mistakes.
You get instant subscriber updates with sales info saved, ready for marketing emails and easy tracking.
The workflow starts when Gumroad reports a new sale.
It adds the buyer’s email and country to MailerLite as a subscriber.
Then it puts the subscriber into a MailerLite group for sales emails.
Finally, it records the sale date, email, product, and country in Google Sheets.
Tools and services used
- Gumroad: Sends webhooks when a new sale happens.
- MailerLite: Adds subscribers and assigns groups for email campaigns.
- Google Sheets: Stores sales info as a CRM log.
- n8n: Runs the automation workflow.
Inputs, processing, and output
Inputs
- New sale data from Gumroad webhook, including email, country, product, and sale time.
Processing Steps
- Trigger is the Gumroad Sale Trigger that listens for sales.
- Add the Gumroad buyer to MailerLite subscribers using the MailerLite node.
- Use an HTTP Request node to assign the new subscriber to a specific MailerLite group.
- Append the sale data as a row in Google Sheets via the Google Sheets node.
Outputs
- New subscriber created in MailerLite with email and country.
- Subscriber assigned to the right MailerLite group for targeting.
- Sale details added to a Google Sheets CRM for easy tracking.
Beginner step-by-step: How to use this workflow in n8n production
Step 1: Download and import workflow
- Click the Download button on this page to get the workflow file.
- Open n8n Editor UI if not already open.
- Select “Import from File” and upload the downloaded workflow.
Step 2: Add credentials and configure nodes
- Go to each node’s credentials section and add your Gumroad, MailerLite, and Google Sheets API keys.
- Update any placeholder IDs such as MailerLite group ID or Google Sheet IDs to match your accounts.
- Check mappings for email, country, and product fields are correct with expressions.
Step 3: Test the workflow
- Trigger a test sale in Gumroad or send a test webhook to verify subscriber creation and data logging.
- Look at execution results in n8n to be sure data flows correctly.
Step 4: Activate for production
- Toggle the workflow’s Active switch to ON in n8n.
- Monitor initial runs through n8n history for errors.
- Optionally connect Slack or email to get alerts on workflow failures.
For those self-hosting n8n, import and activate works the same.
Step breakdown for building workflow
Step 1: Gumroad Sale Trigger Node Setup
- Add Gumroad Sale Trigger node.
- Enter Gumroad Access Token in credentials.
- Copy webhook URL from node.
- Paste this URL into Gumroad Settings > Advanced > Application for webhook registration.
Step 2: Add MailerLite Subscriber
- Add MailerLite node set to Create Subscriber.
- Map email to
{{ $json.email }}. - Add custom field country with
{{ $json.ip_country }}.
Step 3: Assign Subscriber to Group
- Add HTTP Request node.
- Use POST method.
- Input URL replacing subscriber ID in
https://connect.mailerlite.com/api/subscribers/{{ $json.id }}/groups/152489030254069581. - Add MailerLite API credentials.
Step 4: Append Data to Google Sheets
- Add Google Sheets node with append row operation.
- Set spreadsheet and sheet names.
- Map fields: sale timestamp, email, country, product using expressions:
{{ $('Gumroad Sale Trigger').item.json.sale_timestamp }}
{{ $('Gumroad Sale Trigger').item.json.email }}
{{ $('Gumroad Sale Trigger').item.json.ip_country }}
{{ $('Gumroad Sale Trigger').item.json.product_name }}
Step 5: Connect nodes in order
- Gumroad Sale Trigger → MailerLite add subscriber.
- MailerLite add subscriber → HTTP Request to assign group.
- HTTP Request → Google Sheets append row.
Customization ideas
- Change MailerLite group by updating group ID in the HTTP Request node URL.
- Add more sale details to Google Sheets like buyer name or amount by expanding mapped fields.
- Use condition nodes before HTTP Request to assign different groups based on product name.
- Add a Slack integration node to send sales alerts to your team channel.
- Schedule HTTP nodes to MailerLite API to delete inactive or unsubscribed contacts.
Troubleshooting common problems
Webhook not triggering
Webhook URL not added in Gumroad Settings causes no activation.
Verify URL matches exactly in Gumroad application settings.
Subscriber not added to MailerLite group
Incorrect MailerLite group ID or missing API permissions may cause failure.
Check group ID via MailerLite API and use correct API key with group rights.
Google Sheets row not appending
Invalid spreadsheet ID or sheet name cause error.
Check correct IDs and OAuth permissions, re-authenticate if needed.
Pre-production checklist
- Ensure Gumroad Access Token and webhook are active.
- MailerLite API keys allow subscriber creation and group management.
- Google Sheets API credentials have edit rights.
- Run test sales to verify subscriber and CRM row creation.
- Backup existing Google Sheets CRM data.
Deployment guide
Activate workflow in n8n by switching on the Active button.
Keep watch on execution history for errors.
Enable n8n logging to trace webhook and API calls.
Add error alert integrations like Slack if preferred.
Summary
✓ Automates Gumroad sale data to MailerLite subscriber creation.
✓ Assigns subscribers to groups for email sequences.
✓ Appends sales details to Google Sheets CRM row.
→ Saves hours by removing manual data entry.
→ Avoids errors from copying/pasting emails.
→ Helps send targeting emails faster.
