

What this workflow does
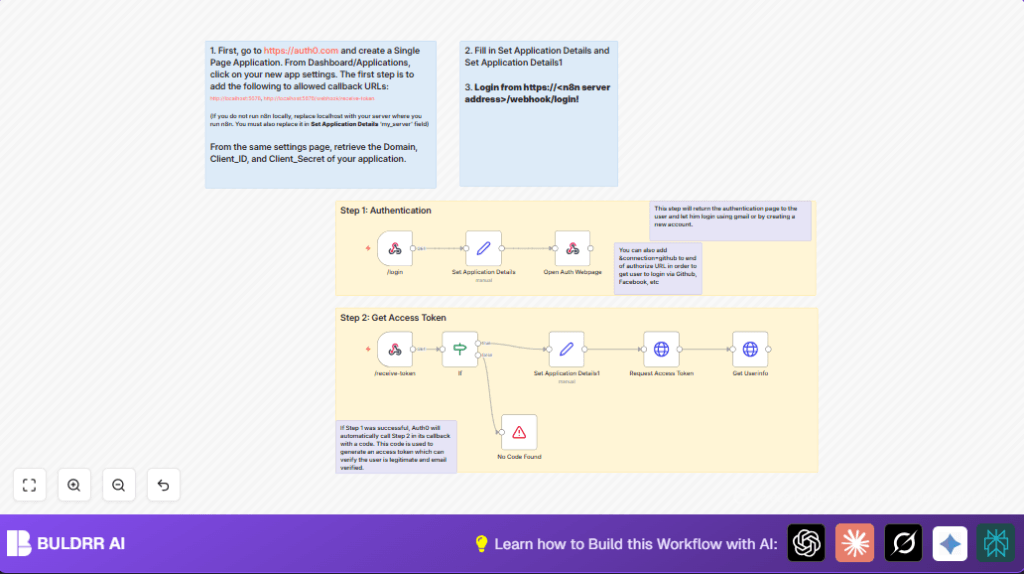
This workflow handles user login with Auth0 automatically.
It directs users to login, gets an authorization code, swaps it for an access token, and fetches user details.
It solves the hard work of manual OAuth2 code exchange and API calls.
The result is fast, reliable user login with Auth0 in n8n.
Who should use this workflow
People who want to add login using Auth0 to their apps without coding all the OAuth2 steps.
Developers who want to save time and avoid login errors.
Anyone using n8n to build automated login flows with Auth0.
Tools and services used
- Auth0 Single Page Application: Manages user login and OAuth2 credentials.
- n8n platform: Automation builder with webhook and HTTP Request nodes.
- Webhook nodes in n8n: Listen for login start and Auth0 redirect callbacks.
- HTTP Request nodes in n8n: Make HTTP calls to Auth0 token and userinfo endpoints.
Inputs, Processing Steps, and Outputs
Inputs
- User visits n8n webhook URL to log in.
- Auth0 redirects back with an authorization code in the URL query.
- Pre-configured Auth0 credentials and URLs in n8n nodes.
Processing Steps
- User request triggers redirect to Auth0 login page.
- Webhook receives authorization code after successful login.
- Workflow checks code presence and stops if missing.
- Exchanges the authorization code for access token using a POST HTTP request.
- Uses access token to call the Auth0 /userinfo API to get user details.
Outputs
- Access token from Auth0 for the logged-in user.
- User profile information including email, name, and picture in JSON format.
Beginner step-by-step: How to use this workflow in n8n
Import and setup
- Download the workflow file using the Download button on this page.
- Open n8n editor and choose “Import from File” to load the workflow.
- Look for Set Application Details and Set Application Details1 nodes. Edit them to add your Auth0 Domain, Client ID, Client Secret, and your n8n server URL.
Configure credentials
- Add any required API credentials or OAuth2 credentials in n8n’s credential manager if needed.
- Check the webhook URLs in Webhook nodes like /login and /receive-token match your environment and Auth0 callback URLs.
Test and activate
- Run a test by opening the
/loginwebhook URL in a browser. It should redirect to Auth0 login page. - Complete login to trigger token exchange and user info retrieval.
- Check the node outputs to see if user data was received correctly.
- Activate the workflow in n8n for production use.
- If running self-host n8n, ensure HTTPS is enabled for secure OAuth2 redirects.
Edge cases and error handling
If the /receive-token webhook does not get a code query parameter, the workflow stops and shows “Couldn’t get authorization code!”.
Make sure Auth0 callback URLs match the redirect URI configured in the workflow.
If the HTTP Request node to get tokens fails with unauthorized error, verify Client ID, Client Secret, and redirect URIs for exact matches with Auth0 dashboard.
Customization ideas
- Add
&connection=githubor other social provider to the Auth0 authorize URL in Open Auth Webpage node to switch social logins. - Change
scopeparameter in the/loginwebhook to control user data access. - Insert a database node after Get Userinfo node to save user data for future use.
- Use custom Auth0 domains by changing the
domainvalues in Set nodes. - Add refresh token support to prolong user sessions by requesting refresh tokens and automating renewal steps.
Summary of results
✓ Saves time by removing manual OAuth coding.
✓ Automatically manages user login and token exchange.
✓ Provides user profile data for app use.
✓ Works with n8n and Auth0 securely.
✓ Easy to customize for different login providers or scopes.
