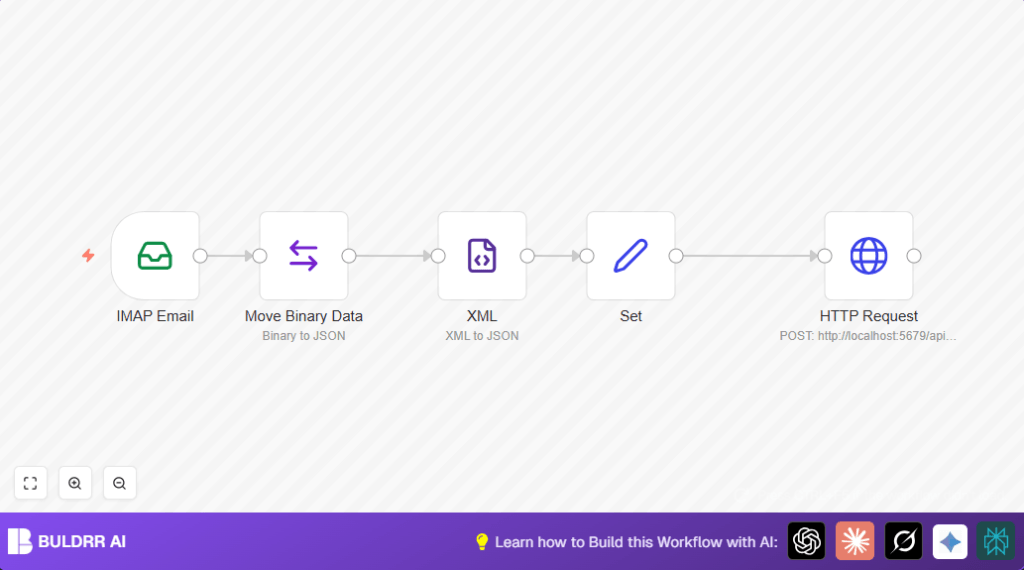
What This Automation Does
This workflow reads emails with sales order XML files attached.
It takes the XML, changes it into JSON, then sends the order info to a sales system automatically.
This stops manual work of copying orders. It saves hours and cuts mistakes.
The workflow connects to an IMAP email, downloads the first XML file from each email, parses it, formats the JSON, and sends a POST request to an API.
The system also handles SSL certificate problems, helpful for testing or private setups.
Tools and Services Used
- IMAP Email: Reads and downloads email attachments.
- Move Binary Data node: Extracts and converts XML binary data to text.
- XML node: Changes XML string into JSON format.
- Set node: Structures JSON data for API request.
- HTTP Request node: Sends sales order JSON to backend API.
- Sales Order API: Receives POST data at
http://localhost:5679/api/sales-order.
Inputs, Processing Steps, and Output
Input
- Sales order emails fetched via IMAP with XML attached.
Processing
- Extract first attachment’s XML using Move Binary Data.
- Convert that XML text to JSON using XML node.
- Use Set node to format JSON into API-ready structure.
- Send JSON data in a POST HTTP Request to sales system.
- Allow unauthorized SSL certs for local or self-signed environments.
Output
Sales order data sent to API, ready for system processing.
Beginner step-by-step: How to use this workflow in production in n8n
Download and Import
- Use the Download button on this page to get the workflow file.
- Inside the n8n editor, click on “Import from File” and select the downloaded workflow file.
Configure Credentials and Settings
- Add your IMAP email account credentials to the IMAP Email node.
- Update the API endpoint URL in the HTTP Request node if needed.
- Adjust any emails, folders, or other IDs used in the workflow to fit your setup.
Test and Activate
- Run the workflow once manually to check if emails are read and orders are sent properly.
- If the test works, activate the workflow using the toggle in the upper-right corner.
For self hosting n8n, see self-host n8n for setup advice.
Step-by-step Guide to Build This Workflow
1. Set Up the IMAP Email Node to Read Sales Order Emails
Navigate to your n8n editor → Click + Add Node → Select IMAP Email node.
Configure:
- Enter your IMAP credentials (host, port, user, password) under credentials.
- Enable Allow Unauthorized Certs under options if you have self-signed certificates.
- Enable Download Attachments to retrieve the XML order files.
You should see the node successfully connecting and pulling recent emails.
Common mistake: Forgetting to set credentials correctly leads to no data retrieval errors.
2. Use Move Binary Data Node to Extract and Convert Attachment Data
Add a Move Binary Data node → Connect it from the IMAP Email node output.
Configure:
- Source Key:
attachment_0(the first attachment) - Destination Key:
xml - Encoding:
utf8to convert binary data to string - Uncheck “Keep Source” to move instead of copying data
This node converts the first attachment’s binary XML content into a UTF-8 string available for subsequent parsing.
Expected outcome: Attachment data is moved into the ‘xml’ field as a string.
3. Convert XML to JSON Using the XML Node
Add an XML node → Connect it from Move Binary Data node.
Configure:
- Set Input Property:
xml(to read the XML string field) - Enable Ignore Attributes and Explicit Root to control output structure
This converts the raw XML string attachment into JSON format, making it easier for the next nodes to manipulate.
Common mistake: Specifying the wrong input property or forgetting to match the output field (here “xml”).
4. Prepare the JSON Data for Posting with a Set Node
Add a Set node and connect it to the XML node.
Configure:
- Use this node to define or clean the structure of your JSON payload.
- In this workflow, it passes the XML conversion output directly, so leave the values empty or customize as needed.
- Ensure the data format matches what your API endpoint expects (adjust the structure here if necessary).
After running, the Set node’s data is used as the HTTP request body parameter.
5. Send Data to Sales System via HTTP Request Node
Add an HTTP Request node connected to the Set node.
Configure:
- Request URL:
http://localhost:5679/api/sales-order(replace with your endpoint) - Method:
POST - Body Content Type:
form-urlencoded - Add a body parameter called
orderRequestwhose value is the data from the Set node:= {{$node["Set"].data}} - Enable Allow Unauthorized Certs if your endpoint uses self-signed certs
- Set response format to
string
This node posts the sales order data to the backend API, completing the automated flow.
Common mistake: Mismatched parameter names or incorrect body format causes request failures.
Customizations ✏️
- Change XML Processing Behavior: In the XML node, toggle Ignore Attributes or disable Explicit Root to adjust how XML data changes to JSON for your XML format.
- Handle Multiple Attachments: Use loops or SplitInBatches node on attachment keys to process many XML files in one email.
- Modify API Endpoint and Parameters: Edit the HTTP Request node URL and body parameters to fit your real API and add headers like API Keys.
- Enrich Payload Data: Add other Set nodes to add info like timestamps or client IDs before sending to API.
Troubleshooting 🔧
- Problem: “No emails or attachments found” on IMAP Email node.
Cause: Wrong IMAP login or mailbox or no emails with attachments.
Solution: Check credentials, mailbox name, and that emails with XML files exist. - Problem: Empty result after XML conversion.
Cause: Move Binary Data didn’t extract data or wrong input property.
Solution: Make sure source key isattachment_0and encoding is UTF-8, and XML node reads fromxml. - Problem: HTTP POST fails or no response.
Cause: Wrong URL, bad request body, or SSL issues.
Solution: Confirm API URL, body matches API format, enable “Allow Unauthorized Certs” if needed.
Pre-Production Checklist ✅
- Check that IMAP email login works.
- Confirm emails with XML attachments are present.
- Run workflow manually to verify XML converts to correct JSON.
- Make sure the API endpoint receives data properly.
- Backup workflows and keep API details documented.
Deployment Guide
When tests pass, save and turn on the workflow with the toggle.
Watch execution logs to spot email or API errors fast.
Add other workflows to send alerts on success/failure or log orders for records.
Conclusion
This step-by-step workflow automates reading XML sales orders from emails and sending data to backend sales systems.
This cuts hours of manual work and reduces mistakes.
Further ideas include adding order checks, alerts on issues, or connecting to CRM tools.
This simple automation using n8n improves order processing quickly and with little code.
Summary
✓ Automates reading sales order emails with XML attachments.
✓ Converts XML to JSON for easy processing.
✓ Sends sales order info to backend API.
✓ Saves hours and lowers manual errors.
✓ Can be customized for more attachments or payload enrichments.
✓ Easy to import and run in n8n with basic setup.
