What This Automation Does
This workflow takes Webflow form submissions and stores them in Airtable automatically.
The main problem it solves is the hard work of making new Airtable tables for each Webflow form by hand.
Now, tables are created and used on their own.
All data goes into the right table without manual steps.
This saves time and stops mistakes
The workflow runs in n8n and uses your API keys for Webflow and Airtable.
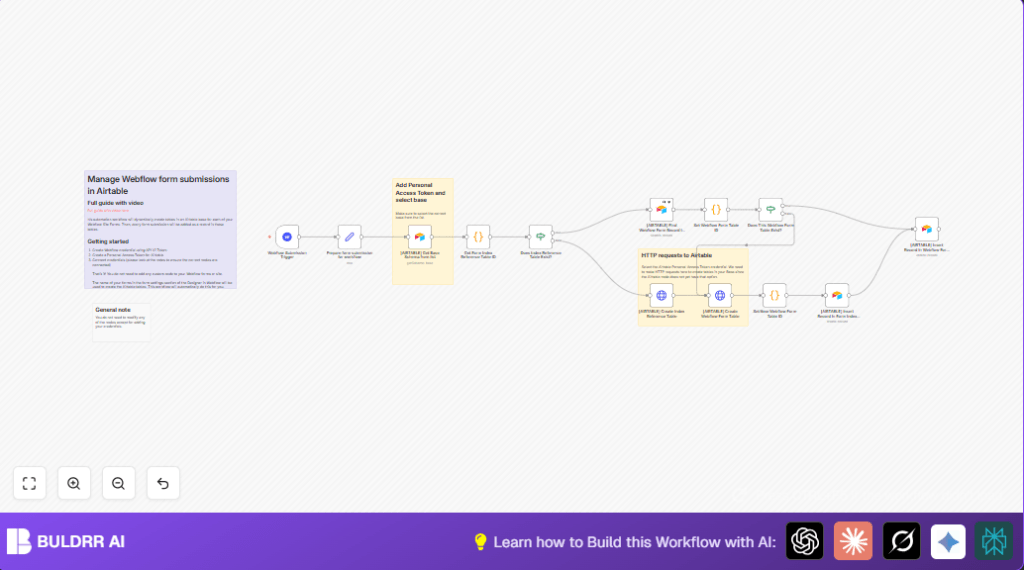
It watches for new form answers in Webflow.
It looks if a special “Form Index” table is there in Airtable.
If missing, it creates that table for tracking forms.
Then it checks if a table matching the form name exists.
If missing, it makes a new table in Airtable just for that form.
It saves the form and table info in the “Form Index”.
Next, new form answers are put into the right Airtable table with all submission details saved as JSON.
This means no need to change Webflow code or do Airtable setup each time.
Tools / Services Used
- Webflow API: To receive form submissions via webhook.
- Airtable API with Personal Access Token: To check base schema, create tables, and insert records.
- n8n Workflow Automation: To connect Webflow and Airtable services and automate all steps.
Inputs, Processing, and Output
Inputs
- Form submission data from Webflow webhook.
- Existing Airtable base schema for checking table presence.
- User Airtable Personal Access Token for API permission.
Processing Steps
- Listen for Webflow form submission events.
- Prepare and clean key submission info.
- Get Airtable base schema to check for “Form Index” and form tables.
- Create “Form Index” table if missing.
- Look up if dedicated form table already exists.
- Create new Airtable table for form if none found.
- Update “Form Index” table with form and table info.
- Insert new submission record into correct Airtable table.
Output
- New Airtable tables created automatically per new Webflow form.
- All form submissions stored as records in matching Airtable tables.
- “Form Index” table tracks all forms and their table IDs centrally.
- Data is saved in JSON format for completeness and further automation.
Beginner Step-by-Step: How to Use This Workflow in n8n
1. Import the Workflow
- Click the Download button on this page to get the workflow JSON file.
- Open the n8n editor where you want to run the workflow.
- Choose “Import from File” and upload the downloaded JSON.
2. Add Required Credentials
- Set up Webflow API Key credential in n8n for the site driving form submissions.
- Add Airtable Personal Access Token (PAT) credential with permissions to create tables and add records.
3. Update Configuration
- Check the workflow nodes for any preset IDs like Airtable base ID or Webflow site ID, and update them to your own.
- Verify any email addresses, Slack channels, or other outputs are current if the workflow uses notifications.
4. Test the Workflow
- Submit a test form on your Webflow site to trigger the webhook.
- Watch the workflow execute in n8n with the debug panel to check for errors.
5. Activate for Production
- When testing is successful, switch the workflow to “active” mode to run live.
- Monitor initial runs until confident data flows correctly.
- If self hosting n8n, consider this self-host n8n option for more control.
Customizations
- Change fields saved during table creation by updating JSON in HTTP Request node.
- Rename tables or fields from JavaScript inside code nodes for custom naming.
- Add notification nodes after record creation to alert teams via Slack or Email.
- Switch from Airtable Personal Access Token to OAuth2 in HTTP Request settings for enhanced security.
- Add filters or validation before insertions using additional If or Code nodes.
Troubleshooting Common Failures
- No Form Index Table ID Found: Check API keys, permissions, and base ID are correct.
- HTTP 401 Unauthorized: Regenerate Airtable Personal Access Token and update in n8n.
- Submissions Not in Tables: Use n8n execution logs to verify data flow and table existence.
Pre-Production Checklist
- Make sure Webflow webhook is setup and active.
- Ensure Airtable PAT has rights to create tables and write records.
- Run tests by submitting forms from Webflow.
- Review n8n logs carefully for errors.
- Backup Airtable base before production runs.
Summary
✓ The workflow watches Webflow forms and stores data in Airtable automatically.
✓ It creates new Airtable tables for each Webflow form without manual work.
✓ Keeps all form data well organized in matching tables and tracks them centrally.
✓ Saves time and reduces errors when processing form submissions.
