What this workflow does
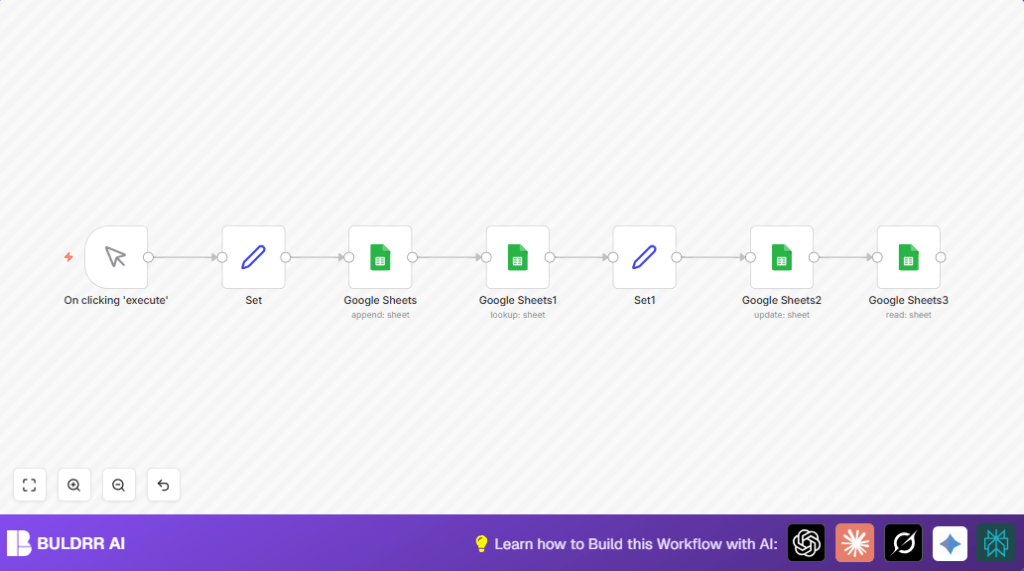
This workflow automates four Google Sheets operations in a single, sequential run — no manual input needed after setup.
It starts by appending a new rental listing to your sheet with a unique ID, name, rent amount, and city. Then it searches the sheet to find all rows that match a specific city. Once those rows are identified, it updates the rent value for the matching entries using the unique ID as a reference point — so only the right row changes. Finally, it reads the entire sheet back so you can confirm all changes landed correctly.
The unique ID is the most important part of this design. Without it, an update node has no reliable way to know which row to change — especially when sheet data grows over time. Every append operation in this workflow auto-generates that ID, so your data stays traceable from day one.
This is the foundation of most real-world Google Sheets automations: write → find → update → verify. Once you understand how these four operations connect, you can swap in any data source, any trigger, and any sheet structure.
Who should use this workflow
This workflow is for anyone who manages rental properties and keeps records in Google Sheets. It helps people who update many listings across different places and want to avoid errors.
No deep technical skills are needed, but some familiarity with n8n and Google Sheets helps. It also fits users wanting to automate manual spreadsheet tasks to gain more time and improve data trust.
Tools and Services Used
- Google Sheets: Stores and manages rental data.
- n8n Platform: Runs the automation workflow connecting Google Sheets operations.
- Google OAuth 2.0 Credentials: Secure access to Google Sheets via API.
Beginner step-by-step: How to build this in n8n
How to Set Up This Workflow in n8n
Step 1 — Import the workflow Download the workflow file using the button on this page. In your n8n editor, click the menu icon (top right) and select Import from File. Upload the downloaded .json file. The workflow will open with all nodes pre-connected.
Step 2 — Connect your Google Sheets credentials Click any Google Sheets node and look for the Credential dropdown. If you haven’t connected Google Sheets before, click Create New and follow the OAuth 2.0 flow. You’ll need to allow n8n access to your Google account. Once connected, apply the same credential to all four Google Sheets nodes in the workflow.
Step 3 — Set your Sheet ID Open each Google Sheets node and find the Spreadsheet field. Replace the existing Sheet ID with your own. You can find your Sheet ID in the Google Sheets URL — it’s the long string of characters between /d/ and /edit. Example: https://docs.google.com/spreadsheets/d/YOUR_SHEET_ID_HERE/edit.
Step 4 — Verify column names match your sheet The Lookup and Update nodes reference specific column names like “City” and “ID”. If your sheet uses different column headers, update the Lookup Column and Matching Column fields in those nodes to match exactly — including capitalization. A single typo here returns zero results with no error message, which is the most common setup mistake.
Step 5 — Run a test Click the Manual Trigger node and press Execute Workflow. Watch the execution log on the right side. Each node should turn green. If a node fails, click it to see the error detail — most failures at this stage are either a missing credential or a wrong Sheet ID.
Step 6 — Check your Google Sheet Open your sheet after the test run. You should see a new row added, the rent value updated for the matched city, and the data should be consistent with what the Read node returned in the execution log.
Step 7 — Activate or schedule Toggle the workflow to Active if you want it to run on a trigger. To run it on a schedule instead of manually, delete the Manual Trigger node and add a Schedule Trigger node — set it to daily, hourly, or whatever your use case needs.
Workflow Inputs, Processing, and Outputs
Operation 1: Append Rows to Google Sheets
This is the first thing the workflow does. It takes new rental data — ID, Name, Rent, and City — and adds it as a fresh row at the bottom of your sheet. A unique ID is generated automatically so every entry stays distinct and traceable.
Use this when you want to log new records without touching the sheet manually.
—
Operation 2: Lookup Rows by Value
Once data is in the sheet, this operation finds rows that match a specific value — for example, all rentals in a particular city. The workflow scans the City column and returns every matching row.
Use this when you need to filter or find specific entries before making changes.
—
Operation 3: Update Existing Rows
After finding the matching rows, this operation changes values in those rows. In this example, it increases the rent amount by a fixed number. The update uses the unique ID as the key so only the right row gets changed — no accidental overwrites.
Use this when prices, statuses, or any values in your sheet need to change based on a condition.
—
Operation 4: Read Data from Google Sheets
The final operation reads the entire sheet after all changes are done. This gives you a clean confirmation that all appends and updates happened correctly before you close the workflow.
Use this to verify data or pass the latest sheet state into the next step of a larger workflow.
Common Mistakes and How to Avoid Them
The caller does not have permission This error means your Google OAuth credential doesn’t have the right scope. Fix it by disconnecting and reconnecting your Google Sheets credential in n8n — during the OAuth flow, make sure you approve all permissions Google requests. If you’re on a Google Workspace account, your admin may need to allow third-party app access.
Lookup returns zero rows even though the data exists Almost always a column name mismatch. The Lookup node is case-sensitive. If your sheet column is named
citybut the node is set to look upCity, it won’t find anything. Open the node, check the Lookup Column field, and match it exactly to your sheet header.Update node changes the wrong row This happens when you don’t use a unique identifier as the matching column. If two rows have the same value in the column you’re matching on (e.g., city = “London”), the update will hit both. Always use a unique ID column — like the auto-generated ID in this workflow — as your matching key in the Update node.
Sheet ID works in testing but breaks after sharing the sheet When you share a Google Sheet with someone else, the Sheet ID stays the same — but if the new owner moves or copies it, the ID changes. Keep the Sheet ID stored as a variable or note it somewhere so you can update the workflow quickly if the sheet ever gets replaced.
Images or workflow preview not loading If the workflow canvas isn’t visible on the page, press CTRL+F5 to do a hard refresh. This clears cached scripts that sometimes block the interactive embed from loading.
Customization Ideas
- Change the city filter in the lookup node to find rentals in other cities like “Paris” or “New York”.
- Adjust the rent increase amount in the Set node to fit real rent changes.
- Add more columns like “Bedrooms” or “Availability” by extending the range and updating the Set nodes accordingly.
- Use a scheduled trigger instead of manual trigger for automatic regular updates.
- Feed dynamic rental data through a form or webhook instead of static data for new entries.
Summary of Benefits and Outcomes
✓ Adds rental entries automatically with unique IDs.
✓ Finds and filters rental listings by city easily.
✓ Updates rent values safely using unique identifiers.
✓ Reads back updated data for confirmation.
✓ Saves time by replacing repetitive manual tasks.
✓ Improves data accuracy and consistency in Google Sheets.
