What This Automation Does
This workflow sends SMS messages worldwide using the ClickSend API.
It solves the problem of manually sending SMS with mistakes or delays.
Users get SMS sent quickly without typing errors or confusion about phone numbers.
The workflow takes text and phone numbers with correct international format as input.
Then it sends the message using ClickSend’s HTTP POST request with basic auth.
The result is reliable SMS delivery to any country through ClickSend.
Who Should Use This Workflow
Small business owners or anyone needing to send SMS worldwide often.
People who want to avoid typing errors in phone numbers or messages.
Users who want to save time by automating SMS sending in n8n.
Those who need simple basic-auth API integration with ClickSend.
Tools and Services Used
- ClickSend API: For sending SMS via HTTP POST with basic authentication.
- n8n automation platform: To create, run, and manage SMS workflows.
- HTTP Request node in n8n: To call ClickSend API with message and recipient data.
- Set node in n8n: To set SMS text and phone number fields.
- Optional – self-host n8n: Useful for users wanting more control by running automation on own servers. self-host n8n
Inputs, Processing, and Output
Inputs
- SMS message content, for example: “Hi, this is my first message”.
- Recipient phone number including international ‘+’ prefix, e.g., “+39xxxxxxxx”.
- ClickSend API username and API key for authentication.
Processing Steps
- The Set SMS data node assigns static or dynamic sms and to fields.
- The Send SMS HTTP Request node sends a POST request to ClickSend with a JSON body.
- The HTTP headers include Content-Type: application/json, and use Basic Auth with username and API key.
- The JSON body is constructed with expressions to embed sms text and recipient number dynamically.
Output
- Successful HTTP response (status 200) confirming SMS sent.
- ClickSend dashboard updates showing sent SMS logs.
- Errors returned if authentication fails or phone number is invalid.
Beginner Step-by-Step: How to Use This Workflow in n8n
Importing the Workflow
- Download the workflow JSON file using the Download button on this page.
- Open the n8n editor where workflows are created.
- Use the Import from File option to upload the downloaded workflow.
Configuring Authentication and Data
- Open the Send SMS HTTP Request node.
- Add ClickSend username as HTTP Basic Auth username.
- Add ClickSend API key as HTTP Basic Auth password.
- Open the Set SMS data node.
- Change the sms field to desired message text or connect dynamic inputs.
- Change the to field to the recipient phone number with ‘+’ prefix.
- Save the nodes.
Testing and Activating
- Run the workflow once using Execute Workflow or Test Workflow button.
- Check if the SMS is sent successfully and the HTTP response is 200.
- If successful, toggle workflow status to Active to run in production.
- Optionally schedule the workflow or add triggers for automation.
Following these steps lets users quickly use the workflow to send SMS worldwide.
The user does not need to build from scratch nor add code manually.
Step-by-Step Guide
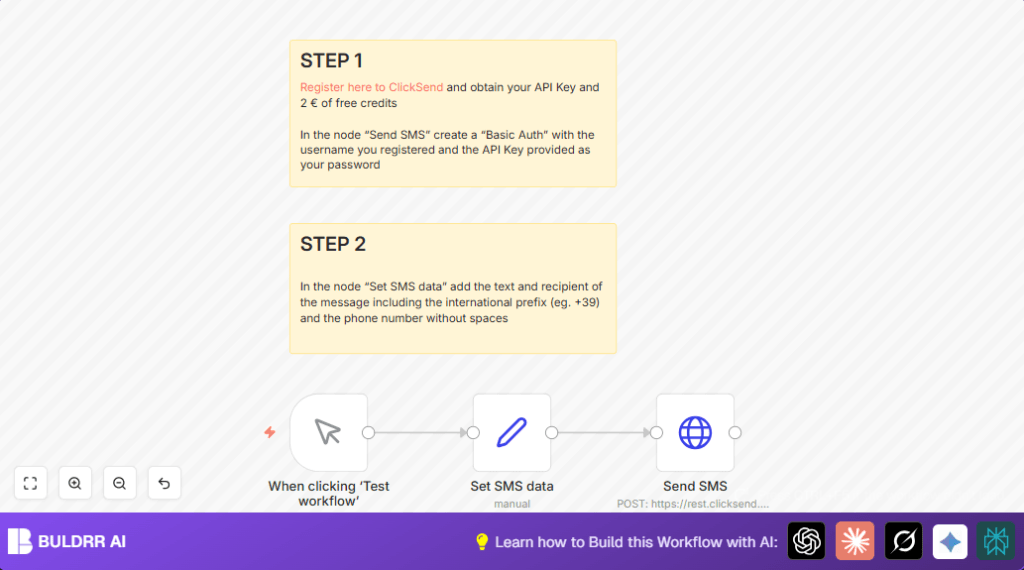
Step 1: Register for ClickSend and get API Credentials
Go to ClickSend. Sign up, verify your account, then navigate to your dashboard to find your username and API key.
Visual check: You should see your API key listed under the API settings section.
Common mistake: Copying credentials incorrectly or using the wrong API key type.
Step 2: Set Up the ‘Send SMS’ Node with Authentication
In n8n, open the Send SMS HTTP Request node. Under Authentication, choose HTTP Basic Auth. Input your ClickSend username as the username and the API key as the password.
Set the URL to https://rest.clicksend.com/v3/sms/send, and HTTP method to POST. Add a header with Content-Type: application/json.
The JSON body for the message uses expression syntax to dynamically send SMS text and recipient number:
{
  "messages": [
    {
      "source": "php",
      "body": "{{ $json.sms }}",
      "to": "{{ $json.to }}"
    }
  ]
}
Visual check: Ensure the Basic Auth credentials and JSON body preview are correct.
Common mistake: Missing curly braces or incorrect field references in the JSON body.
Step 3: Configure the ‘Set SMS data’ Node
This node statically assigns values for testing. Set two fields:
sms: The message content, for example, “Hi, this is my first message”.to: The recipient’s phone number with international prefix, e.g., “+39xxxxxxxx”.
Visual check: After saving, these should appear as assigned fields in the node’s output.
Common mistake: Forgetting the international ‘+’ prefix or including spaces in the number.
Step 4: Connect the Nodes in Proper Sequence
The workflow sequence is:
- Manual Trigger Node (“When clicking ‘Test workflow’”)
- Set SMS data
- Send SMS
Click and drag connections between output ports and inputs accordingly.
Visual check: The arrows should flow from trigger → set → send nodes.
Common mistake: Skipping the connection or connecting in reverse order causing no message send.
Step 5: Trigger the Workflow Manually
Click the “Execute Workflow” or “Test Workflow” button in n8n.
The manual trigger node activates and passes data through the nodes to send your SMS.
Visual check: Confirm the Send SMS node returns a success response such as HTTP 200.
Common mistake: Running without setting recipient number or API credentials.
Customizations ✏️
- Change the message content dynamically by connecting other nodes (e.g., a Google Sheets node for personalized messages) and mapping the output to the
smsfield in Set SMS data. - Allow bulk messaging by looping through an array of phone numbers and texts, using the HTTP Request node’s ability to handle multiple calls with split-in-batches node.
- Integrate error handling by adding a Function node that analyzes the Send SMS response and triggers alerts or retries on failure.
- Switch to use different authentication methods if ClickSend updates their security, simply by editing the HTTP Request node’s auth settings.
- Add logging by inserting a Google Sheets or database node to store sent message details including timestamps and statuses.
Troubleshooting ????
Problem: “401 Unauthorized” error from Send SMS node
Cause: Incorrect username or API key in Basic Auth.
Solution: Double-check credentials in the HTTP Request node and re-enter them precisely, then save and retest.
Problem: SMS not delivered or incorrect phone number errors
Cause: Phone number missing international prefix or formatted incorrectly.
Solution: Ensure recipient numbers have ‘+’ prefix and no spaces or special characters.
Problem: Workflow runs but no SMS sent, HTTP status other than 200
Cause: Malformed JSON body or headers.
Solution: Verify the JSON structure exactly matches the one provided in the “Send SMS” node, and ensure Content-Type header is set to application/json (no extra spaces).
Pre-Production Checklist ✅
- Verify your ClickSend account has sufficient credits for sending SMS.
- Double-check that API credentials match exactly those provided by ClickSend.
- Test phone numbers with international prefixes and confirm they are deliverable.
- Run multiple test messages to observe the workflow response and ClickSend dashboard for sent message logs.
- Save and version your workflow in n8n for rollback if needed.
Deployment Guide
After successful tests, activate the workflow in n8n by switching the toggle to Active.
Set scheduling options if needed or connect with other event-driven workflows.
Monitor the workflow dashboard for any errors or logs.
Adjust or customize workflow as volume or requirements change.
Conclusion
Using this workflow sends SMS worldwide automatically thanks to ClickSend and n8n.
Users save hours of manual work and avoid typos in numbers or messages.
The flow is simple, testable, and expandable for more features.
Start by importing, configuring API keys, testing, then activating for live use.
Expand next by adding personalized messages, bulk sends, or error handling.
Sending SMS the easy way helps reach customers without extra hassle.
