What this workflow does
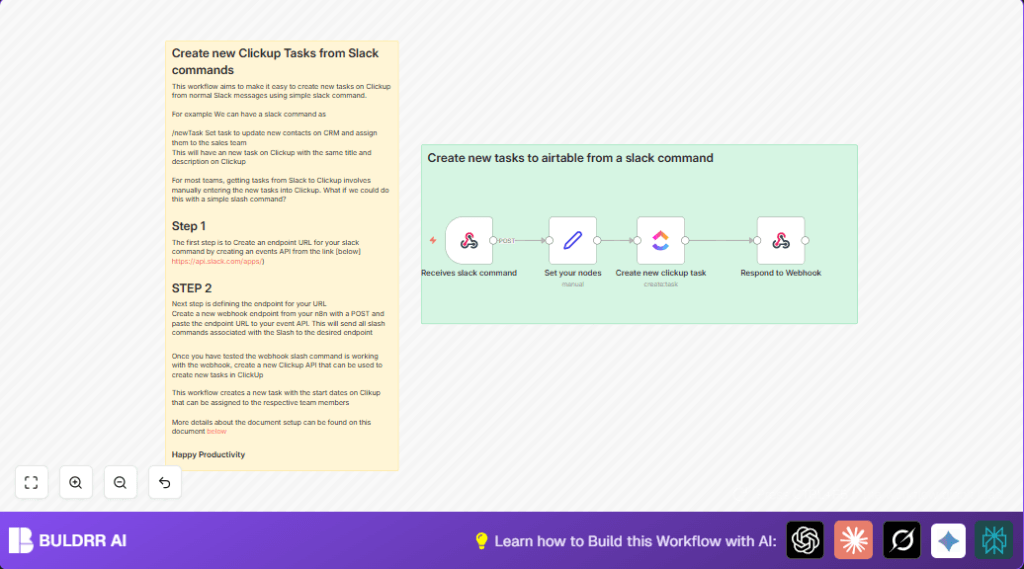
This workflow receives a slash command from Slack and instantly creates a task in ClickUp using the task details given in Slack.
It solves the problem of manually typing tasks into ClickUp, saving time and reducing errors.
The output is a new task in ClickUp and a message back in Slack confirming the task ID.
Tools and services used
- Slack: Enables slash commands to trigger workflows.
- ClickUp API: Creates tasks programmatically via an API call.
- n8n Workflow Automation: Handles receiving Slack data, processing it, and calling ClickUp.
Inputs, Processing, and Output
Inputs
This workflow takes input from a Slack slash command including:
- Task name and description typed after the command.
- Slack user and channel information.
Processing Steps
1. The Webhook node receives the Slack slash command payload.
2. The Set node extracts main fields like channel name, user name, command, and text (task details).
3. The ClickUp node uses the extracted text to create a new task on a specified ClickUp list and space.
4. The Respond to Webhook node sends confirmation back to Slack with the new task’s ID.
Output
A new task created in ClickUp with the Slack text as its title and content.
A message sent back to Slack confirming creation, showing the task ID.
Who should use this workflow
Any team or user who uses Slack for communication and ClickUp for task management.
It is especially helpful for users who create many tasks from Slack messages and want to save time on manual entry.
Beginner step-by-step: How to use this workflow in n8n
Step 1: Import the workflow
- Download the available workflow file from this page.
- Go to your n8n editor and select “Import from File”.
- Upload the downloaded workflow file.
Step 2: Configure credentials and IDs
- Set up Slack credentials or API keys needed to receive slash commands.
- Add the ClickUp OAuth2 credentials in n8n Credentials settings.
- Update the ClickUp node configuration with your correct Team ID, Space ID, and List ID.
Step 3: Update Slack slash command
- Copy the webhook URL from the Webhook node.
- Paste this URL in the Slack slash command settings as the Request URL.
Step 4: Test the workflow
- Run the workflow manually or invoke the slash command in Slack with sample task details.
- Check that a task appears in ClickUp and a confirmation returns in Slack.
Step 5: Activate for production
- Turn on the workflow by toggling its active switch in n8n.
- Ensure Slack users have access to the slash command.
For users hosting n8n themselves, ensure correct public access and SSL so Slack can reach your webhook. See self-host n8n if needed.
Customization ideas
- Add user IDs in the ClickUp node assignees field to automatically assign tasks.
- Extend ClickUp node settings with start or due dates parsed from Slack text.
- Change the confirmation message in Respond to Webhook node to show task link or assignee details.
- Log Slack commands to Google Sheets or Airtable for tracking by adding extra nodes after the Set node.
- Use conditional nodes to route tasks to different ClickUp lists based on keywords in the Slack message.
Common edge cases and troubleshooting
Issue: Slack commands do not trigger workflow
Cause: Slack slash command URL or method is wrong.
Fix: Verify Slack slash command Request URL matches your Webhook node URL exactly including HTTPS and path.
Issue: ClickUp task creation fails with authorization error
Cause: ClickUp OAuth2 credentials expired or wrong.
Fix: Re-authenticate OAuth2 credentials inside n8n and retest.
Issue: User in Slack does not get confirmation message
Cause: Misconfigured Respond to Webhook node or response mode.
Fix: Make sure response mode is enabled and template uses {{ $json.id }} properly in response text.
Summary of results
✓ Slash commands from Slack create ClickUp tasks automatically
✓ Manual data entry errors are reduced
✓ Task creation is confirmed immediately back in Slack
✓ Workflow can be customized for assignments, dates, and logging
→ Saves hours weekly by automating Slack-to-ClickUp task creation
