What This Automation Does
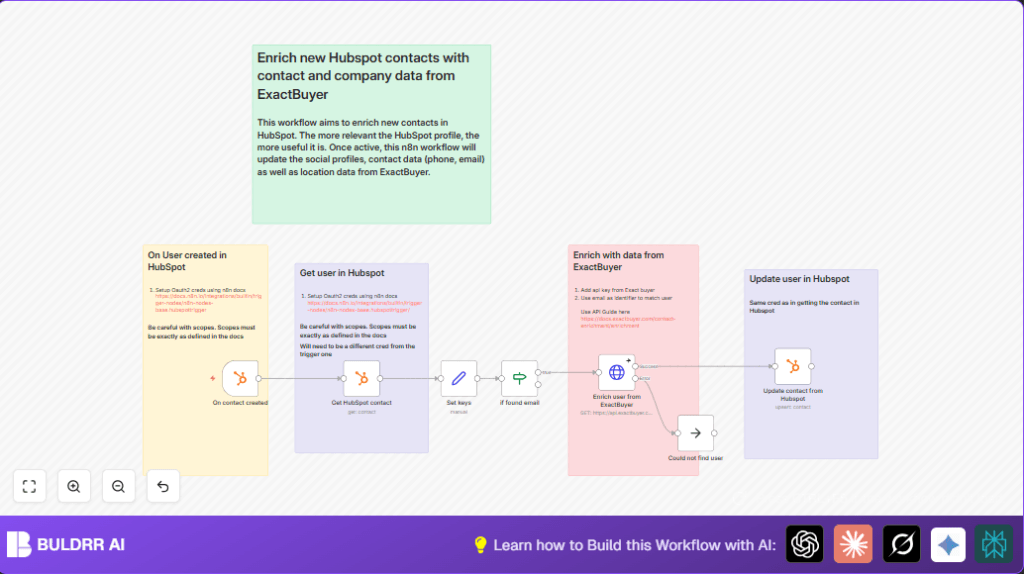
This workflow watches for new contacts created in HubSpot.
It then gathers basic info like email and contact ID.
Next, it calls the ExactBuyer API to add details like job title, phone, and social profiles.
After that, it updates the HubSpot contact with this new data.
This saves many hours of manual work and makes contact info better for marketing and sales.
How This Workflow Works: Input → Process → Output
Input
- New contact creation event in HubSpot triggers the workflow.
Processing Steps
- HubSpot Trigger node detects the new contact.
- HubSpot Get Contact node fetches full contact details using the contact ID.
- Set node extracts user ID (VID) and email from the response.
- If node checks if email exists; only continuing if it is present.
- HTTP Request node calls ExactBuyer API with the email to get extra info.
- HubSpot Update Contact node writes enriched data back to HubSpot.
- NoOp node handles errors if ExactBuyer does not respond, so workflow continues smoothly.
Output
- HubSpot contact updated with job title, phone, company size, social links, and other enrichments.
- Error handling maintains workflow stability, avoiding crashes.
Who Should Use This Workflow
This workflow fits people who use HubSpot for marketing and sales.
If there are many new contacts each week but trouble keeping data complete and useful, this helps save time.
It is good for teams wanting up-to-date contact info automatically added without manual work.
Tools and Services Used
- HubSpot API with OAuth2: To track new contacts and update them.
- ExactBuyer API: To enrich contacts with external data.
- n8n Automation: Platform to build and run the workflow.
- Optional Self-host n8n: For managing workflows on your own server, see self-host n8n.
Beginner Step-by-Step: How to Use This Workflow in n8n
Importing the Workflow
- Download the workflow file by clicking the Download button on this page.
- In your n8n editor, click on the main menu and select Import from File.
- Choose the downloaded workflow file and open it. The workflow will load into your editor.
Setting Up Credentials and Configurations
- Add your HubSpot OAuth2 credentials in the HubSpot Trigger and HubSpot Get Contact nodes.
- Enter your ExactBuyer API key in the HTTP Request node’s authentication settings.
- Update any IDs, emails, or fields in the Set and Update nodes if you use custom properties.
Testing and Activating Workflow
- Create a test contact in HubSpot to trigger the workflow once.
- Watch the workflow run in n8n and check that the contact is updated with new info.
- Turn the workflow’s toggle to ON to activate it for live use.
- Make sure your n8n instance keeps running to catch all new contacts.
Customizations
- Change the required parameter in the HTTP Request node to add or remove enrichment fields like social media or company details.
- Add more mappings in the HubSpot Update Contact node to store extra company profile data if available.
- Connect the error output to an email node to get alerts if ExactBuyer API enrichment fails instead of silently ignoring errors.
- Adjust JSON path expressions in the Set node if using non-standard email fields in HubSpot.
Troubleshooting
- 401 Unauthorized from ExactBuyer API: Check ExactBuyer API key in HTTP header authentication in the HTTP Request node.
- HubSpot Trigger not firing: Make sure webhook URL is correct and contact creation events are enabled in HubSpot developer settings.
- Incomplete contact updates: Verify JSON paths in data mapping from ExactBuyer response to HubSpot fields.
- Workflow stops on error: Confirm error output connects to a NoOp node or alternative to keep running.
Pre-Production Checklist
- Confirm HubSpot OAuth2 credentials have permissions for reading and writing contacts.
- Test ExactBuyer API key using a REST client to check access first.
- Create a new HubSpot contact to check if the workflow triggers properly.
- Use n8n’s debug mode to review data flow and catch errors before activating.
- Save a backup copy of the workflow’s JSON file before enabling in production.
Deployment Guide
After testing, activate the workflow by toggling the ON switch in your n8n editor.
Keep your n8n environment running so results happen automatically whenever new contacts are made.
Check execution logs regularly and add email or Slack notification nodes to inform team members on failures.
Summary
✓ Quickly adds full contact info from ExactBuyer to HubSpot contacts.
✓ Saves many hours of manual updating every week.
✓ Keeps CRM data cleaner, improving marketing and sales actions.
→ The workflow listens to new HubSpot contacts, fetches baseline info, enriches data with ExactBuyer, and updates contacts automatically.
