What this workflow does
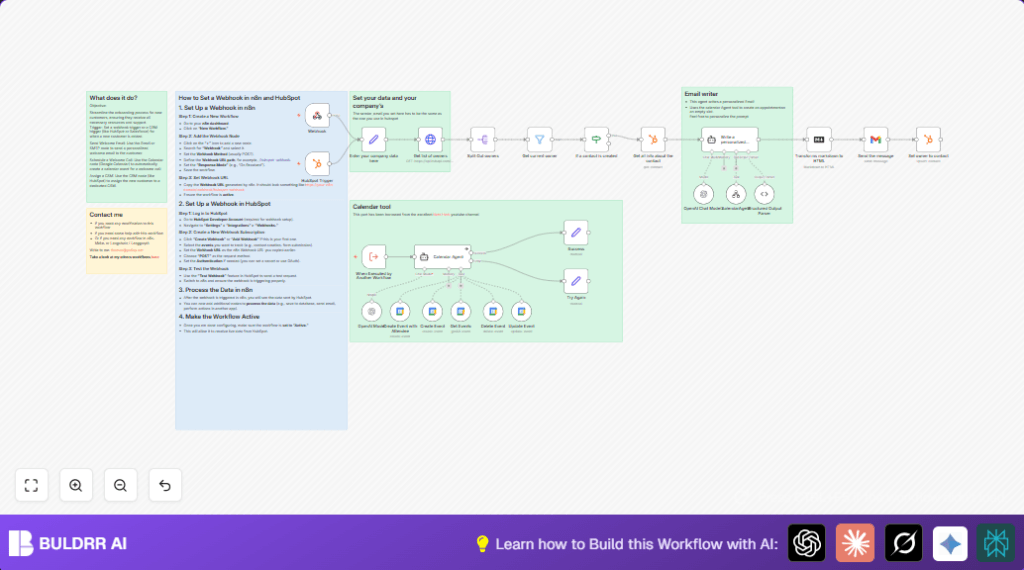
This workflow automates customer onboarding triggered by new contacts in HubSpot. It sends a personalized welcome email, schedules a welcome call on Google Calendar, and assigns the correct Customer Success Manager automatically. This removes manual work and mistakes, saving hours per 10 customers and improving customer experience.
The workflow starts when HubSpot sends new contact data via a Webhook node. It fetches contact details using a HubSpot node. Then it uses an AI Langchain agent to write a custom welcome email and set a meeting in Google Calendar using Google nodes. Finally, it updates HubSpot to assign the right manager and emails the customer through Gmail.
Who should use this workflow
This is for teams using HubSpot CRM who want to save time on onboarding new clients. It fits Customer Success Managers who send welcome emails and schedule calls manually. Businesses wanting to avoid errors and delays in onboarding will benefit most.
Users must have basic n8n experience and accounts on HubSpot, Google Calendar, Gmail, and OpenAI API access. It suits those looking to automate repetitive CRM tasks and improve speed and accuracy.
Tools and services used
- HubSpot API: Triggers on new contact creation and provides contact details.
- Google Calendar API: Creates and manages calendar events for welcome calls.
- Gmail API: Sends personalized welcome emails with BCC tracking.
- OpenAI API (Langchain Agent): Generates email text and schedules meeting requests.
- n8n: Orchestrates the workflow nodes and manages data flow.
Inputs, processing steps, and outputs
Inputs
- New contact creation event from HubSpot via the Webhook node.
- OAuth credentials for HubSpot, Google Calendar, Gmail, and OpenAI API.
- Company info set manually in Set node.
Processing Steps
- Fetch full contact info from HubSpot using contact ID.
- Request list of HubSpot owners. Filter owner matching sender email.
- Validate event type is contact creation to proceed.
- Use Langchain agent to produce a personalized email and schedule call instructions.
- Convert AI email output from Markdown to HTML.
- Create Google Calendar event for welcome call via Google nodes.
- Send the welcome email through Gmail with BCC for monitoring.
- Update contact owner in HubSpot dynamically.
- Handle success or retry on failure with appropriate messages.
Outputs
- A personalized welcome email sent to the new contact.
- A scheduled meeting on Google Calendar shared with customer and sender.
- Contact owner assigned in HubSpot CRM.
- Internal monitoring email archive of outgoing messages.
Beginner step-by-step: How to use this workflow in n8n
Importing the Workflow
- Download the workflow file using the Download button on this page.
- In your n8n editor, click on the menu, select “Import from File,” and choose the downloaded workflow file.
Setup Credentials and Configuration
- Add all required credentials: HubSpot OAuth, Google Calendar OAuth, Gmail OAuth, and OpenAI API Key in the n8n Credentials area.
- In the Set node named for company info, update the sender name, sender email, and company name to your actual data.
- If needed, update any calendar IDs or email addresses used for BCC within the Gmail node.
Testing the Workflow
- Trigger a test new contact creation event in HubSpot or send test data to the Webhook node.
- Watch the workflow run and check logs. Confirm the email sends and calendar event appears.
Going Live
- When testing works, activate the workflow by toggling the active switch in your n8n dashboard.
- Monitor future runs to ensure smooth operation.
- For better control or security, consider self-host n8n.
Customization ideas
- Change the Google Calendar account by updating OAuth credentials in all Google nodes.
- Edit the Langchain agent prompt to change email tone, add FAQs, or other instructions.
- Add SMS notifications after sending email using SMS nodes for extra touchpoints.
- Extend the If node to cover more HubSpot event types like contact updates or form submissions.
Handling errors and failures
- If HubSpot trigger does not fire, check event subscription type and OAuth tokens.
- For Google Calendar event creation issues, verify calendar ID and OAuth permissions.
- If Gmail emails fail, re-authenticate Gmail node and check message parameters.
- Use Set nodes named “Success” and “Try Again” to manage retry logic and responses.
Summary of benefits and results
✓ Saves over 3 hours per 10 new customers by automating onboarding tasks.
✓ Prevents errors and missed client outreach by automating emails and calendar schedules.
✓ Improves customer satisfaction with timely, personalized welcome messages and calls.
✓ Frees Customer Success Managers to focus on high-value tasks rather than manual coordination.
