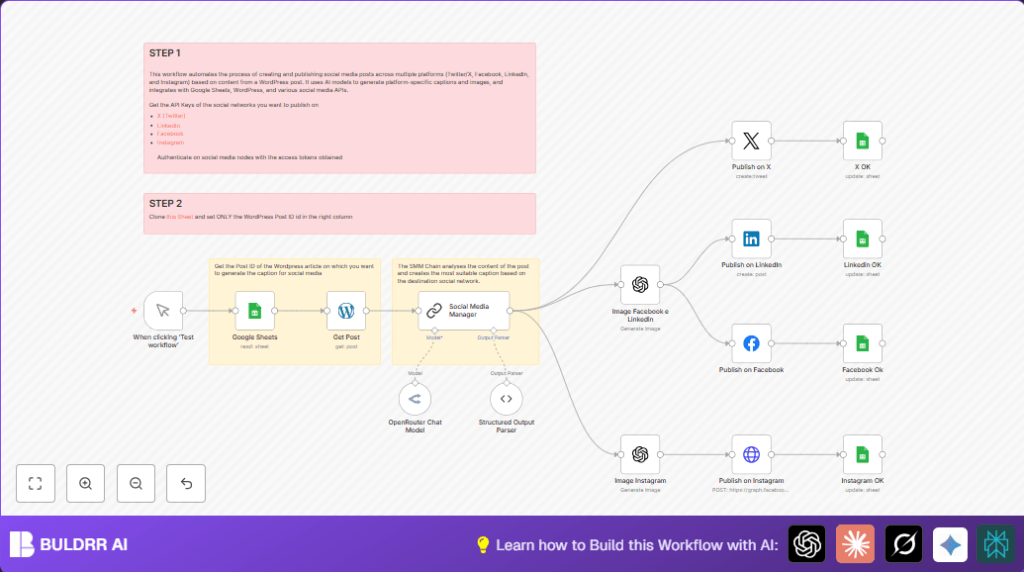
1. Opening Problem Statement
Meet Sara, a digital marketing specialist managing social media for a rapidly growing tech company. Every week, Sara spends several hours manually crafting and tailoring social media posts for X (formerly Twitter), Facebook, LinkedIn, and Instagram based on new WordPress blog content. She juggles multiple styles, tones, and formats to engage distinct audiences on each platform. Despite her hard work, the process is time-consuming, repetitive, and prone to errors and inconsistency. Missing hashtags, scheduling errors, and out-of-sync content often lead to decreased engagement and lost marketing opportunities.
Imagine how much time, energy, and revenue Sara could save if she automated this entire process, including creating platform-specific captions and images specifically tailored to each social network’s audience and style, all triggered right from her WordPress content. This workflow takes that complex, multi-step routine and turns it into a seamless, reliable automation with n8n and AI.
2. What This Automation Does
This unique n8n workflow automates social media content publishing by connecting WordPress posts to tailored AI-generated content and images for multiple platforms. When you run this workflow, here’s what happens:
- Fetch WordPress post content: Retrieves the exact blog post content by its Post ID from your WordPress site.
- Generate platform-specific social posts: Uses OpenRouter’s AI model to create engaging, audience-optimized captions for Twitter (X), Facebook, LinkedIn, and Instagram, following each platform’s best practices.
- Create custom images with OpenAI: Produces unique images for Instagram and for Facebook/LinkedIn tailored to their ideal sizes and presentation styles.
- Publish posts automatically: Posts the generated text and images directly on each social media platform via their APIs.
- Update Google Sheets log: Marks each post as published in a Google Sheets document to track publishing status and content.
- Maintain consistency and quality: Ensures all posts reflect a professional tone aligned with company branding and engagement strategies.
Thanks to this automation, marketing teams save hours per post cycle, reduce human errors, and maintain a consistent brand voice across platforms effortlessly.
3. Prerequisites ⚙️
- n8n account with workflow execution access
- WordPress account with API access to fetch posts
- Google Sheets account connected via OAuth2 for managing post metadata and status tracking 📊
- OpenRouter account for access to advanced language models 🔑
- OpenAI account for AI image generation 🔐
- Social media API access tokens for:
- X (Twitter) API (OAuth2 authentication) 📧
- LinkedIn API 🔑
- Facebook Graph API 📧
- Instagram (via Facebook Graph API) 📧
Optionally, you can self-host n8n for better control and privacy. Learn more about self-hosting options at Hostinger.
4. Step-By-Step Guide
Step 1: Trigger Workflow Manually
Navigate to your n8n editor and start by clicking When clicking ‘Test workflow’ node. This manual trigger allows you to test or execute the workflow on-demand without needing an external event.
Common mistake: Forgetting to trigger the workflow manually for the first run.
Step 2: Connect to Google Sheets and Fetch Post ID
Your Google Sheets node is configured to look up a WordPress Post ID from a sheet named “Social Media post” (sheetId: 1suPQNdgoAzrklleN4ok2mZnsq0GK1dt59oIHv8JWX5U). In the sheet, enter the WordPress post ID in the designated column to identify the content to process.
Navigate to the Google Sheets node → Select your connected Google Sheets credential → Confirm the document and sheet name match the template.
Expected: The row with the WordPress post ID will be fetched.
Common mistake: Using an incorrect Post ID or sheet permissions not granted.
Step 3: Retrieve WordPress Post Content
The Get Post node uses the WordPress API with the postId parameter dynamically set to the ID fetched from Google Sheets. This node pulls the full content of the post including title and body HTML.
Navigate the Get Post node → Enter your WordPress API credential → Confirm the postId is configured as {{$json['POST ID']}}.
Outcome: You obtain complete WordPress post data ready for content creation.
Common mistake: API credentials missing or incorrect post ID leading to retrieval failure.
Step 4: Generate Social Media Content with OpenRouter AI
In the Social Media Manager node, an AI prompt integrates the WordPress title and content to create tailored captions for each platform. The prompt includes best practice instructions for tone, hashtags, content length, and call to actions customized for LinkedIn, Instagram, Facebook, and X (Twitter).
Navigate the Social Media Manager AI node → Ensure OpenRouter credentials are set → Check the prompt includes the variable interpolation of WordPress post title and content.
Expected result: AI outputs JSON with fields: twitter, facebook, linkedin, instagram.
Common mistake: Improper variable reference resulting in incomplete prompts and suboptimal text.
Step 5: Parse AI Output to Structured Format
The Structured Output Parser node sets a schema for the AI-generated data to be parsed into structured fields: twitter, facebook, linkedin, instagram. This ensures consistent output for the next nodes.
Open the Structured Output Parser node → Confirm the JSON schema matches platform fields.
Outcome: Workflow has clear, structured social post texts.
Step 6: Generate Images for Instagram
The Image Instagram node uses OpenAI’s image generation API with the Instagram caption prompt to create a unique 1024×1024 image URL for Instagram posts.
Node settings → Resource: image → Size: 1024×1024 → Prompt set dynamically to {{$json.output.instagram}}.
Expected: An image URL returned for Instagram publishing.
Step 7: Generate Images for Facebook and LinkedIn
Similarly, the Image Facebook e Linkedin node generates an image sized 1792×1024 based on the Facebook caption prompt.
This image suits the typical post style for Facebook and LinkedIn.
Outcome: Image data ready for Facebook and LinkedIn publishing.
Step 8: Publish on X (Twitter)
The Publish on X node posts the AI-generated Twitter caption to X using OAuth2 credentials.
Set the text field to {{$json.output.twitter}} and confirm your account connection.
Outcome: Your tweet goes live automatically.
Step 9: Update X Post Status in Google Sheets
X OK node is triggered next to mark the tweet as published. It updates the ‘TWITTER’ column with ‘x’ for the corresponding row using the row_number.
This helps track published content to avoid duplicates.
Step 10: Publish on LinkedIn
The Publish on LinkedIn node takes the LinkedIn caption and image, posting as an organization. It uses LinkedIn API credentials to send the content with proper media category.
Confirm the text input is set dynamically from Social Media Manager output linkedin field.
Step 11: Update LinkedIn Post Status in Google Sheets
Similar to X update, the Linkedin OK node updates the ‘LINKEDIN’ column in Google Sheets to show publishing success.
Step 12: Publish on Facebook
Facebook post is created via the Facebook Graph API Photos edge, attaching the photo and message with link to the original post.
Ensure credentials and page node ID are configured correctly.
Step 13: Update Facebook Post Status in Google Sheets
The Facebook OK node flags the Facebook column with ‘x’ in the sheet, tracking status.
Step 14: Publish on Instagram
Instagram post publishing is done through an HTTP Request node to Facebook Graph API’s Instagram endpoint, linking image URL and caption.
Set the request with POST method, query parameters for image_url and caption, and ensure Facebook credentials.
Step 15: Update Instagram Post Status in Google Sheets
Instagram OK node updates the sheet marking Instagram post as done using the same row number.
5. Customizations ✏️
- Change AI model or prompt: In the OpenRouter Chat Model node, switch the language model or enhance prompt content for different writing styles or audiences.
- Add more social networks: Use additional social media nodes compatible with their APIs, then expand the Social Media Manager prompt and output parser schema.
- Modify image size or prompt: In the Image Instagram or Image Facebook e Linkedin nodes, tweak the image size or change your prompt to generate different visual styles.
- Automate trigger: Replace the manual trigger with a webhook or scheduled trigger so posts publish automatically when new WordPress content is detected.
- Use different Google Sheets columns: Adjust Google Sheets nodes to match your custom sheet structure for different metadata.
6. Troubleshooting 🔧
Problem: “Google Sheets API error or No results found”
Cause: Incorrect Post ID in sheet, permission denied, or API quota exceeded.
Solution: Verify your sheet data, permissions, and API limits in Google Cloud Console.
Problem: “WordPress API fetch failed”
Cause: Wrong Post ID, revoked credentials, or connectivity issues.
Solution: Test WordPress API credentials and ensure Post ID is correct. Retry the API call manually.
Problem: “AI prompt output empty or malformed”
Cause: Incorrect prompt variable reference or API key issues.
Solution: Double-check the prompt content, variable names, and OpenRouter API quota or key validity.
Problem: “Social media post fails to publish”
Cause: API token expiry, missing permissions, or API changes.
Solution: Reauthenticate your social media credentials through n8n and check relevant API documentation for updates.
7. Pre-Production Checklist ✅
- Confirm all API credentials (WordPress, OpenRouter, Google Sheets, OpenAI, and social medias) are correctly set and working.
- Test the manual trigger and verify WordPress post data is fetched accurately.
- Check AI generation outputs sensible, platform-tailored posts.
- Verify images are generated with correct sizes and returned URLs or binaries.
- Ensure posts publish successfully and respective Google Sheets columns update after each platform post.
- Backup your WordPress and Google Sheets data before running production jobs.
8. Deployment Guide
Activate this workflow by switching it to Active in the n8n UI after confirming all credentials and test runs succeed.
Consider scheduling this workflow with a cron or webhook trigger to auto-run when new WordPress posts are published.
Monitor execution logs from n8n to catch and resolve any failures promptly.
9. FAQs
Can I use a different AI model than OpenRouter’s Gemini 2.0?
Yes, replace the OpenRouter Chat Model node with another supported AI language model node compatible with n8n.
Does this workflow consume many API credits?
Yes, especially OpenAI image generation and OpenRouter for text generation — monitor usage to avoid unexpected costs.
Is my data safe using these third-party APIs?
Your data is as secure as the API providers guarantee. Use OAuth and keep tokens confidential. Consider self-hosting n8n for greater control.
Can this handle many posts per day?
It depends on API rate limits of the involved services. Increase concurrency or split posts if needed.
10. Conclusion
By following this guide, you’ve set up a powerful, tailored WordPress-to-social-media publishing pipeline using n8n and AI models. This workflow removes hours of tedious manual work, reducing human errors, and ensures professional, engaging social media content across Twitter (X), Facebook, LinkedIn, and Instagram.
Next, consider automating post performance tracking with Google Analytics integration or expanding to include more social channels like Pinterest or TikTok. This automation is a strong foundation for scaling your digital marketing efficiently and effectively. Happy automating!