What This Automation Does
This workflow creates an API endpoint that your FlutterFlow app can call easily.
It solves the problem of manually changing data from the backend to match FlutterFlow’s needs.
When triggered by a GET request, it fetches customer data, puts it into a proper format, and sends it back as JSON for your app to use.
This saves developers time and prevents mistakes in API responses.
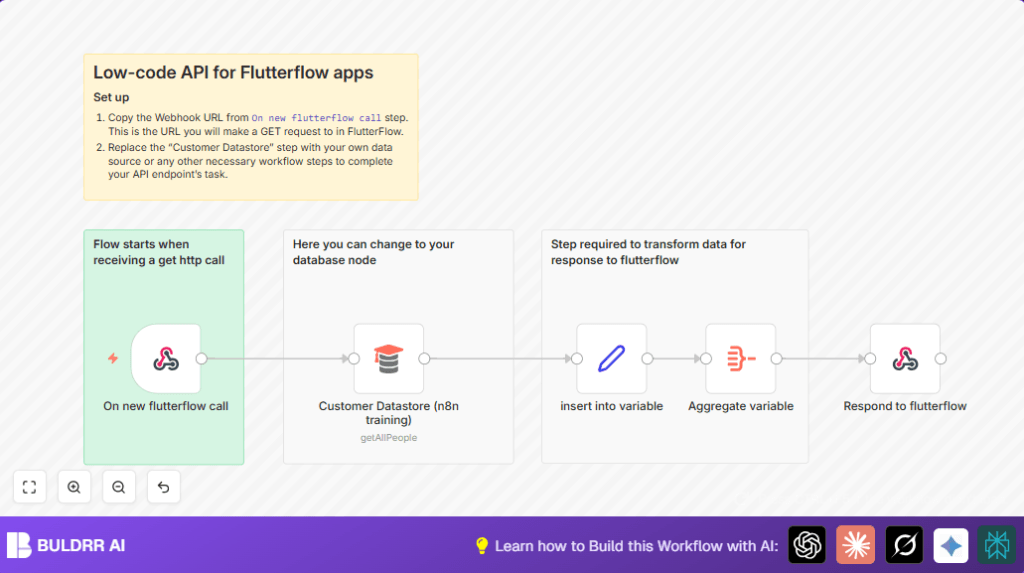
How This Workflow Works
Inputs
- The workflow listens for an HTTP GET request using a Webhook node.
- It gets data from a database or any data source via the configured customer datastore node.
Processing Steps
- The Customer Datastore (n8n training) node fetches all customer records.
- A Set node stores the fetched data into a variable called
studentsfor easier handling. - The Aggregate node combines the data into one JSON array, making it ready for API output.
Output
- The Respond to Webhook node sends back the JSON data to the FlutterFlow app.
This flow gives your app a reliable API that sends exactly the data format FlutterFlow expects.
Why This Workflow Exists
Manually changing API data and handling responses takes time and can cause errors.
This workflow makes the connection between your backend and FlutterFlow much simpler.
It automates data fetching and formatting so you don’t need to fix errors constantly.
This leads to faster app building and fewer bugs.
Tools and Services Used
- n8n Workflow Automation: Runs the workflow and automates tasks.
- Webhook node: Receives requests from FlutterFlow.
- Customer Datastore (n8n training): Sample data source fetching customer info.
- Set node: Holds data in variables.
- Aggregate node: Combines data into the right JSON format.
- Respond to Webhook node: Sends JSON back to FlutterFlow.
Beginner Step-by-Step: How to Use This Workflow in n8n
Import the Workflow
- Click the ‘Download’ button on this page to get the workflow file.
- Open your n8n editor where you already work on automations.
- Use ‘Import from File’ in the editor to add this workflow.
Configure Credentials and Data
- Add or select any needed API Keys or database credentials in n8n.
- Update the customer datastore or data source node to use your real data. If needed, change IDs, emails, channel names, tables, or folders.
Test and Activate
- Run the workflow manually once to check if data fetching and response work.
- Make sure the webhook URL inside FlutterFlow matches the one shown in the Webhook node settings.
- If everything works, switch the workflow to ‘Active’ status to make it live.
You are now ready to use this automated API in production.
For users running n8n on their own servers, useful information about self-host n8n is available.
Common Issues and Solutions
- No response from webhook: Check that the Respond to Webhook node is connected last and set to respond with JSON.
- Empty or bad data from aggregation: Ensure the variable ‘students’ is spelled correctly and passed properly between nodes.
- Webhook URL 404 or wrong data: Confirm the HTTP method (GET by default) matches FlutterFlow and the webhook URL is copied exactly.
Customizations You Can Do
- Replace the Customer Datastore node with your own database node like MySQL or Airtable.
- Switch the webhook to POST if FlutterFlow needs to send data with the request.
- Add a filter node after fetching data to return only certain customers, like active ones.
- Insert a Function node with a simple script to shape the JSON output exactly how the FlutterFlow app wants it.
Summary
✓ Creates a simple API endpoint that matches FlutterFlow’s data needs.
✓ Saves time by automating data fetching and formatting.
✓ Stops manual errors in API responses.
✓ Works with any customer data source after customization.
✓ Easily tested and activated in n8n.
