What This Workflow Does
This workflow manages email subscribers automatically in e-goi using n8n.
It solves the problem of slow, manual subscriber updates and data errors.
The result is faster, more accurate subscriber management without typing or checking by hand.
It creates new subscribers, updates their info, then fetches updated data to confirm changes.
This saves time and reduces mistakes for marketing teams or small businesses using e-goi.
Tools and Services Used
- n8n Automation Platform: Workflow execution and orchestration.
- e-goi Marketing Platform: API to create, update, and get subscriber data.
- e-goi API Credentials: Required to access e-goi securely.
Inputs, Processing, and Output
Input
- Manual trigger to start the workflow.
- Initial subscriber email and basic info like first name.
- e-goi list ID where subscriber will be added.
Processing
- Create subscriber in e-goi list with provided email and details.
- Update subscriber information using contact ID from creation step.
- Retrieve updated subscriber info to verify changes.
Output
- Confirmed subscriber data with updated fields.
- Clear workflow execution logs at each step.
Beginner Step-by-Step: How to Use This Workflow in n8n
Step 1: Import the Workflow
- Download the workflow file using the Download button on this page.
- Open the n8n editor where the workflow runs.
- Select “Import from File” and upload the downloaded workflow.
Step 2: Configure Credentials and Data
- Add your e-goi API Key in the Credentials section inside n8n.
- Check the e-goi list ID in the create and update nodes. Change it if needed.
- Change the example subscriber email and name if you want to test a different contact.
Step 3: Test the Workflow
- Run the workflow manually using the Manual Trigger to check all steps.
- Look at node outputs to confirm subscriber is created, updated, and fetched.
Step 4: Activate for Production
- Turn the workflow switch to “Active” in the editor.
- You can trigger manually or connect to scheduled or event triggers for automatic runs.
If the user hosts n8n on their own server, consider referencing self-host n8n for setup help.
What Happens Inside the Workflow
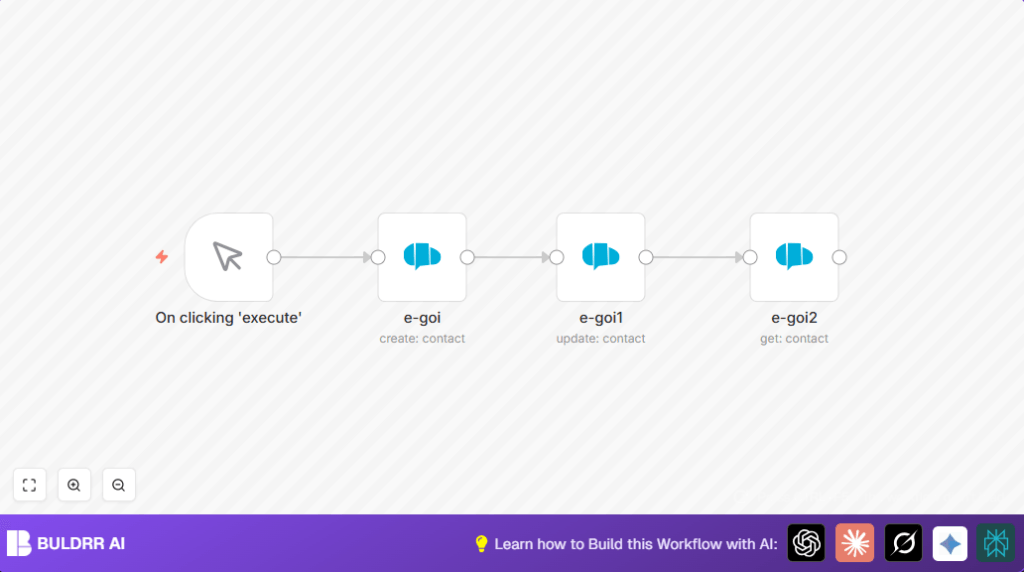
First, a manual action starts the process.
Then, the e-goi node creates a new subscriber using given info and list ID.
Next, a second e-goi node updates the subscriber details using the contact ID from creation.
An expression dynamically pulls the list ID and contact ID from the last node output for accuracy.
Lastly, a third e-goi node gets the updated subscriber to confirm changes.
Outputs show the updated subscriber data.
Customizations and Extensions
- Change or add more subscriber fields like last name, phone number, or tags in the update node.
- Add error-checking nodes to handle problems like failed API calls.
- Include other tools like CRMs or messaging platforms by adding their nodes.
Troubleshooting Common Issues
- API authentication failure: Check e-goi API Key in n8n credentials section.
- Contact ID missing: Ensure the create subscriber node runs without errors and outputs contact ID.
- Wrong list ID: Verify e-goi list ID matches your actual subscriber list.
Pre-Production Checklist
- Confirm e-goi API credentials are valid and authorized.
- Test all nodes separately to catch errors early.
- Verify all dynamic expressions like list and contact IDs pull correct data.
- Backup subscriber list data before running big updates.
Deployment Guide
After testing, activate the workflow by switching it on in n8n.
Use manual or automated triggers depending on needs.
Check execution logs regularly for success and errors.
Fix issues based on those logs.
Summary
✓ Automates subscriber creation and updates in e-goi.
✓ Saves time by removing manual work.
✓ Reduces errors in subscriber data.
✓ Gives clear feedback by retrieving updated subscriber info.
✓ Easy to configure and test with simple steps.
