Is Your Gmail Inbox Out of Control?
Is Your Gmail Inbox Out of Control?
You open Gmail and there it is — 847 unread emails, labels that mean nothing anymore,
important messages buried under newsletters, and that sinking feeling that something
critical slipped through.
This is inbox chaos. And it is not a you problem. It is a systems problem.
Most people spend 20–30 minutes every morning sorting, labeling, and archiving just to
feel like they have a clean slate. By afternoon, the inbox is a mess again.
This n8n Gmail label management workflow solves that at the root. It connects to your
Gmail account via the Gmail API, reads emails sitting under a specific label, removes
that label, and applies a new one — all automatically, on a schedule you control.
Whether you are a freelancer juggling 5 client threads, a VA managing an executive’s
inbox, or a founder who lives in Gmail, this workflow runs silently in the background
and keeps every email exactly where it should be.
Zero inbox chaos. Finally.
What this workflow does
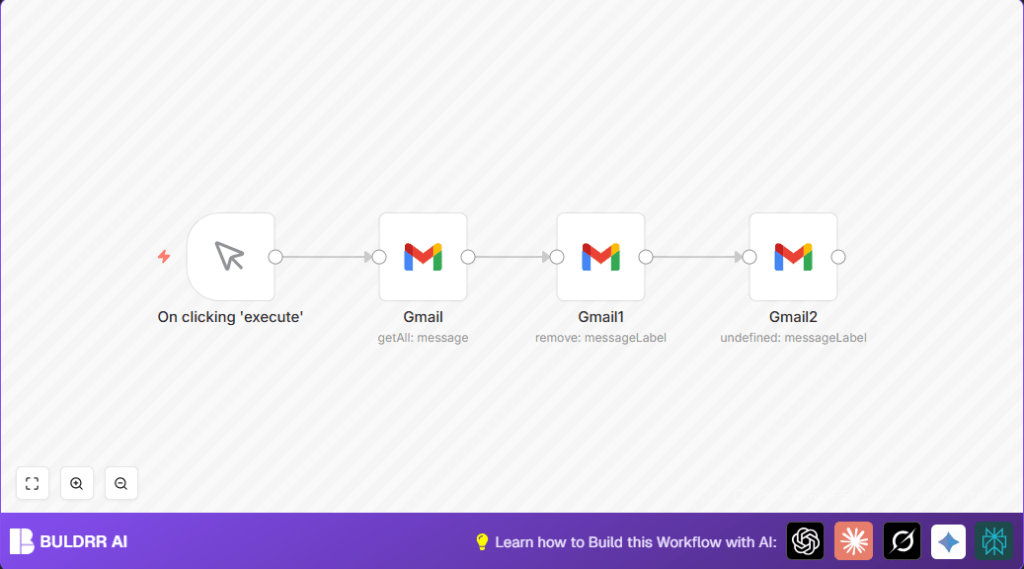
This n8n workflow automates Gmail label management using a simple but powerful
3-step process:
Step 1 — Trigger: The workflow starts with a Manual Trigger node (which you can
swap for a Schedule/Cron trigger to run every hour, every morning, or at any
interval you choose).
Step 2 — Fetch emails: The first Gmail node searches your inbox for all emails
currently sitting under a specific label — for example, “To Review” or “Client:
Pending.” It pulls a list of matching message IDs from the Gmail API.
Step 3 — Relabel: For each email found, the workflow runs two actions:
– Removes the original label (e.g., “To Review”)
– Adds the new label (e.g., “Client: Done” or “Archived”)
The result: emails move from one label to another in seconds, without you
touching a single message.
You can run this manually when needed, or activate it on a schedule so your
inbox self-organizes every few hours. The workflow handles as many emails as
the Gmail API returns per call — and you can add pagination to process
larger batches.
Real example: A virtual assistant managing a founder’s inbox uses this workflow
to move all emails labeled “Needs Reply” to “Replied” every evening at 6 PM.
What used to take 15 minutes of manual sorting now takes 0 seconds.
The Inbox Chaos Problem This Workflow Solves
Labels fill up fast. Emails sit in “To Review” for weeks, client messages get buried under newsletters, and the sorting system you built months ago no longer reflects how you actually work. Gmail’s built-in filters are rigid — they follow rules you set once and can’t keep up when things change.
This n8n workflow runs on a schedule, finds emails sitting in the wrong label, and moves them where they belong — automatically. Your labels stay accurate, your inbox stays clean, and you stop doing it by hand.
Who should use this workflow
This workflow is built for anyone whose Gmail labels get messy faster than
they can clean them up:
Freelancers managing multiple clients: You have labels for each client, but
emails pile up in “To Review” and never get moved. This workflow clears the
backlog automatically.
Virtual assistants and executive assistants: You manage someone else’s inbox
and need emails to flow through stages (Received → In Progress → Done) without
manual drag-and-drop every hour.
Startup founders and solopreneurs: You are too busy to triage email twice a
day. Set this workflow on a schedule and your inbox sorts itself while you work.
Project managers: You use Gmail labels as a lightweight task system. This
workflow moves emails between project stages (New → Active → Closed)
automatically as work progresses.
Customer support teams: Route and re-route support emails between team labels
without logging into Gmail every time someone changes ticket status.
If you currently spend more than 10 minutes a day manually moving emails
between Gmail labels — this workflow is for you.
Tools and services used
- Gmail API via Gmail node: Accesses and changes email labels.
- n8n workflow automation: Runs the process and connects the steps.
- OAuth2 credentials for Gmail: Securely connect n8n to Gmail account.
Beginner step-by-step: How to use this workflow in n8n
Step 1: Download and import the workflow
1. Click the Download Workflow button on this page.
2. Open your n8n editor (local or cloud instance).
3. Go to the top menu → Import → Import from File.
4. Select the downloaded .json file. The workflow will load with all nodes visible.
Step 2: Set up Gmail OAuth2 credentials
5. In n8n, go to Settings → Credentials → Add Credential → Gmail OAuth2.
6. You will need a Google Cloud project with the Gmail API enabled.
7. Copy your Client ID and Client Secret from Google Cloud Console into n8n.
8. Click “Connect” and authorize access to your Gmail account.
9. Save the credential and give it a name you will recognize.
Step 3: Find your Gmail Label IDs
10. Gmail uses internal Label IDs — not the display names you see in the sidebar.
11. To find them: open Gmail → go to Settings → See all settings → Labels.
12. Alternatively, use the Gmail API Explorer at
developers.google.com/gmail/api/reference/rest/v1/users.labels/list
— sign in and it will return a JSON list of all your labels with their IDs.
13. Label IDs look like this: Label_123456789 or INBOX, SENT, etc.
14. Copy the IDs for your “source” label (the one to remove) and
your “destination” label (the one to add).
Step 4: Configure the Gmail nodes
15. Click the first Gmail node → set Resource to “Message” and
Operation to “Get Many.”
16. Under Filters, set Label IDs to your source label ID.
17. Click the second Gmail node → set Operation to “Modify.”
18. In the “Remove Labels” field, add your source label ID.
19. In the “Add Labels” field, add your destination label ID.
Step 5: Test and activate
20. Click “Execute Workflow” to do a test run.
21. Check your Gmail — emails should now carry the new label.
22. If it works, click the Active toggle to turn the workflow on.
23. Optional: Replace the Manual Trigger with a Schedule Trigger node
and set your preferred interval (e.g., every day at 7 AM).
Inputs, processing steps, and output
Inputs
- The label ID to find emails by.
- Gmail OAuth2 credentials.
- The new label ID to apply.
Processing Steps
- Fetch all emails with the given original label.
- For each email, remove the old label.
- Add the new label to each email.
Output
Emails now have the new label instead of the old one.
The inbox is cleaner and better organized.
Edge cases and failures
Common Errors and How to Fix Them
Error: “Invalid Credentials” or “401 Unauthorized”
Your OAuth2 token has expired or been revoked. Go to n8n Settings →
Credentials → find your Gmail credential → click Reconnect. Re-authorize
with Google and save. This usually happens if you change your Google
account password or revoke app permissions.
Error: “Label ID not found” or “400 Bad Request”
The Label ID in your node does not match any label in your Gmail account.
Double-check by calling the Gmail API Labels list endpoint. Remember:
label names like “To Review” are not the same as Label IDs like
“Label_3456789012.” They must match exactly.
Issue: Only some emails are processed, not all
Gmail API returns a maximum of 100 messages per request by default.
If you have more than 100 emails under a label, turn on “Return All” in
the Gmail node settings, or run the workflow multiple times.
The Gmail API rate limit is 250 quota units per second per user —
this workflow uses approximately 2–3 units per email processed,
so batches of up to 80 emails run safely in one execution.
Issue: Workflow runs but nothing changes in Gmail
Check that your OAuth2 credential has the gmail.modify scope enabled
(not just gmail.readonly). If it was set up with read-only access,
re-create the credential with full Gmail access.
Issue: New label appears but old label is not removed
This means Node 2 (add label) succeeded but Node 3 (remove label) failed.
Check the execution log in n8n — look for a red error on the Modify node
and read the exact API error message. Usually a wrong Label ID or a
permission scope issue.
Ideas for customization
- Change label IDs to move emails between any labels you want.
- Switch the manual trigger to a Cron trigger for automatic runs.
- Add filters in Gmail nodes for sender or subject to move only certain emails.
- Add a Slack or Email node after to notify you if any errors happen.
- Use pagination settings to handle many emails in one run.
For hosting the workflow on your own server, see helpful resources on self-host n8n.
What Zero Inbox Chaos Actually Feels Like
When this workflow is running, something shifts.
You stop dreading opening Gmail. Labels stay accurate without you touching them. Emails land where they belong — clients in the client folder, newsletters in the newsletters folder, team messages in the right project label.
The mental overhead of a chaotic inbox disappears. You spend that time on actual work instead of email triage.
That is the real value of automating Gmail label management with n8n — not just the technical convenience, but the daily calm of knowing your inbox is handled.
Real-World Example: How a VA Uses This Workflow
Maya manages email for a 3-person SaaS startup. Every day, the founder
receives 60–80 emails that need to be triaged across four labels:
“New,” “In Progress,” “Replied,” and “Archive.”
Before this workflow: Maya spent 20 minutes every morning and 15 minutes
every evening manually dragging emails between labels in Gmail.
That is 2.5 hours per week — just on label management.
After setting up this n8n workflow with a Schedule Trigger running at
8 AM and 6 PM daily: the inbox auto-sorts itself. Maya’s manual label
time dropped to zero. She now uses those 2.5 hours for actual
client communication and task follow-ups.
Setup time: 25 minutes.
Time saved per week: 2.5 hours.
Cost: Free (n8n self-hosted on a $4/month server).
Summary
✓ Saves 2–10 hours weekly by automating Gmail label sorting
✓ Zero manual errors — labels are applied consistently every time
✓ Works on a schedule — inbox organizes itself while you sleep
✓ Fully customizable — change label IDs, add filters, connect Slack alerts
✓ Free to use — n8n self-hosted + Gmail API free tier
✓ Safe — no emails are deleted or modified, only labels change
✓ Works with Gmail, Google Workspace, and Gmail aliases
