What this workflow does
This workflow takes form submissions from Webflow and sends message notifications to specific Slack channels.
It stops the need to sort form data manually.
If a matching Slack channel does not exist, it makes one automatically.
You get a neat Slack message showing form answers in the right channel fast, every time.
Who should use this workflow
This is for people who manage many Webflow forms and want to keep teams updated in Slack.
It suits community managers, event coordinators, or anyone with several online forms needing quick Slack alerts.
It stops lost or late messages and makes sure the info reaches the right team.
Tools and services
- n8n: Runs the automation workflow.
- Webflow API V1: Sends form submissions to n8n.
- Slack Bot OAuth Token: Creates channels and posts messages.
- Slack Block Kit: Formats messages nicely in Slack.
Input → Processing → Output
Input
The input is a form submission from Webflow containing form name and data fields.
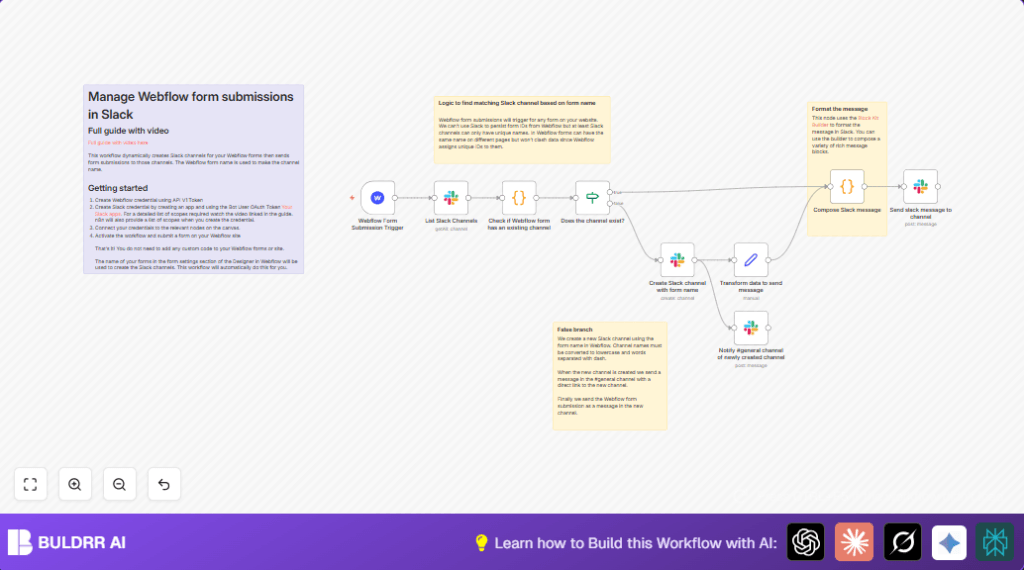
Processing
- The workflow triggers from a new Webflow form submission.
- It gets a list of all Slack channels.
- It checks if there is a Slack channel with a name matching the form’s name (lowercase and hyphenated).
- If no channel found, it creates one with the transformed form name.
- It formats the form data into a Slack Block Kit message.
- Sends the message to the matched or newly created Slack channel.
- Also sends a notification message to the #general Slack channel if a new channel was created.
Output
A Slack message listing form answers posts in the correct Slack channel fast.
The team sees form submissions clearly grouped by channel, and admins get notices when new channels spawn.
Beginner step-by-step: How to use this workflow in n8n production
Step 1: Import the workflow
- Download the workflow file using the Download button on this page.
- Open the n8n editor where workflows are managed.
- Click to import the workflow using the “Import from File” option.
Step 2: Configure credentials and settings
- Set up your Webflow API V1 Token in n8n Credentials.
- Configure Slack Bot OAuth Token with required permissions.
- Check and update IDs, emails, channels, or table settings in the nodes if your workspace needs it.
- Paste code snippets if needed from the provided code blocks in nodes directly.
Step 3: Test the workflow
- Submit a test Webflow form to send data to n8n.
- Watch for a Slack message to appear in the correct or newly created channel.
Step 4: Activate the workflow for production
- Once testing looks correct, switch the workflow to active mode.
- Keep n8n running live on server or self-host n8n to listen to webhook calls.
Now all live form submissions post automatically in Slack according to the workflow logic.
Inputs and outputs explained
The workflow input comes from Webflow’s form submission webhook.
The output is a formatted Slack message posting to a specific Slack channel matching the form name.
Handling edge cases and errors
When Slack does not allow channel creation due to missing permissions, the workflow fails with a scope error.
Check Slack app scopes like channels:manage and chat:write to fix this.
If the Webflow trigger does not start, the webhook might be inactive or the wrong site selected in the trigger.
Verify your webhook URL and settings in Webflow.
Customization ideas
- You can change the Slack message formatting code to add buttons, images, or links.
- Adjust the channel naming scheme by modifying the code that transforms form names.
- Change the notification channel from #general to another Slack channel or direct message a user.
- Add extra nodes to save form data to Google Sheets or a database alongside Slack.
Summary and results
✓ Saves time by automating Webflow form message routing into Slack.
✓ Avoids missed submissions by immediate Slack notifications.
✓ Creates new Slack channels automatically when needed.
✓ Gives clear Slack messages showing all form answers in one place.
✓ Keeps the whole team updated with #general notifications.
✓ Easy to set up using the ready-to-import workflow in n8n.
