What this workflow does
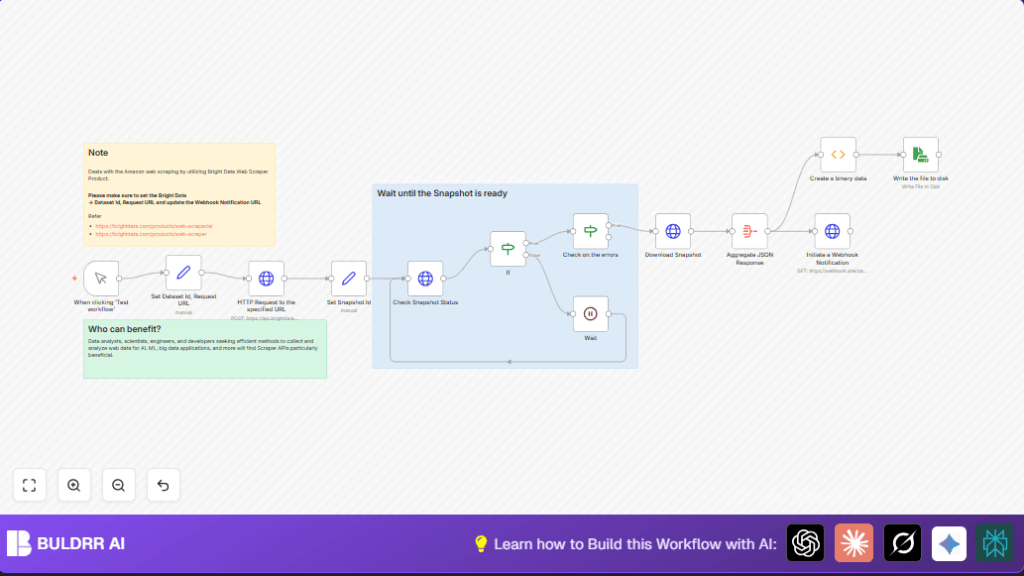
This workflow automates bulk product data extraction from Amazon using the Bright Data Web Scraper API inside n8n.
It solves the problem of slow, manual scraping by triggering data snapshots, checking progress, downloading results, and saving data automatically.
The final result is a ready JSON file containing structured product data and a webhook notification that can trigger other processes.
Who should use this workflow
Anyone who needs fast, repeatable, and reliable bulk extraction of ecommerce product data.
This suits data analysts, market researchers, and automation users wanting to avoid manual scraping or costly data buying.
The workflow helps reduce errors, save time, and deliver fresh, clean data regularly.
Tools and services used
- n8n: Workflow automation platform to build and run the process.
- Bright Data: Web scraping service providing snapshot APIs for bulk dataset extraction.
- HTTP Header Authentication: Used in n8n to securely access Bright Data APIs.
- Local file system: Where the output JSON file is saved for future use.
Inputs, processing steps, and outputs
Inputs
- Bright Data dataset ID (such as gd_l7q7dkf244hwjntr0).
- List of product URLs formatted as a JSON array.
- API authentication credentials stored in n8n.
Processing Steps
- Send a POST request to Bright Data to trigger a new snapshot extraction with the dataset ID and URLs.
- Save the returned snapshot ID for monitoring.
- Poll Bright Data snapshot status every 30 seconds until the status is ‘ready’.
- Check for zero errors in the snapshot data before downloading.
- Download the complete snapshot JSON dataset using the snapshot ID.
- Aggregate the JSON items for easy usage.
- Send a webhook notification with the aggregated data.
- Convert JSON to base64 binary data for file saving.
- Write the binary JSON file to disk at specified local path.
Outputs
- A JSON file named ‘bulk_data.json’ saved on the local disk.
- A webhook push containing the extracted product data.
Beginner step-by-step: How to run this workflow in n8n
Import and setup
- Download the workflow file using the Download button on this page.
- Open the n8n editor and select Import from File to load the workflow.
- Go to the credentials section and add your Bright Data API Key using HTTP Header Auth.
- Open the Set Dataset Id, Request URL node and replace the dataset_id and URLs with your own.
Test and activate
- Run the workflow manually with the Manual Trigger node to test everything.
- Check if the workflow triggers the snapshot, polls correctly, downloads data, and saves the file.
- If the test works, switch the workflow toggle to activate it for production.
For self hosting n8n, use self-host n8n to have full control over file saving and credentials.
Handling edge cases and errors
- If the snapshot status never changes to ready, increase the wait time between polls or check the Bright Data dashboard manually.
- For 401 Unauthorized errors, verify the Bright Data API credentials in n8n’s credential settings.
- If file writing fails, confirm that n8n has correct permission to write on the chosen file path, and the folder exists.
Customization ideas
- Change the dataset ID and product URLs inside the Set Dataset Id, Request URL node to scrape different products.
- Modify the polling interval in the Wait node to adjust how often the workflow checks snapshot readiness.
- Replace the webhook URL in the Initiate a Webhook Notification node with a custom endpoint.
- Update the Create a binary data node if different file formats like CSV are needed.
- Extend error checks in the If nodes to handle more error cases.
Summary of results
→ Saves hours by automating bulk Amazon product data extraction.
→ Reduces manual errors with automated status checking and error handling.
→ Provides fresh, structured JSON files ready for analysis or use in AI pipelines.
✓ Sends data via webhook to enable downstream integrations.
✓ Supports easy customization for datasets, URLs, timing, and output format.
