What this workflow does
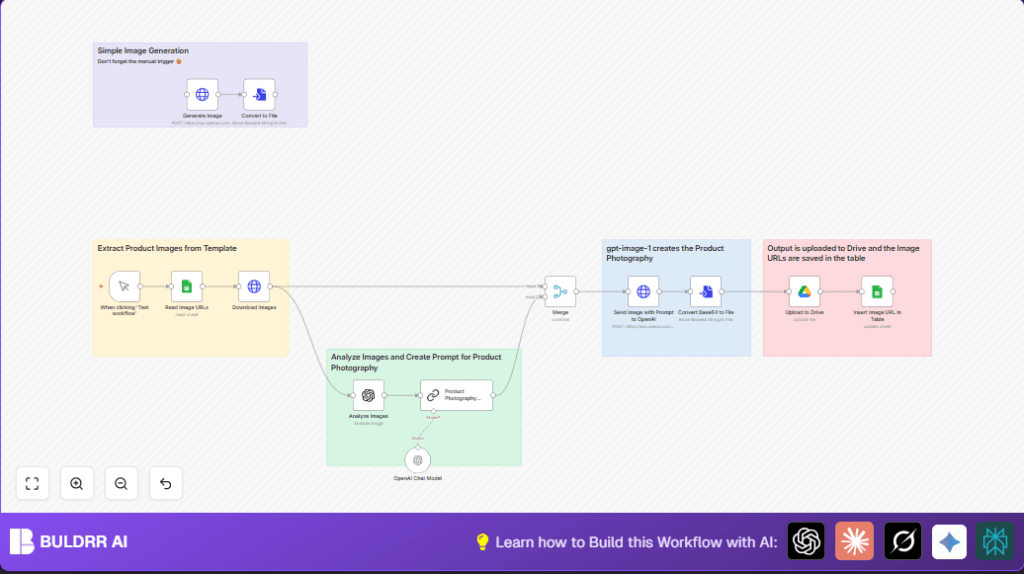
This workflow reads product image URLs from a Google Sheets file. It downloads each image, uses OpenAI to analyze and describe the image briefly, then creates detailed prompts to generate realistic product photos. The images get edited by OpenAI’s API to get a professional look. Final images upload to Google Drive, and new URLs update back in the sheet. This saves time and keeps product photos consistent and high quality.
Who should use this workflow
This workflow is for ecommerce store owners or anyone handling many product photos. It helps people who want to avoid manual editing and inconsistent styles. Users who have product images online and want to create professional photos fast will find this useful.
Basic knowledge of n8n and accounts for Google Sheets, Google Drive, and OpenAI API is needed.
Tools and services used
- Google Sheets: Stores the list of product image URLs.
- Google Drive: Uploads the edited images.
- OpenAI API: Analyzes images and edits them based on prompts.
- n8n: Automates the whole process in one workflow.
Inputs, processing, and outputs
Inputs
- Spreadsheet with product image URLs.
- OpenAI API key and Google credentials.
Processing steps
- Read URLs from Google Sheets.
- Download images from URLs.
- Use OpenAI image analysis to describe images shortly.
- Create detailed photography prompts with OpenAI’s GPT-4.
- Send images and prompts to OpenAI’s image editing endpoint.
- Convert OpenAI’s base64 response to files.
- Upload final images to Google Drive.
- Update Google Sheets with new image URLs and prompts.
Outputs
- Edited product photos in Google Drive.
- Updated Google Sheets rows with new image links and prompt info.
Beginner step-by-step: How to use this workflow in n8n
Importing the workflow
- Download the workflow file using the Download button on this page.
- Open n8n editor where the workflow will run.
- Use the “Import from File” option to load the workflow JSON file.
Configuring credentials and settings
- Add your Google Sheets and Google Drive OAuth credentials in the respective nodes.
- Insert your valid OpenAI API key in the OpenAI nodes.
- Update the Google Sheets node to point to your spreadsheet by setting the correct Document ID and Sheet Name.
- Set the Google Drive upload node’s folder ID to your target folder.
Running and activating
- Test the workflow using the Manual Trigger node by clicking ‘Execute Workflow’.
- Check outputs for errors and verify new images appear in Google Drive, and URLs update in Sheets.
- Activate the workflow for automatic or scheduled runs within n8n.
If you want more control or security, consider self-host n8n on your server.
Edge cases and failures
Errors reading Google Sheets often come from missing or wrong OAuth permissions.
OpenAI image editing can fail if the HTTP Request node does not send proper multipart/form-data or misses the image binary.
Make sure to use correct document IDs, API keys, and binary references to avoid these problems.
Customization ideas
- Change the OpenAI image model in the editing HTTP Request node for different photo styles.
- Edit the photography prompt in the Chain LLM node to adjust lighting, human model pose, or effects.
- Add an image processing node to add watermarks after editing and before upload.
Summary of workflow results
✓ Saves hours of manual photo editing.
✓ Ensures all product photos have a consistent, professional look.
✓ Automatically updates product photo links in Google Sheets.
✓ Reduces errors in photo management and speeds product launches.
