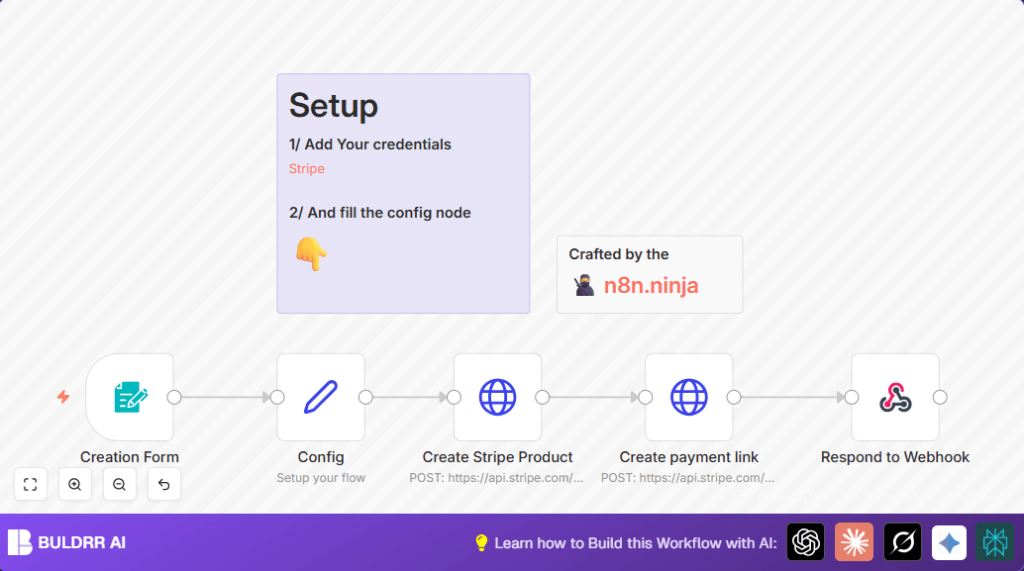
Create Stripe Payment Links Automatically with n8n

This n8n workflow automates creating Stripe products and payment links from form submissions, saving time and reducing manual errors in payment setup processes. It streamlines e-commerce operations by instantly generating payment URLs based on user input.
httpRequest
formTrigger
set
+2
Workflow Identifier: 2050
NODES in Use: formTrigger, set, httpRequest, respondToWebhook, stickyNote

Press CTRL+F5 if the workflow didn't load.

Learn how to Build this Workflow with AI:

Visit through Desktop for Best experience

1. Opening Problem Statement

Meet Anna, an independent digital content creator who sells online courses. She often struggles with manually setting up payment products and links in Stripe every time she launches a new course or updates pricing. This repetitive task consumes hours weekly, and manual entry sometimes leads to errors—incorrect prices, wrong currencies, or broken payment links—resulting in lost sales and frustrated customers.

Anna needs a fast, reliable way to generate Stripe products and payment links instantly without diving into Stripe’s dashboard each time. She’s looking for a solution that saves time, reduces costly mistakes, and improves her checkout experience seamlessly.

2. What This Automation Does

This n8n workflow picks up form submission data and uses it to create Stripe products and payment links automatically. When Anna or anyone fills the form with product title and price, the workflow:

  • Reads the product title and price input.
  • Converts the price into the smallest currency unit (like cents for EUR).
  • Creates a new product in Stripe via API with name, price, and currency.
  • Generates a payment link for that product instantly.
  • Redirects the user to the live Stripe payment page.
  • Eliminates manual product and link creation steps, boosting efficiency.

This saves Anna hours of tedious data entry each week and reduces the chance of payment errors that could lose her sales.

3. Prerequisites ⚙️

  • n8n account with a running instance capable of accepting webhooks.
  • Stripe API credentials with access to create products and payment links.
    🔐 Setup the Stripe credentials in n8n using the built-in Stripe API credential type.
  • ✅ Optional but recommended a public URL for your n8n instance if you want external users to submit the form.

4. Step-by-Step Guide

Step 1: Create the Form Trigger Node

Navigate to the nodes panel and add a Form Trigger node. Set the following:

  • Path: my-form-id (this is your webhook path)
  • Form Title: “Create a payment link”
  • Add two fields in the form: title (required, text), price (required, number)
  • Response Mode: responseNode

Once configured, you will get a webhook URL from n8n, where the form data can be posted or accessed.

Common Mistake: Forgetting to mark fields as required will allow empty submissions causing errors downstream.

Step 2: Configure the Set Node for Data Preparation

Add a Set node named “Config” right after the form node. Here we prepare and transform your data:

  • Include the field title as is.
  • Add a new field currency and set it manually to EUR or your desired currency.
  • Add a price field converting submitted price to the lowest currency unit (input price multiplied by 100). Use expression: {{$json.price * 100}}

This prepares the price for Stripe’s API, which expects amounts in cents (integer).

Visual Confirmation: After execution, you should see the transformed JSON with title, currency, and price correctly set.

Step 3: Create Stripe Product via HTTP Request

Insert an HTTP Request node named “Create Stripe Product” connected after the Config node. Configure it as follows:

  • Method: POST
  • URL: https://api.stripe.com/v1/products
  • Authentication: Use your predefined Stripe credentials
  • Content Type: application/x-www-form-urlencoded
  • Body Parameters:
    • name = {{ $json.title }}
    • default_price_data[unit_amount] = {{ $json.price }}
    • default_price_data[currency] = {{ $json.currency }}

This node creates the product with price in Stripe and attaches price data directly to it.

Common Mistake: Using string price without converting to smallest unit will cause errors.

Step 4: Generate Payment Link from Created Product

Add another HTTP Request node named “Create payment link” just after the product creation node:

  • Method: POST
  • URL: https://api.stripe.com/v1/payment_links
  • Authentication: Same Stripe credentials
  • Content Type: application/x-www-form-urlencoded
  • Body Parameters:
    • line_items[0][price] = {{ $json.default_price }} (from the previous node’s output)
    • line_items[0][quantity] = 1

This creates a payment link associated with the Stripe product you just made.

Important: You must reference the price ID from the created product, which is in default_price of the JSON response.

Step 5: Redirect User to Payment Link

Finally, add a Respond to Webhook node connected after the payment link creation node. Configure:

  • Respond With: redirect
  • Redirect URL: {{ $json.url }} (payment link URL from previous node)

This redirects whoever submitted the form directly to the Stripe hosted payment page.

5. Customizations ✏️

  • Change Currency: Update the “currency” field in the Config node from EUR to any other supported currency code like USD or GBP.
  • Add Quantity Field to Form: In the Form Trigger node, add a quantity number field and then adjust the HTTP Request body parameters for “Create payment link” to use this quantity dynamically instead of always 1.
  • Custom Product Metadata: Modify the “Create Stripe Product” node body parameters to include additional metadata fields such as description or category by adding extra parameters in the form and passing them along.

6. Troubleshooting 🔧

Problem: “Invalid price parameter” error from Stripe API

Cause: The price amount sent is not in the smallest currency unit (e.g., cents).

Solution: Confirm the Config node correctly multiplies the price by 100 and outputs an integer, and that expression syntax matches exactly {{$json.price * 100}}.

Problem: Webhook not triggering when form submitted

Cause: n8n instance may not be publicly accessible or misconfigured webhook path.

Solution: Verify your n8n webhook URL is active, the form path matches exactly “my-form-id”, and your instance has a public URL or tunnel service.

Problem: Payment link redirects to an error page

Cause: The price ID used to create payment link is incorrect or missing.

Solution: Check output from Stripe product creation node includes default_price field, and map it correctly in the payment link creation node.

7. Pre-Production Checklist ✅

  • Test the form submission with sample data and watch the workflow run in real-time inside n8n.
  • Confirm Stripe credentials have proper permissions and are valid.
  • Check HTTP Request nodes have correct URLs and body parameter mappings.
  • Ensure redirection happens correctly to a valid payment page.
  • Backup your current workflow before major changes.

8. Deployment Guide

Activate your n8n workflow and ensure it is listening for the webhook at my-form-id. Share the form URL with your team or customers.

Monitor execution logs in n8n for any errors or failed API calls. Optional: set up alerting if running in production to track failed executions.

9. FAQs

  • Can I use other payment processors like PayPal?
    Not directly with this workflow; it is tailored for Stripe’s API. However, you can build similar workflows integrating other payment gateways using HTTP Request nodes.
  • Does this consume Stripe API credits?
    Yes, creating products and payment links consumes API calls from your Stripe account.
  • Is my data safe?
    Your data is handled within n8n and Stripe securely. Always use HTTPS and keep credentials private.
  • Can this handle large volumes?
    This workflow can handle typical use at small to medium scale, but very high throughput may require optimization or Stripe account limits check.

10. Conclusion

By following this guide, you’ve created an automated system to transform form submissions directly into Stripe products and payment links. This cuts manual setup time from hours to seconds, greatly reducing errors and improving revenue flow.

Now, Anna can focus on creating more great digital content rather than dealing with payment setup. Next, consider adding email notifications on purchase or integrating this workflow with a CRM to track customers automatically.

Automation like this unlocks efficiency and scale for your business with n8n and Stripe working seamlessly together.

Promoted by BULDRR AI

Related Workflows

Automate Viral UGC Video Creation Using n8n + Degaus (Beginner-Friendly Guide)

Learn how to automate viral UGC video creation using n8n, AI prompts, and Degaus. This beginner-friendly guide shows how to import, configure, and run the workflow without technical complexity.
Form Trigger
Google Sheets
Gmail
+37
Free

AI SEO Blog Writer Automation in n8n (Beginner Guide)

A complete beginner guide to building an AI-powered SEO blog writer automation using n8n.
AI Agent
Google Sheets
httpRequest
+5
Free

Automate CrowdStrike Alerts with VirusTotal, Jira & Slack

This workflow automates processing of CrowdStrike detections by enriching threat data via VirusTotal, creating Jira tickets for incident tracking, and notifying teams on Slack for quick response. Save hours daily by transforming complex threat data into actionable alerts effortlessly.
scheduleTrigger
httpRequest
jira
+5
Free

Automate Telegram Invoices to Notion with AI Summaries & Reports

Save hours on financial tracking by automating invoice extraction from Telegram photos to Notion using Google Gemini AI. This workflow extracts data, records transactions, and generates detailed spending reports with charts sent on schedule via Telegram.
lmChatGoogleGemini
telegramTrigger
notion
+9
Free

Automate Email Replies with n8n and AI-Powered Summarization

Save hours managing your inbox with this n8n workflow that uses IMAP email triggers, AI summarization, and vector search to draft concise replies requiring minimal review. Automate business email processing efficiently with AI guidance and Gmail integration.
emailReadImap
vectorStoreQdrant
emailSend
+12
Free

Automate Email Campaigns Using n8n with Gmail & Google Sheets

This n8n workflow automates personalized email outreach campaigns by integrating Gmail and Google Sheets, saving hours of manual follow-up work and reducing errors in email sequences. It ensures timely follow-ups based on previous email interactions, optimizing communication efficiency.
googleSheets
gmail
code
+5
Free