What This Workflow Does
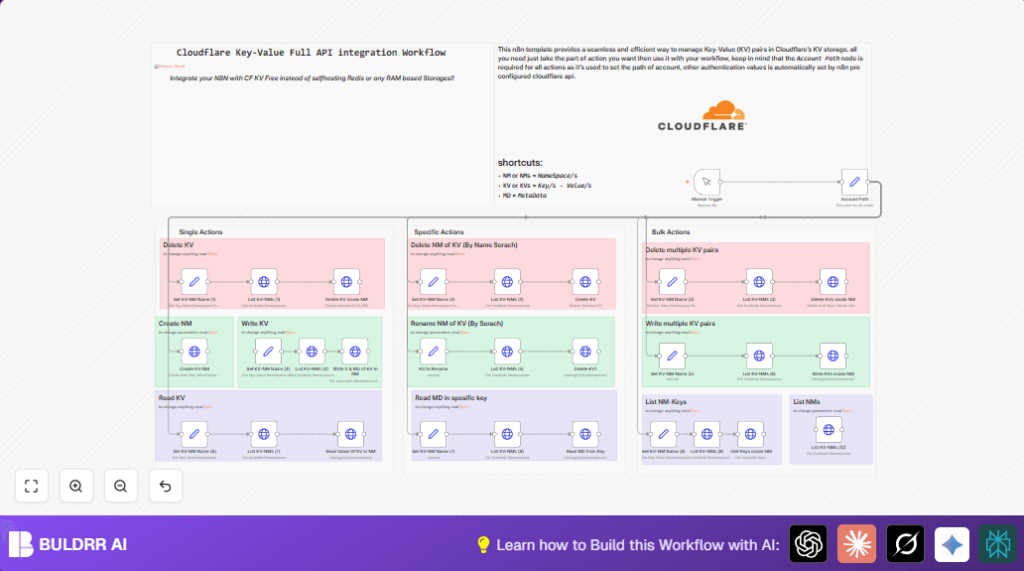
This workflow lets you manage your Cloudflare Key-Value (KV) storage automatically using n8n.
You can create, list, rename, and delete KV namespaces. You also can add, read, or delete many keys inside namespaces in bulk without manual errors.
It helps reduce mistakes like deleting wrong keys or misnaming namespaces and saves lots of time spent in the Cloudflare dashboard.
Who Should Use This Workflow
This workflow is for developers or teams managing multiple Cloudflare Workers projects.
If you often handle configuration or cache data inside Cloudflare KV storage, this workflow makes your tasks automated and error-free.
Tools and Services Used
- n8n: Automation platform to build and run workflows.
- Cloudflare API: Used for managing KV namespaces and keys.
- HTTP Request nodes: Make API calls to Cloudflare inside n8n.
- Set nodes: Define configuration values like account IDs and namespace names.
- Manual Trigger node: Start and test the workflow manually.
Inputs, Processing, and Output
Inputs
- Cloudflare Account ID (account identifier)
- Cloudflare API Key configured inside n8n credentials
- Namespace names or existing namespace IDs
- Key names and key-value pairs to read, write or delete within namespaces
Processing Steps
- Create or rename namespaces using POST or PUT API calls.
- List existing namespaces with GET requests for reference or validation.
- Write or delete keys in bulk inside a namespace with PUT or DELETE calls.
- Read specific key values or their metadata using GET requests.
Output
- JSON responses from Cloudflare API showing success, namespace, or key details.
- Clean automation results without needing manual Cloudflare dashboard actions.
Beginner Step-by-Step: How to Use This Workflow in n8n
Import the Workflow
- Click the “Download” button on this page to save the workflow file locally.
- Open n8n editor.
- Select “Import from File” in the n8n workflow menu and upload the workflow file.
Configure Credentials and IDs
- Go to the HTTP Request nodes and attach your Cloudflare API Key credential if not already connected.
- Update the Account Path (account_identifier) value in the “Account Path” Set node with your Cloudflare Account ID.
- Change any namespace names, key names, or IDs used in the flow to match your Cloudflare setup.
Test the Workflow
- Use the Manual Trigger node to run the entire workflow manually.
- Check the execution results of each HTTP Request node to confirm API calls succeed.
Activate for Production
- Once testing is successful, enable the workflow to run on real triggers or schedules as needed.
- Monitor executions regularly from the n8n dashboard to catch any errors early.
- Consider linking to a webhook trigger or scheduled trigger for automatic KV management.
- If self-hosting n8n, consult self-host n8n resources for smooth deployment.
Customization Ideas
- Adjust TTL by changing expiration and expiration_ttl fields in bulk key writes.
- Extend API pagination parameters to fetch more than 20 namespaces if needed.
- Add error handling nodes after HTTP requests to log failed API calls automatically.
- Modify metadata structure in key writes to include custom app-specific information.
- Connect the workflow to webhook triggers for event-driven KV storage updates.
Edge Cases and Errors
- Authentication errors happen if the Cloudflare API Key is invalid or expired; regenerate and update credentials.
- Deleting or renaming namespaces fails if namespace names do not exactly match existing ones; always verify using the list namespaces API response.
- Bulk writes fail if JSON data is wrongly formatted or misses required fields; test with small samples first.
- Deleting keys that do not exist causes API errors; validate key presence before deletion.
Summary of Results
✓ Saves time by automating all Cloudflare KV namespace and key management tasks.
✓ Removes human mistakes in API calls like wrong key deletions or namespace renaming errors.
✓ Enables batch operations for efficiency, such as bulk writing or deleting keys.
→ Provides reliable and repeatable automation managed inside n8n for easier maintenance.