What This Workflow Does
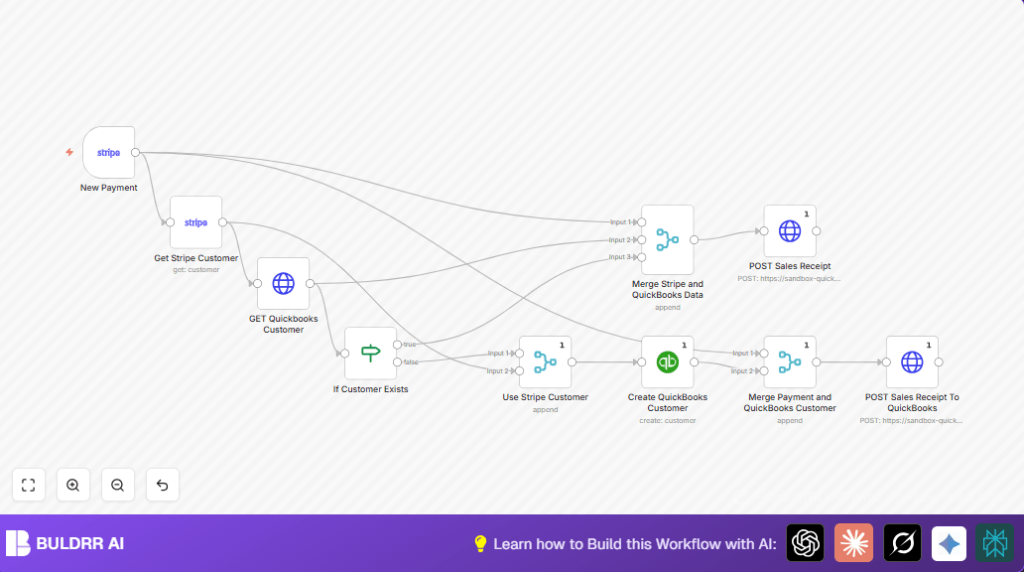
This workflow listens for successful payment events from the Stripe service.
It then checks if the customer is already in QuickBooks Online by searching their email.
If the customer is new, the workflow creates them in QuickBooks.
Finally, it posts a sales receipt in QuickBooks with the exact payment details.
This helps avoid manual entry, saves time, and reduces mistakes in accounting.
Tools and Services Used
- n8n: For building and running the automation workflow.
- Stripe API: To capture real-time payment events.
- QuickBooks Online API: To manage customers and sales receipts.
- OAuth2: For secure authentication with QuickBooks.
Inputs, Processing Steps, and Outputs
Inputs
- Stripe payment_intent.succeeded events.
- Stripe customer ID from event data.
- QuickBooks company ID and OAuth2 credentials.
Processing Steps
- Trigger on Stripe payment success event.
- Retrieve Stripe customer details using the customer ID.
- Query QuickBooks using customer email to find existing customer.
- Use conditional logic to decide if customer creation is needed.
- Create new QuickBooks customer if not found.
- Merge Stripe and QuickBooks customer data.
- Merge payment data with customer data for completeness.
- Post a sales receipt in QuickBooks linked to the customer.
Outputs
- Sales receipts automatically logged in QuickBooks.
- Customer records updated or created in QuickBooks.
- Data accuracy improved and manual work reduced.
Beginner Step-by-Step: How to Use This Workflow in n8n
Step 1: Import the Workflow
- Download the workflow file using the Download button on this page.
- In the n8n editor, click on the menu and select Import from File.
- Choose the downloaded workflow file and upload it.
Step 2: Setup Credentials and IDs
- Add or update the Stripe API credentials in the workflow settings.
- Add or update the QuickBooks Online OAuth2 credentials.
- Enter your QuickBooks company ID wherever it shows
{companyID}in HTTP Request nodes. - Make sure email and customer fields match your data structure if needed.
Step 3: Test the Workflow
- Use sample Stripe payment events to trigger the workflow and watch node outputs.
- Check QuickBooks to see if customer and sales receipt are correctly created.
Step 4: Activate for Production
- Once tests pass, activate the workflow in n8n to run continuously.
- Monitor logs for errors during first days to ensure smooth operation.
For users who want full control over running n8n, self-host n8n is a good option.
Common Errors and How to Fix Them
- 401 Unauthorized Error: Happens when QuickBooks OAuth2 credentials are wrong or expired.
- Stripe Trigger Not Running: Usually webhook URL missing or wrong in Stripe dashboard.
- Sales Receipt Creation Failed: Check JSON body format and required fields carefully.
Customization Ideas
- Change the item description in the sales receipt HTTP Request node.
- Add taxes by changing the
TaxCodeRefvalue. - Use the live QuickBooks environment by replacing sandbox URLs with live company IDs.
- Add more Stripe customer fields like phone or address to QuickBooks customer creation node.
Sample JSON for QuickBooks Sales Receipt POST
This JSON is used to create a sales receipt linked to the customer, based on Stripe payment data.
{
  "Line": [
    {
      "Description": "{{ $json.data.object.description }}",
      "DetailType": "SalesItemLineDetail",
      "SalesItemLineDetail": {
        "TaxCodeRef": { "value": "NON" },
        "Qty": 1,
        "UnitPrice": {{ $json.data.object.amount_received / 100 }},
        "ItemRef": {"name": "Subscription", "value": "10"}
      },
      "Amount": {{ $json.data.object.amount / 100 }},
      "LineNum": 1
    }
  ],
  "CustomerRef": {
    "value": {{ $input.all()[1].json.Id }},
    "name": "{{ $input.all()[1].json.DisplayName }}"
  },
  "CurrencyRef": {"value": "{{ $json.data.object.currency.toUpperCase() }}"},
  "PrivateNote": "Payment from Stripe Payment Intent ID: {{ $json.data.object.id }}"
}
Summary of Workflow Benefits and Outcomes
✓ Saves over 5 hours of manual work every week.
✓ Reduces human errors by automating customer and payment entries.
✓ Keeps QuickBooks sales receipts updated accurately and immediately.
→ Allows focused time on business instead of data entry.
→ Ensures payment data shows correctly for audits and cash flow.
