What this workflow does
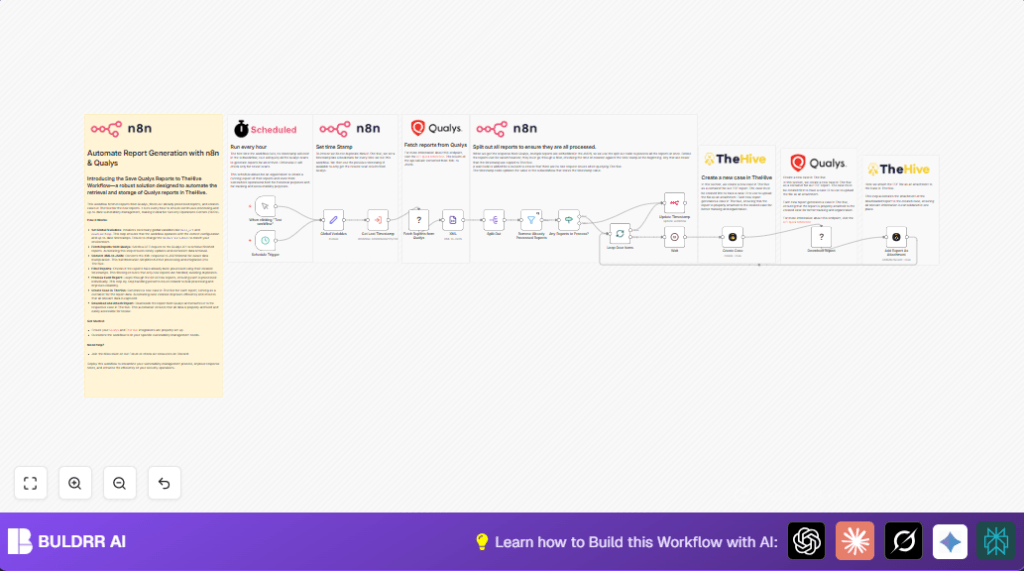
This workflow automatically downloads new finished vulnerability scan reports from Qualys every hour.
It stops duplicate and old reports from being processed again by using a saved timestamp.
For each new report, the workflow creates a new case in TheHive and attaches the full PDF report.
This saves time, stops errors, and keeps security teams working faster and with fresh data.
Who should use this workflow
Anyone who works in a Security Operations Center (SOC) or handles vulnerability reports from Qualys.
It is best for users who want to avoid manual downloading and uploading of scan results.
It helps analysts who need quick, organized case creation and report attachments in TheHive.
Users with basic API knowledge and access to Qualys and TheHive accounts will benefit most.
Tools and services used
- n8n workflow automation: Runs the whole process on schedule.
- Qualys API: Provides the latest finished vulnerability scan reports.
- TheHive API: Creates cases and uploads PDF reports into the incident response system.
- XML node in n8n: Converts Qualys XML data to JSON for easier reading.
How the workflow works (Input → Process → Output)
Inputs
- Hourly trigger from n8n to start the workflow automatically.
- Qualys credentials and API URL for fetching scan reports.
- Stored timestamp of last processed report to avoid duplicates.
- TheHive credentials for case creation and report attachment.
Process steps
- Fetch all finished reports from Qualys API via HTTP GET request.
- Convert Qualys response from XML to JSON for easier handling.
- Split all reports into individual items to process separately.
- Filter out reports with timestamps older or equal to the stored last processed timestamp.
- If new reports exist, split them in batches to process one by one safely.
- Pause for 1 second between API calls to avoid rate limiting.
- Create new cases in TheHive for each new report using report details.
- Download full PDF report from Qualys using report ID.
- Attach downloaded PDF to the corresponding TheHive case.
- Update stored timestamp with current run time to know what was processed.
Outputs
- New cases in TheHive with attached vulnerability scan PDF reports.
- Saved timestamp updated to only process newer reports in the future.
- Accurate and current vulnerability tracking without manual downloads or uploads.
Beginner step-by-step: How to use this workflow in n8n production
Import the workflow
- Click the Download button on this page to get the workflow file.
- Open n8n editor where you want to run the workflow.
- Use the menu option “Import from File” to upload the workflow file into n8n.
Configure credentials and details
- Go to the workflow settings and add your Qualys API credentials.
- Also add TheHive API credentials in the appropriate nodes.
- Check nodes that need IDs, emails, folder paths, or any other details and update them as your environment requires.
Test and activate
- Run the workflow once manually using the Execute button to confirm it works with your data.
- Fix any errors shown during test runs, especially credential or endpoint issues.
- Once confirmed, activate the workflow by enabling the Schedule Trigger node.
- Optionally, set up notifications for workflow success or failure alerts.
For more secure and private operation, consider running self-host n8n.
Inputs and outputs explained
- Inputs: Hourly Schedule trigger, Qualys API credentials, stored last processed timestamp, TheHive API credentials.
- Outputs: New cases created in TheHive with full PDF reports attached, updated timestamp saved for next run.
Edge cases and common errors
- Unauthorized errors happen when API credentials for Qualys are wrong or missing. Double-check keys.
- If old reports keep processing, the timestamp may not be saved or filtered properly; check the timestamp workflow and date formats.
- Attachment fails if case ID is incorrect or the downloaded file is not valid PDF binary data. Confirm the downloaded file and case links are correct.
Customization ideas
- Change how often the workflow runs by editing the Schedule Trigger to 30 minutes or daily.
- Add filters to include or exclude certain report types or status values.
- Add extra notification steps after each TheHive case creation, like sending Slack messages or emails.
- Store downloaded reports in cloud storage services for backup, such as Google Drive or AWS S3.
- Adjust TheHive case fields like severity, tags, or description to match team needs.
Summary of benefits and outcome
✓ Saves many hours of manual work weekly by handling Qualys reports automatically.
✓ Prevents errors from duplicate or missing reports by tracking timestamps.
✓ Creates organized, ready-to-investigate cases in TheHive with attached reports.
✓ Keeps vulnerability tracking current and reliable without manual downloads.
