Opening Problem Statement
Meet Sarah, a content manager who oversees 82 blog posts on her WordPress site. Every week, she spends hours manually reading through titles and assigning categories to keep her content organized for visitors. This manual task not only drains her time but also introduces mistakes—posts end up miscategorized, making it harder for her audience to find relevant content. The constant juggling wastes over 3 hours weekly and affects user experience negatively.
What if Sarah could automate this tedious and error-prone process? Imagine being able to auto-categorize all existing posts in just minutes, accurately assigning each to one relevant category without lifting a finger. This is exactly the problem solved by the n8n workflow we’re about to explore today.
What This Automation Does
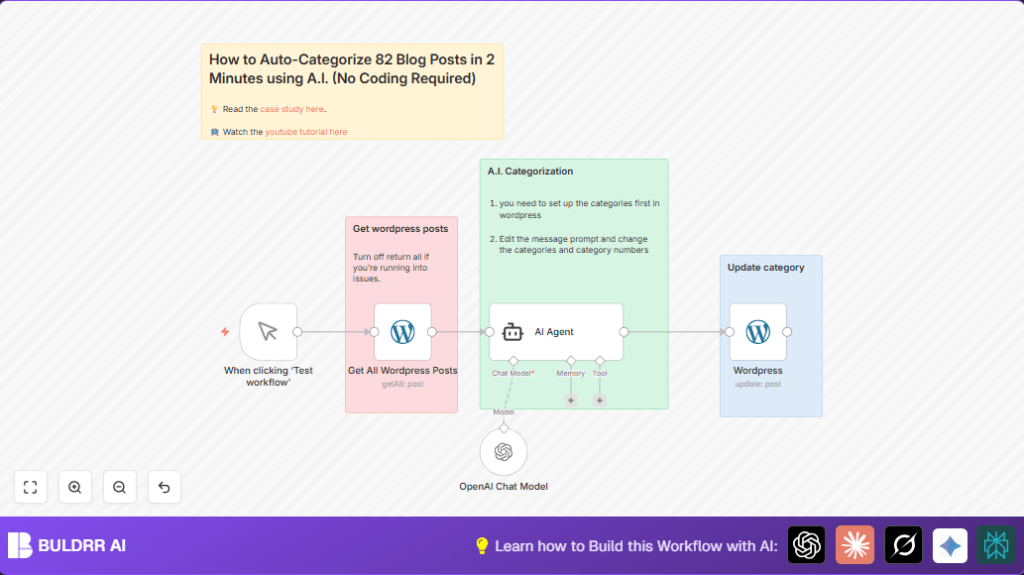
This n8n workflow integrates WordPress and OpenAI’s AI language model to categorize posts automatically. When triggered, it:
- Fetches all posts from your WordPress site with a single click.
- Analyzes each post title to determine the primary category using a custom AI prompt.
- Updates each post’s category in WordPress to reflect the AI’s recommendation.
- Supports a fixed list of categories tailored for content organization like Content Creation and AI Tools.
- Eliminates manual sorting errors and speeds up post management dramatically.
- Saves Sarah over 3 hours of manual work, streamlining her editorial workflow.
Prerequisites ⚙️
- n8n account with access to workflow editor and API credentials.
- WordPress site with REST API enabled and API credentials (used here: Rumjahn.com WordPress API credentials).
- OpenAI account with API key to use the AI Chat Model node.
- Basic familiarity with n8n’s manual trigger node for workflow execution.
Step-by-Step Guide
Step 1: Access the n8n Editor and Prepare Workflow
Open your n8n editor. Click New Workflow, name it “Auto Categorize WordPress Posts.” You will start by adding a Manual Trigger node to activate this process.
You should see a blank canvas ready for nodes. Naming conventions help future edits.
Step 2: Add and Configure Manual Trigger Node
Click the plus button, select Manual Trigger from nodes. This node starts your workflow when you click ‘Execute Workflow’ or ‘Test Workflow’. No configuration needed here; it just triggers the process.
Once added, you’ll see a node labeled “When clicking ‘Test workflow’”.
Step 3: Add WordPress “Get All Posts” Node
Click to add new node → search for WordPress. Choose the operation getAll and set returnAll to true to pull all posts.
Set your WordPress API credentials (same used for your site). This node fetches all posts for categorization.
Common mistake: Forgetting to provide or correctly link API credentials, resulting in authorization errors.
Step 4: Add AI Agent Node for Categorization Logic
Add the AI Agent node (Langchain agent type) that processes each post’s title through AI to identify the best matching category ID.
Configure it with this prompt text:
=You are an expert content strategist and taxonomy specialist with extensive experience in blog categorization and content organization.
I will provide you with a blog post's title. Your task is to assign ONE primary category ID from this fixed list:
13 = Content Creation
14 = Digital Marketing
15 = AI Tools
17 = Automation & Integration
18 = Productivity Tools
19 = Analytics & Strategy
Analyze the title and return only the single most relevant category ID number that best represents the main focus of the post. While a post might touch on multiple topics, select the dominant theme that would be most useful for navigation purposes.
{{ $json.title.rendered }}
Output only the category numberYou don’t need to change anything else unless you want to customize categories.
Step 5: Chain the “Get All Posts” Node to the AI Agent Node
Drag from the output pin of the “Get All WordPress Posts” node to input of the “AI Agent” node. This passes every post title to AI for categorization.
Step 6: Add WordPress Update Post Node
Next, add another WordPress node configured to update the post.
Set the postId parameter dynamically as {{ $('Get All WordPress Posts').item.json.id }} to target the correct post.
Under update fields, set categories dynamically based on the AI Agent’s output: {{ $json.output }}.
Link the output from the “AI Agent” node to this WordPress update node.
Common mistake: Not mapping postId correctly, resulting in wrong post updates.
Step 7: Connect the Workflow Chain
Ensure the nodes are connected in this order for correct execution: Manual Trigger → Get All WordPress Posts → AI Agent → WordPress Update Post.
Step 8: Test the Workflow
Click the manual trigger node and hit Execute Workflow or Test Workflow.
You should see posts being fetched, categorized, and updated seamlessly within a couple of minutes.
Check your WordPress admin page afterwards to confirm categories are properly assigned.
Customizations ✏️
- Change Categories List: In the AI Agent node, modify the list of category IDs and names in the prompt to fit your own taxonomy.
- Limit Posts Processed: In “Get All WordPress Posts” node, turn off
returnAlland set a limit if you want to process a subset. - Adjust AI Response Format: Modify the AI Agent’s prompt to return category names instead of IDs if preferred—then adjust mapping accordingly in the WordPress update node.
Troubleshooting 🔧
Problem: “401 Unauthorized” when accessing WordPress API
Cause: Incorrect or missing WordPress API credentials.
Solution: Go to the WordPress node credentials settings and re-enter your WordPress API key. Verify API permissions granted.
Problem: AI Agent returns no category or invalid output
Cause: The prompt might be misformatted or OpenAI API key expired.
Solution: Edit the AI Agent prompt carefully to match the example format exactly. Check your OpenAI API key validity.
Problem: Posts not updating categories in WordPress
Cause: Incorrect dynamic expressions in the update node’s postId or categories fields.
Solution: Verify you mapped {{ $('Get All WordPress Posts').item.json.id }} exactly and that the AI Agent output matches the expected category ID format.
Pre-Production Checklist ✅
- Ensure WordPress API credentials are valid and connected in n8n.
- Test OpenAI API key by running a simple test prompt in AI Agent node.
- Verify the categories exist in your WordPress before running the workflow.
- Run the workflow in test mode first to confirm output correctness.
- Backup your WordPress database to rollback in case of unexpected results.
Deployment Guide
Activate your workflow by switching it on within n8n. Schedule it or trigger manually via the Manual Trigger node when needed.
Monitor executions in the n8n dashboard for errors or logs. This workflow can be run repeatedly to keep your WordPress posts categorized as you add new content.
FAQs
Can I use custom categories not in the fixed list?
Yes, edit the AI Agent prompt to include your categories and their IDs. Just ensure your WordPress site has these categories created beforehand.
Does this workflow consume OpenAI API credits?
Yes, each post title analysis sends a request to OpenAI, so the number of posts processed affects your API usage.
Is my data safe when using OpenAI?
OpenAI has strict privacy policies, but be mindful not to include sensitive information in titles or prompts.
Conclusion
With this n8n workflow, you’ve automated the categorization of all 82 WordPress blog posts in just minutes. Sarah no longer wastes hours manually sorting through titles or worries about inconsistent categories. This automation saves time, improves content organization, and enhances user experience on your website.
Ready for next steps? Consider automating tagging, scheduling new posts, or integrating analytics for smarter content strategies. Keep exploring to make your WordPress management smarter and easier.