What this workflow does
This workflow connects TheHive and SIGNL4 to handle security alerts automatically. When TheHive sends or updates an alert, the workflow sends notifications to SIGNL4 or resolves alerts there. This removes manual work and helps teams respond faster and with fewer mistakes.
You get real-time alert notifications on SIGNL4 for open incidents and automatic resolution when incidents close in TheHive.
Who should use this workflow
This workflow is helpful for security teams using TheHive to track incidents and SIGNL4 for mobile alert notifications. It fits teams wanting to save time and avoid manual message sending.
No deep coding needed, but some basic API and webhook familiarity is helpful.
Tools and services used
- TheHive API: Sends alert updates via webhooks.
- SIGNL4 API: Sends and resolves mobile alert notifications.
- n8n: Runs the workflow connecting TheHive and SIGNL4.
How this workflow works: Inputs → Process → Outputs
Inputs
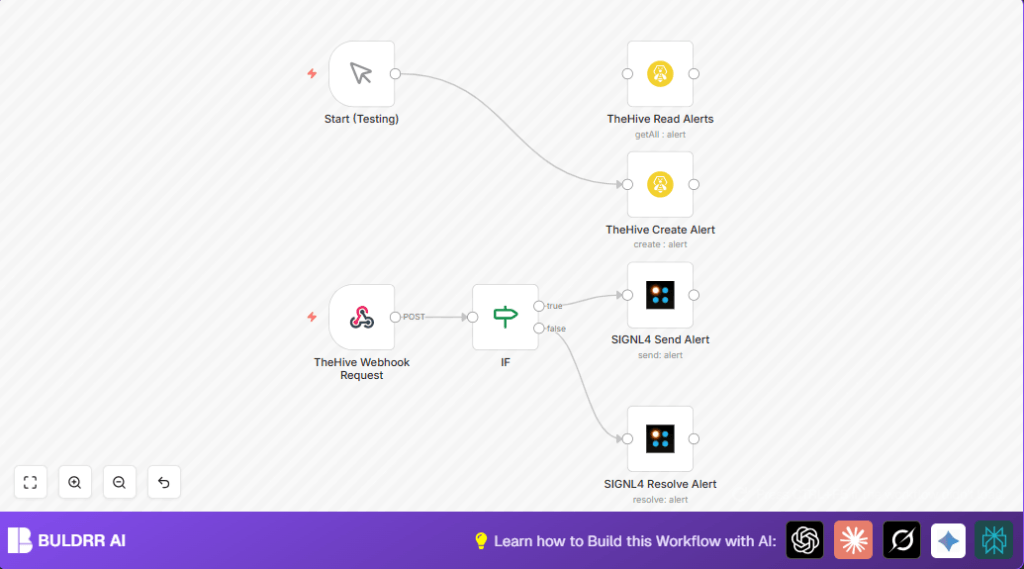
- TheHive sends alert details to the Webhook node via POST.
- A manual trigger can send test alerts to TheHive.
Processing steps
- The Webhook node receives TheHive alert JSON.
- The IF node checks if alert
stageis ‘Closed’. - If not closed, SIGNL4 Send Alert node sends a notification with alert description and ID.
- If closed, SIGNL4 Resolve Alert node tells SIGNL4 to clear the alert matching TheHive alert ID.
- Manual Trigger node starts a test alert creation in TheHive.
Outputs
- New alerts reach SIGNL4 for immediate team notification.
- Closed alerts in TheHive automatically resolve in SIGNL4.
- Test alerts created manually in TheHive to verify workflow.
Beginner step-by-step: How to use this workflow in n8n
Importing and setup
- Download the workflow file using the Download button on this page.
- Open your n8n editor (including self-host n8n if you run n8n on your own server).
- Click “Import from File” and select the downloaded workflow.
- After import, go to each node requiring credentials (TheHive API and SIGNL4 API keys) and add your API Key or credentials.
- If needed, update fields like alert IDs, email addresses, or tags inside the nodes to match your environment.
Testing the workflow
- Trigger the Manual Trigger node to create a test alert in TheHive.
- Confirm that a SIGNL4 alert shows up and resolves correctly when TheHive alert status changes.
Activate for production
- Turn on the workflow using the active toggle in n8n.
- Ensure TheHive is set to send alerts to the Webhook node URL.
- Monitor for errors and check SIGNL4 dashboard for alert notifications.
Customization ideas
- Change alert tags in the TheHive alert creation to fit organizational needs.
- Add severity or timestamps from TheHive to SIGNL4 message content.
- Filter which alerts to process based on their source or other attributes.
- Add an email notification for alerts open longer than a set time.
Troubleshooting common issues
- Webhook not receiving alerts: Check HTTP method is POST and TheHive uses correct webhook URL.
- Alerts not sent to SIGNL4: Check API credentials are added and valid.
- Alerts not resolved in SIGNL4: Confirm external ID matches TheHive alert object ID exactly.
Summary: What the user gets
✓ Automatic alert notifications sent from TheHive to SIGNL4.
✓ Alerts marked closed in TheHive will clear in SIGNL4 automatically.
✓ Saves time by removing manual alert forwarding and reduces errors.
✓ Allows easy testing with a manual trigger to create alerts.
