What This Workflow Does
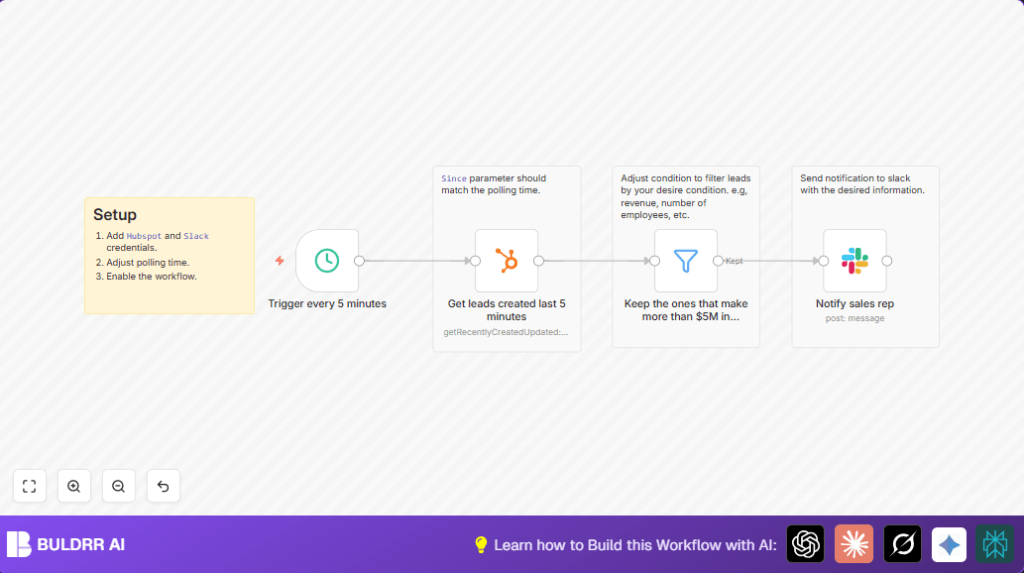
This workflow checks HubSpot every 5 minutes to find new leads created in that time.
It filters those leads to keep only companies with more than $5 million in annual revenue.
Then it sends a detailed message about the lead directly to the right sales rep on Slack.
This saves salespeople from manually searching leads and ensures they quickly follow up on the most valuable opportunities.
Who Should Use This Workflow
Any sales team using HubSpot to track leads who want to focus on high-value companies.
It helps sales managers and reps avoid wasting time on less promising leads.
Teams that work daily in Slack will find notifications convenient for fast action.
Tools and Services Used
- HubSpot: To get recently created companies or leads via API.
- Slack: To send message notifications to sales reps.
- n8n: The automation platform connecting HubSpot and Slack with nodes.
- Schedule Trigger node: Starts the workflow every 5 minutes.
- HubSpot node: Fetches leads created in the last 5 minutes.
- Filter node: Keeps only leads with annual revenue over $5 million.
- Slack node: Sends messages to sales reps.
Inputs, Process, and Outputs
Inputs
- New leads created in HubSpot within the last 5 minutes.
- Lead details like company name, website, revenue, and employee count.
Process Steps
- Schedule Trigger runs every 5 minutes to start the workflow.
- HubSpot node uses
{{ $now.minus({ "minutes": 5 }) }}for the ‘since’ parameter to get fresh leads. - Filter node selects only leads with annual revenue > $5,000,000.
- Slack node builds a message with lead info and sends it to the assigned sales rep.
Outputs
- Slack notifications with key lead details to the sales reps.
- Less manual checking for sales teams.
- Faster reaction to valuable leads.
Beginner Step-by-Step: How to Use This Workflow in n8n
Importing and Setup
- Download the workflow using the Download button on this page.
- Open your n8n editor, then use “Import from File” to add the workflow.
- Add your HubSpot OAuth2 credentials under the HubSpot node to allow data fetching.
- Add your Slack OAuth2 token under the Slack node for sending messages.
- Check the Slack node and update the recipient field with the correct sales rep user ID or channel ID if needed.
- Verify the Schedule Trigger timing matches the HubSpot node ‘since’ parameter (default is 5 minutes).
Testing
- Manually run the workflow to test if leads are fetched and messages are sent.
- Fix any error messages related to credentials or missing data.
Activation
- Once testing passes, activate the workflow using the toggle button.
- Monitor successful runs in the executions panel.
If hosting n8n yourself, it’s helpful to review self-host n8n options for performance and control.
Customization Ideas
- Change the Filter node to select leads based on number of employees instead of revenue.
- Send Slack messages to a channel for team-wide notifications instead of single users.
- Modify the polling interval in Schedule Trigger and the HubSpot node ‘since’ parameter (e.g., every 10 minutes).
- Add a Code node to run custom JavaScript on leads for scoring or formatting before messaging.
- Include more lead details like deal amount or lifecycle stage in Slack messages.
Common Problems and Solutions
- No leads returned from HubSpot node: Usually the ‘since’ parameter does not match the polling time. Try increasing the timeframe or aligning intervals.
- Slack message not sending: Check Slack user ID or OAuth2 token validity. Reauthenticate and verify user IDs with Slack API tools.
- Filter node excludes all leads: Confirm property names exist and use
toInt()for number comparisons. Adjust filter logic if properties differ.
Summary of Results
✓ Increased sales team focus on high-value leads.
✓ Saved hours daily by removing manual HubSpot checks.
✓ Instant Slack alerts push sales reps to act faster.
✓ Reduced risk of missing important leads.
