What This Workflow Does
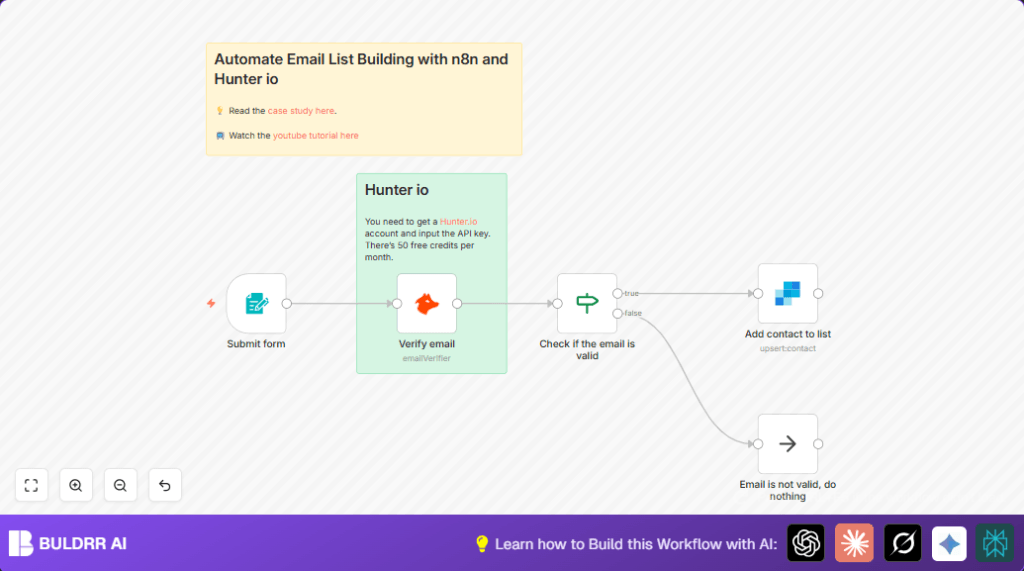
This workflow gets a new email from a website form. It checks if the email is real using Hunter io. If the email is valid, it adds the email to a SendGrid mailing list. If not, it stops without any errors. This saves time and keeps your email list clean.
The main problem solved is removing fake or wrong emails without manual work. The result is a better email list that helps your marketing send to real people only.
Tools and Services Used
- n8n Form Trigger node: Receives email submissions from your website form.
- Hunter io Email Verifier node: Checks email validity through API.
- n8n If node: Decides the workflow path based on email status.
- SendGrid Add Contact node: Adds valid emails to your mailing list automatically.
- n8n No Operation (NoOp) node: Ends workflow quietly for invalid emails.
Input → Process → Output
Input
- Visitor submits email using your online form connected to the Form Trigger node.
Processing Steps
- Step 1: The Form Trigger node gets the email submission.
- Step 2: The Hunter Email Verifier node uses the email to call Hunter’s API and check if it’s valid.
- Step 3: The If node looks at the verification status; if it is “valid”, the flow continues.
- Step 4: If valid, the SendGrid Add Contact node adds the email to the selected mailing list.
- Step 5: If invalid, the No Operation node ends the workflow without errors.
Output
- The email is either added to the SendGrid mailing list or ignored silently if invalid.
Who Should Use This Workflow
This workflow fits small online businesses and newsletter owners who get many email sign ups.
It helps anyone who wants to stop fake or wrong emails from cluttering their lists and wasting marketing money.
Beginner Step-by-Step: How to Use This Workflow in Production
Step 1: Download and Import the Workflow
- Click the Download button on this page to get the workflow file.
- Open your n8n editor where you want to add this.
- Use the Import from File option in n8n to upload the downloaded workflow file.
Step 2: Update Credentials and IDs
- Open each node that needs credentials.
- Add your valid API Keys for Hunter io and SendGrid in the credentials section.
- Double-check and update the SendGrid mailing list ID to match your target list.
Step 3: Test the Workflow
- Submit a test email through the form linked to the Form Trigger node.
- Watch the workflow run in n8n to confirm emails flow and contacts get added correctly.
- Check that invalid email submissions do not cause errors and are stopped by the No Operation node.
Step 4: Activate the Workflow
- Once tested, toggle the switch in the top-right corner of n8n to activate the workflow.
- Ensure your self-host n8n instance runs without interruptions.
- Monitor workflow runs regularly to catch any errors early.
Common Edge Cases and Failures
- If Hunter io API key is missing or wrong, the email check fails and returns an error.
- If SendGrid API key or list ID is wrong, contacts won’t be added successfully.
- If the form’s webhook URL is not set correctly in the website form, submissions won’t start the workflow.
- The If node test must check for exact lowercase “valid” status to work properly.
Customization Ideas
- Change the form’s title and description inside the Form Trigger node to match your brand voice.
- Add other fields like “Name” or “Company” into the form and map these to SendGrid contact properties.
- Switch out the SendGrid node for another email platform if needed, like Mailchimp.
- Add logging nodes to save valid emails to Google Sheets or a database for audit or marketing analysis.
Summary
✓ Automatically validate emails submitted through your online form.
✓ Stop fake or typo emails from entering your lists.
✓ Add only valid emails into SendGrid automatically.
✓ Save time by removing manual email checks.
→ Keep your email list healthy and your marketing more effective.
→ Easy to set up, test, and run inside your n8n automation.
