What this workflow does
This workflow helps handle job applicants automatically using n8n and ERPNext. It checks if resumes are uploaded, reads resumes, compares them to job details using Google Gemini AI, and assigns scores for candidate fit. Then, it updates the ERPNext system and sends emails or WhatsApp messages to applicants about their status.
This stops manual resume reading and speeds up hiring decisions. It saves many hours by doing tasks that usually take recruiters a long time.
Who should use this workflow
Any HR manager or recruiter using ERPNext for job applications can use this. It suits busy teams who want to reduce manual screening and speed up candidate replies.
Users with basic n8n setup knowledge and access to required tools can benefit most.
Tools and services used
- ERPNext: Holds job applicant data and job descriptions. Sends webhook and receives updates.
- n8n Automation Platform: Runs the workflow to process data and connect services.
- Google Gemini (PaLM) AI API: Analyzes resumes against job descriptions to rate applicants.
- Microsoft Outlook: Sends email notifications to rejected applicants.
- WhatsApp Business Cloud API: Sends acceptance messages to applicants.
Inputs, processing, and outputs
Inputs
- New job application data sent from ERPNext via webhook.
- Resume attached as PDF file URL.
- Job Opening ID for fetching job description.
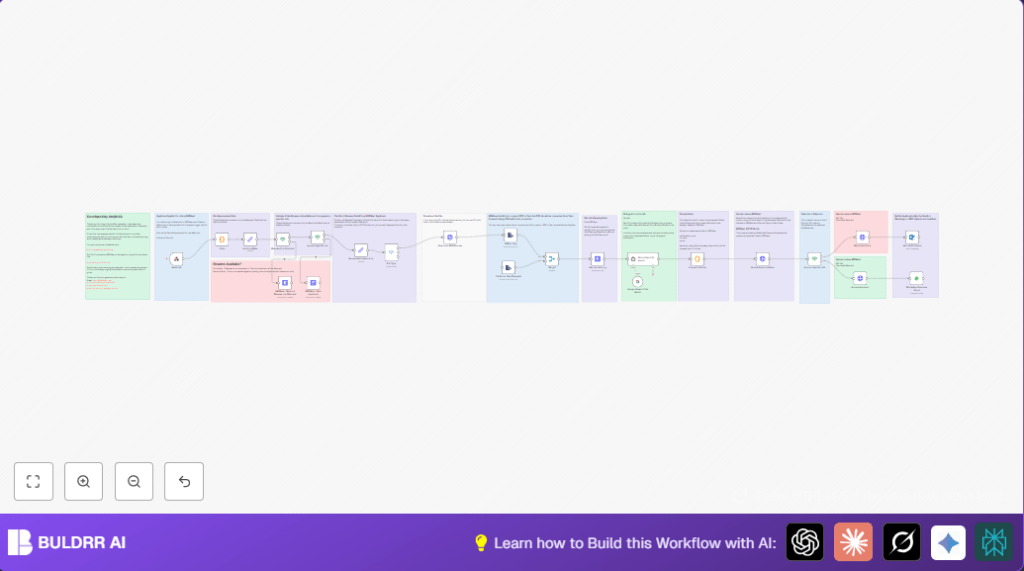
Processing steps
- Webhook node captures applicant data.
- Code node processes and extracts needed input fields.
- If nodes check if resume link is valid and if job opening exists.
- Set node extracts resume file link.
- Switch node chooses workflow branch based on file type (only PDF supported fully).
- HTTP Request node downloads PDF resume.
- ExtractFromFile node converts PDF to plain text.
- ERPNext API reads job description using Job Opening ID.
- Google Gemini AI analyzes resume text vs job description. Produces fit level, score, rating, and justification.
- Code node parses AI output text into structured fields.
- HTTP Request node updates applicant record in ERPNext with AI results.
- If node compares score: below 80 rejects applicant; above accepts.
- Microsoft Outlook node sends rejection email if score is low.
- WhatsApp Business Cloud node sends acceptance message if score is high.
Outputs
- ERPNext Job Applicant record updated with fit level, score, rating, and justification.
- Applicant status changed to Accepted, Rejected, or Hold automatically.
- Applicant receives a status notification by email or WhatsApp message.
Beginner step-by-step: How to use this workflow in n8n
Importing the workflow
- Download the workflow file using the Download button on this page.
- Open n8n editor where you want to add this workflow.
- Use the menu option “Import from File” and select the downloaded file.
Configure credentials and settings
- Fill in ERPNext API credentials to allow reading and updating applicant data.
- Set Google Gemini API Key or credentials in the AI node.
- Configure Microsoft Outlook credentials for email sending.
- Configure WhatsApp Business Cloud API credentials for message sending.
- Update any IDs like Job Opening IDs or email addresses if needed in the nodes.
- Check the webhook path in the Webhook node matches the ERPNext webhook URL.
- Copy and paste any required Code node snippets or prompt text if missing.
Testing and activating workflow
- Send a test job application from ERPNext or use webhook test to see if the workflow runs successfully.
- Fix any errors found in the test run using n8n logs.
- Once tests pass, activate the Webhook node to start real-time processing.
Consider using self-host n8n if you want control over the automation server.
Edge cases and failure handling
If no resume link or invalid link is found, the workflow marks the applicant as rejected automatically.
If the applied job opening ID is missing or incorrect, the applicant status changes to Hold for manual review.
If resume file format is not PDF (like DOC or images), the workflow currently does not support text extraction and will require upgrades.
If AI analysis returns no result or error, check API keys and prompt formats in the Google Gemini node.
Customization ideas
- Add support for Word or image resumes by adding extract nodes for those formats.
- Change AI score threshold from 80 to fit your hiring policy by adjusting the If node condition.
- Add more notification channels like Slack or SMS by connecting new messaging nodes.
- Replace the resume download HTTP node with an S3 node if storing resumes on Amazon S3.
- Edit the AI prompt to make the scoring consider special skills or compliance factors.
Summary of workflow results
✓ Automatically screen job applicants’ resumes from ERPNext.
✓ Score and rate candidates using Google Gemini AI based on job descriptions.
✓ Update applicant status in ERPNext without manual work.
✓ Notify candidates by email or WhatsApp about their application decision.
→ Saves many hours of manual resume reading and data entry every week.
→ Helps recruiters focus on best candidates quickly.
