What this workflow does
This workflow lets you start or stop n8n workflows by sending commands from your Telegram app. It solves the problem of not being able to access n8n dashboards quickly during an issue. The workflow listens to your private Telegram messages and uses commands like /stop marketing or /start sales to change workflow states remotely.
You save time and avoid delays in fixing workflow errors. The workflow uses the Telegram bot and the n8n API to act on your commands. It works anywhere you have Telegram, without opening computers or dashboards.
⚡ One Message. Instant Control.
Send /stop marketing from your phone — and that n8n workflow stops
in seconds. No login. No dashboard. No delays. Just one Telegram
message gives you full remote control over your automation stack.
Tools and services used
- Telegram Bot API: Receives and filters messages based on your chat ID.
- n8n API: Authenticates and performs workflow activation or deactivation.
- Telegram Trigger node: Listens for incoming Telegram messages to the bot.
- Filter node: Filters messages to allow only those from your personal chat ID.
- Switch nodes: Detect command type (start or stop) and target workflow keywords.
- n8n node: Sends API calls to activate or deactivate workflows by workflow ID.
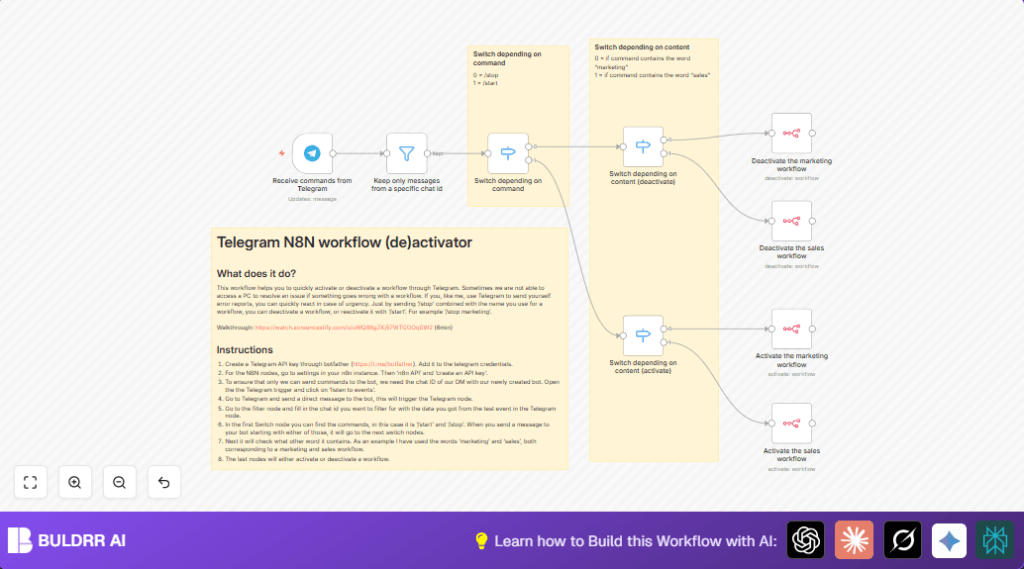
How this workflow works (Input → Process → Output)
Input
The workflow receives messages sent to the Telegram bot. The user sends text commands like /stop marketing or /start sales from their private chat.
Processing Steps
- The Telegram Trigger captures the message.
- The Filter node checks if the message came from the allowed Telegram chat ID only.
- The first Switch node identifies if the command is to start or stop a workflow.
- Two other Switch nodes check the command details to find the exact workflow name (like “marketing”, “sales”, “usdc”, or “hsuite”).
- Based on the command and workflow, the n8n node calls the n8n API to activate or deactivate the targeted workflow.
Output
The targeted n8n workflow changes its state—either starting or stopping—without manual login or dashboard access. The user controls workflows remotely just via Telegram messages.
Most n8n users face the same problem — when something breaks or
needs to be paused urgently, you have to open a laptop, log into
the dashboard, find the workflow, and manually toggle it.
This workflow eliminates all of that.
Whether you’re traveling, on your phone, or away from your desk —
you stay in full control. One Telegram message is all it takes to
start or stop any workflow remotely, from anywhere in the world.
→ A campaign running at the wrong time? /stop campaign
→ Ready to resume after a fix? /start sales
→ No computer needed. No dashboard login. Just Telegram.
Who should use this workflow
This workflow is for users who manage important n8n workflows and need quick, mobile control. It helps when dashboard access is slow or unavailable. Users managing digital campaigns, sales automation, or any time-sensitive workflows will benefit most.
It is also useful for anyone wanting to pause or resume workflows with simple Telegram commands from their phone, saving time during emergencies.
Beginner step-by-step: How to use this workflow in n8n
Step 1: Import the workflow
- Download the supplied workflow file using the Download button on this page.
- Open your n8n editor, then go to the top right menu and select Import from File.
- Choose the downloaded workflow file to load it into your workspace.
Step 2: Add credentials
- Add your Telegram bot API key under n8n credentials named Telegram API.
- Add your n8n API key credential created from your n8n instance settings.
Step 3: Update workflow settings
- Edit the Filter node to put your personal Telegram chat ID for security.
- In the Switch nodes, update or add workflow keywords to match your workflows.
- In the n8n node, replace workflow ID URLs with your real workflow IDs to control.
Step 4: Test the workflow
- Send test Telegram messages like /stop marketing from your personal chat to the bot.
- Watch in n8n if the correct workflow is stopped or started as expected.
Step 5: Activate for production
- Once testing succeeds, activate the workflow in n8n so it runs continuously and listens for commands.
If using self-host n8n, verify the instance supports API key authentication and is reachable online. More help at self-host n8n.
Customization ideas
- Add more keywords and cases in the Switch nodes to support extra workflows like “finance” or “support.”
- Change the Filter node to allow multiple Telegram chat IDs for more users.
- Add synonyms in command detection like /enable or /disable alongside /start and /stop.
- Add Telegram Send Message nodes after actions to send confirmation replies to the user.
Edge cases and troubleshooting
If workflows do not activate or deactivate correctly, check that workflow IDs in the n8n node match your actual workflows exactly. Also confirm API keys are added and correct.
If the Telegram Trigger does not start, verify the bot token is correct and the bot has been messaged from your Telegram account to initialize chat ID capture.
Summary of results
✓ Users send Telegram messages to start or stop workflows anytime.
✓ Workflows change state remotely without dashboard login.
✓ Faster response saves time and prevents errors during issues.
✓ Control from mobile keeps campaigns and systems running smoothly.
