1. Opening Problem Statement
Meet Sarah, a busy team lead managing a constantly updating Google Sheet full of customer requests. Every five minutes, she wastes valuable time manually checking which rows are new and which ones have already been processed. This repetitive task leads to missed updates, duplicated efforts, and frustration, causing delays in responding to customers. On top of that, manually tracking processed rows risks errors like accidentally skipping data or reprocessing the same information, costing her team hours each week and impacting overall productivity.
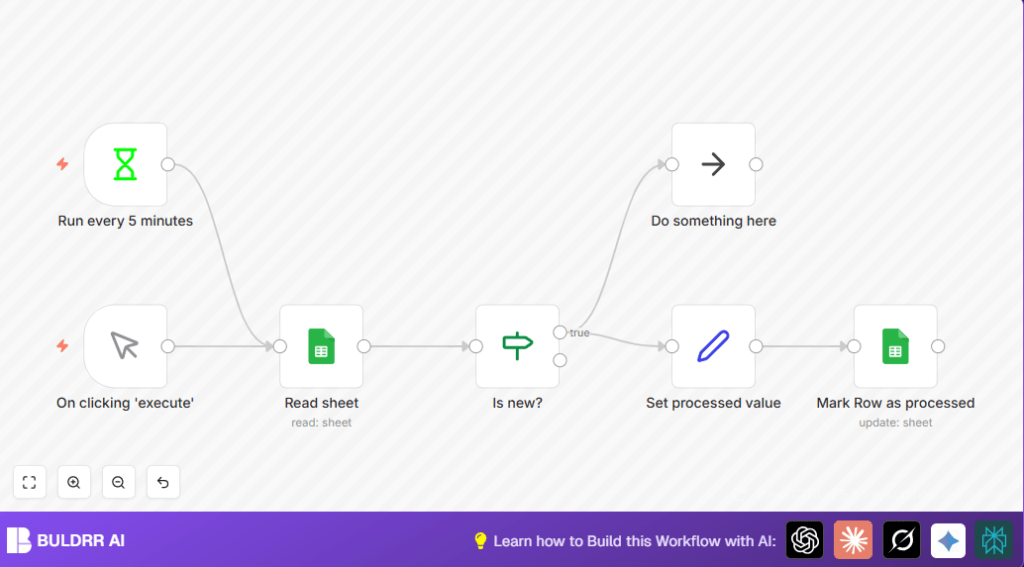
2. What This Automation Does
This specific n8n workflow automates Sarah’s Google Sheets row checking and updating process, saving time and reducing errors. When this workflow runs, it:
- Runs automatically every 5 minutes to fetch all rows from a specified Google Sheet.
- Checks each row to determine if it has been processed by inspecting a ‘Processed’ column.
- Executes a defined action only on rows that are new (i.e., those without a timestamp in the ‘Processed’ column).
- Marks those rows as processed by updating the ‘Processed’ column with the current timestamp.
- Prevents duplication of work and ensures real-time tracking of processed data.
- Allows manual triggering for immediate re-execution when needed.
This workflow can save Sarah several hours per week and ensures her team responds to new data promptly and accurately.
3. Prerequisites ⚙️
- n8n account with access to create workflows.
- Google Sheets account with access to the sheet to be automated (OAuth2 authentication).
- A Google Sheet with a “Processed” column to track row status.
- Basic familiarity with n8n nodes such as Manual Trigger, Interval, Google Sheets, If, and Set.
4. Step-by-Step Guide to Build the Workflow ⚙️
Step 1: Set up the Trigger
Go to the n8n editor panel. Click +New Workflow. From the node search bar, add an Interval node. Set the unit to minutes and the interval to 5. This node triggers the workflow every 5 minutes automatically.
Expected outcome: Your workflow will now execute every 5 minutes without any manual intervention.
Common mistake: Forgetting to set the interval unit to minutes, which could cause unexpected triggers.
Step 2: Add the Manual Trigger Node (Optional)
Still in the editor, add a Manual Trigger node. This allows you to manually execute the workflow to test or re-run anytime.
Connect this manual trigger node to the next node in the workflow.
Expected outcome: You can now click “Execute” in n8n to run the workflow instantly.
Common mistake: Not properly connecting the manual trigger node to the next step, so the workflow won’t execute on manual trigger.
Step 3: Read Data from Google Sheets
Search for the Google Sheets node and add it to your workflow. Set the operation to Read and select the proper Sheet ID. Authenticate your Google account via OAuth2.
Expected outcome: The node fetches all rows from the sheet each time it runs.
Common mistake: Using the wrong Sheet ID or not setting OAuth2 authentication correctly, causing authentication errors.
Step 4: Filter New Rows with If Node
Add an If node. Configure it to check if the “Processed” column is empty for each row. Use expression {{$json["Processed"]}} and condition “is empty.”
Expected outcome: The workflow branches—only unprocessed rows continue through the “true” path.
Common mistake: Incorrect expression syntax or referencing the wrong column name.
Step 5: Perform an Action on New Rows (No Operation as Placeholder)
This workflow has a NoOp node named “Do something here” which acts as a placeholder where you can insert your actual processing logic (like sending an email or updating another system).
Expected outcome: This is where your automation task on new data will execute.
Common mistake: Leaving this node empty during real-world use—be sure to replace it with meaningful steps.
Step 6: Set Processed Timestamp
Add a Set node after the action node. Configure it to add a new field “Processed” with the current timestamp using expression {{$now.toISO()}}.
Expected outcome: Each new row receives a timestamp marking it as processed.
Common mistake: Forgetting to update the correct field name or expression.
Step 7: Update the Google Sheet Row
Add another Google Sheets node configured to update the row with the new “Processed” timestamp. Use operation: update and set the key as “ID” to identify rows.
Expected outcome: The Google Sheet row is updated, preventing repetitive processing.
Common mistake: Not specifying the row key correctly, resulting in failed updates.
5. Customizations ✏️
1. Replace NoOp with Email node: In the “Do something here” NoOp node, substitute with an Email Send node to notify team members of new entries.
2. Change interval timing: Adjust the Interval node to run every minute or every 10 minutes depending on your business needs.
3. Add additional filters: Extend the If node to check other columns for conditions to fine-tune which rows get processed.
6. Troubleshooting 🔧
Problem: “Google Sheets node authentication failed”
Cause: Incorrect OAuth2 credentials or expired tokens.
Solution: Re-authenticate Google Sheets node by clicking on the credentials field and connecting your Google account again.
Problem: “If node always routes to false”
Cause: Wrong field name or expression syntax mistake.
Solution: Double-check expression, ensure column name exactly matches “Processed” and is spelled correctly.
7. Pre-Production Checklist ✅
- Confirm Google Sheet has a “Processed” column to avoid runtime errors.
- Test manual trigger to verify single-run behavior.
- Check interval trigger fires every 5 minutes as expected.
- Run with sample data including both processed and unprocessed rows.
- Back up your Google Sheet before deploying updates to prevent accidental data loss.
8. Deployment Guide
Activate the workflow by toggling it to “Active” in n8n. Monitor initial runs via n8n’s execution logs to ensure rows are processed correctly. If errors occur, consult the troubleshooting section above. n8n supports both cloud and self-hosted environments, so you can deploy where your data compliance needs fit best.
9. FAQs
Q: Can I use this with Excel Online instead of Google Sheets?
A: This workflow specifically uses Google Sheets nodes; to use Excel Online, you’d need to replace those nodes with Microsoft Excel integration nodes.
Q: Does updated timestamp consume large API limits?
A: Each update counts as an API call. For large sheets, monitor usage in Google Cloud Console to avoid hitting quota limits.
Q: Is my sheet data secure?
A: n8n uses OAuth2, which is a secure authentication method, ensuring no raw passwords are stored and data access is limited to authorized tokens.
10. Conclusion
By building this tailored Google Sheets row processing automation in n8n, you’ve eliminated manual tracking tasks that cost hours weekly. This precise system ensures no row goes unprocessed, boosting efficiency and reducing errors for data managers like Sarah. Next steps could include integrating email notifications for new rows or linking to CRM systems to automate customer follow-ups. Keep exploring n8n’s powerful nodes to craft workflows that fit your unique needs!