Streamlining Gong Call Processing for Sales Teams with n8n Automation ⚙️
Meet Angel, a sales operations manager who spends hours manually extracting and compiling data from Gong sales calls to update Salesforce opportunities and prepare insights for her team. Angel often faces frustrations with inconsistent transcript formats, lost attendee details, and missing metadata that slow down accurate sales analysis and follow-ups. These manual tasks can consume upwards of 4 hours per week and sometimes lead to lost revenue opportunities due to delayed insights.
In this blog post, we’ll walk through an n8n workflow that automates this entire process seamlessly — extracting detailed Gong call data, joining transcripts, enriching call metadata with Salesforce opportunity details, and preparing a clean, structured data set ready for downstream use.
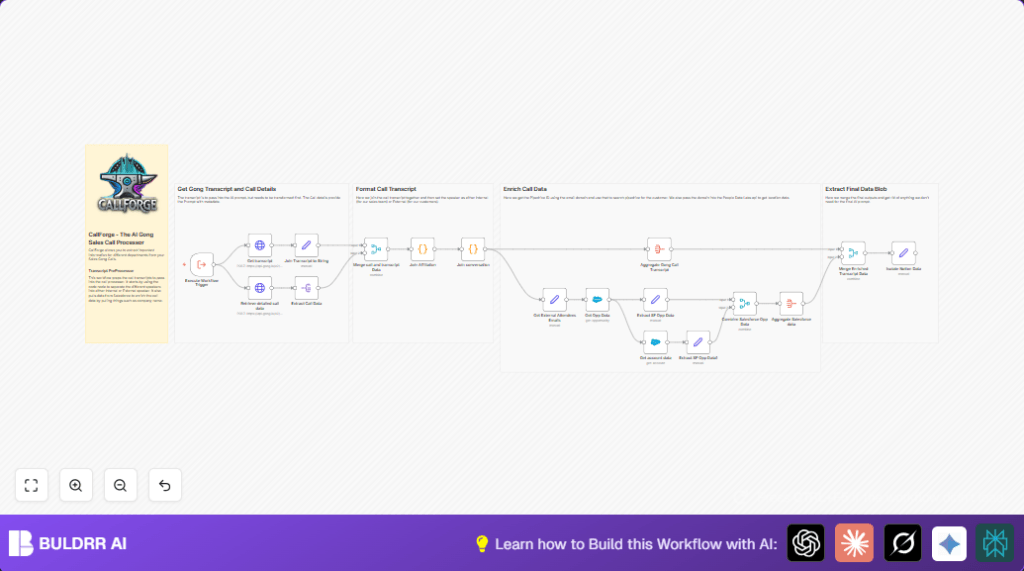
What This Gong Call Processing Automation Does
When this workflow runs, here’s what happens:
- The workflow is triggered programmatically when a Gong call event occurs (Execute Workflow Trigger node).
- It calls Gong’s API to retrieve comprehensive call details and the call transcript via HTTP Request nodes.
- Merges and transforms the transcript data to associate speaker IDs with internal or external affiliations using Code nodes for better context.
- Pulls Salesforce opportunity and account data related to the call, enriching the capture with precise deal information.
- Compiles all extracted and enriched data into a structured format that can be forwarded to tools such as Notion or CRM systems for sales insights.
- Reduces manual work dramatically, saving Angel roughly 3-5 hours per week and improving data accuracy for sales forecasting and analytics.
Prerequisites ⚙️
- n8n account (self-hosting recommended for enterprise control, see self-hosting options).
- Gong API access with valid authentication credentials.
- Salesforce account with OAuth2 credentials (for opportunity and account data retrieval).
- Basic knowledge of n8n nodes: Execute Workflow Trigger, HTTP Request, Code, Salesforce nodes.
Step-by-Step Guide to Set Up the Gong Call Processor
1. Configure the Workflow Trigger Node
Navigate to your n8n editor. Add the Execute Workflow Trigger node to start your workflow. This node listens for Gong-related triggers—such as completed calls or transcript availability. No parameters need setting here; it acts as the entry point for all following actions.
Why this is important: It ensures the workflow automatically starts without manual intervention when there’s a new Gong call event.
2. Retrieve the Gong Call Transcript & Details via HTTP
Add two HTTP Request nodes named Get transcript and Retrieve detailed call data respectively.
Configure both nodes to POST JSON requests to Gong API endpoints:
– Transcript endpoint: https://api.gong.io/v2/calls/transcript?callIds=[callId]
– Call details endpoint: https://api.gong.io/v2/calls/extensive
Include authentication via your Gong API credentials using HTTP Header Auth.
Make sure the body JSON includes the call ID provided by the trigger, dynamic like {{ $json['calldata[0].calls'].id }}.
Expected outcome: These nodes return detailed call metadata and transcript arrays to your workflow.
Common mistake: Incorrect call ID path in JSON will cause API errors or empty results. Verify with sample call data.
3. Extract and Join Transcript Text
Use a Set node named Join Transcript to String to transform transcript arrays into a cleaner format. Apply a JMESPath expression to select speaker IDs and sentences text arrays from the API response for further processing.
4. Merge Call and Transcript Data
Add a Merge node to combine your call details and transcript data by position. This creates a unified object with all call information in one flow.
5. Annotate Speaker Affiliations
Add a Code node called Join Affiliation. Paste this JavaScript snippet to replace speaker IDs with affiliations (Internal or External) based on the call parties:
// Retrieve input data from all items
const inputData = $input.all();
const originalJson = inputData[0].json; // Get the original JSON data
const conversation = originalJson.Conversation;
const parties = originalJson.parties;
// Create a mapping of speakerId to affiliation
const affiliationMap = {};
parties.forEach(party => {
affiliationMap[party.speakerId] = party.affiliation;
});
// Replace speakerId with affiliation in the conversation data
const updatedConversation = conversation.map(entry => {
const affiliation = affiliationMap[entry.speaker] || 'Unknown'; // Fallback to 'Unknown' if not found
return {
...entry,
speaker: affiliation, // Replace speakerId with affiliation
};
});
// Return the updated conversation along with the original JSON data
return [{ json: { ...originalJson, updatedConversation } }];
This step provides clear context in your transcript, helping distinguish internal sales talk from client conversations.
6. Format Transcript Output
Follow up with another Code node called Join conversation to format the updated conversation array into a readable multiline string, where each line follows "Speaker: Text" format.
7. Retrieve Salesforce Opportunity Data
Use the Salesforce node configured with OAuth2 credentials to GET the Opportunity data by ID referenced in the call data. This adds deal stage, lead source, forecast, and other critical sales metadata.
8. Extract and Refine Opportunity and Account Fields
Add Set nodes (Extract SF Opp Data and Extract SF Opp Data1) to pick relevant fields like Name, IsWon, StageName, and Employees_Bucket__c. These slimmed data objects are easier to merge later.
9. Aggregate Salesforce Data
Use Aggregate node to combine all Salesforce outputs into a clean array ready for merging with transcript data.
10. Final Data Merge and Extraction
Merge all enriched data (call, transcript, Salesforce) in a combined Merge node, then pass into a final Set node (Isolate Notion Data) to produce the exact data structure needed for Notion or other sales tools.
Customizations ✏️
- Include More Gong Metadata: Adjust the Retrieve detailed call data HTTP Request’s
contentSelectorJSON to pull additional fields like sentiment scoring or competitor mentions. - Modify Speaker Affiliation Logic: In the Join Affiliation Code node, tweak the mapping rules to add a custom speaker category or alias for more nuanced transcript analysis.
- Add CRM Data Sources: Extend the workflow by adding nodes for Pipedrive or HubSpot to enrich contact and account information further before final merging.
Troubleshooting 🔧
- Problem: “HTTP Request node returns 401 Unauthorized”
Cause: Gong or Salesforce API tokens expired or misconfigured.
Solution: Refresh API credentials in n8n and verify header authentication setup. - Problem: “Transcript code node error or empty Conversation array”
Cause: Incorrect JMESPath query or Gong API response structure changed.
Solution: Test API response in Postman, update JMESPath or parsing logic accordingly.
Pre-Production Checklist ✅
- Confirm API access to Gong and Salesforce is authorized and working via test calls.
- Validate that the correct call IDs are dynamically passed from the trigger node to HTTP nodes.
- Run test executions to ensure transcript joins and affiliation replacements work as intended.
- Check merged data output for completeness and accuracy before deployment.
Deployment Guide
Activate your workflow by enabling it in n8n. Connect this workflow trigger node to your Gong event source (webhook or inside an app). Monitor executions in the n8n dashboard and periodically check for API credential expirations to prevent downtime.
Conclusion
By following this guide, Angel and sales teams can automate extracting and enriching Gong call data, syncing valuable insights effortlessly into Salesforce and Notion. This cuts down data prep time by hours weekly and enhances sales forecasting reliability.
Next, consider automations like real-time call sentiment analysis, personalized email follow-ups post call, or integrating with customer support platforms for holistic client management.
Ready to save time and empower your sales data processing? Let’s build it now with n8n!