What This Workflow Does
This workflow automates making 360° try-on videos for fashion e-commerce. It solves the problem of slow, manual video creation. Users get finished videos quickly without needing editing skills.
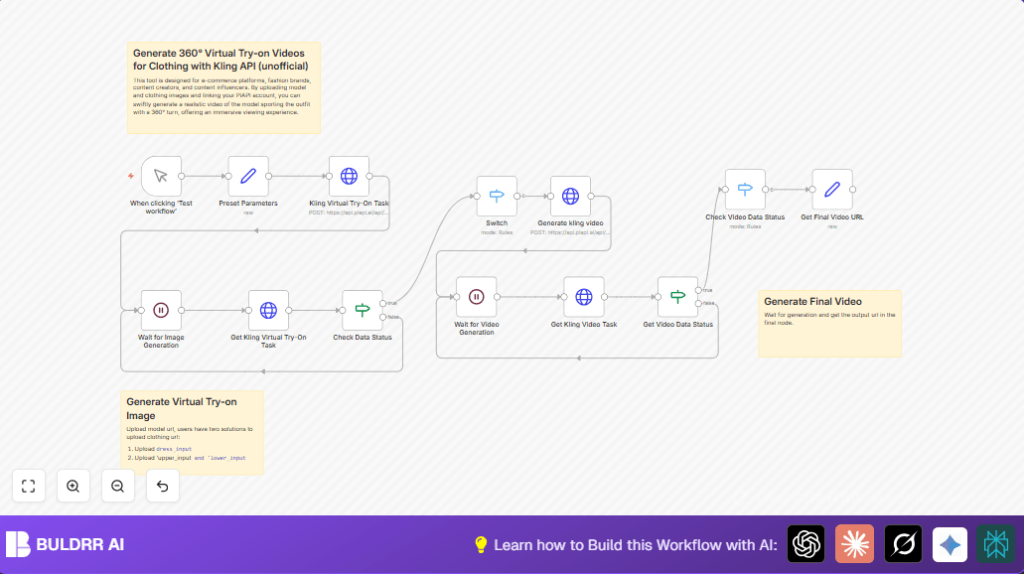
The workflow uses Kling API and n8n to do virtual try-on and video generation. It handles uploading images, starting tasks, waiting for completion, checking status, generating videos, and getting the final link automatically.
Who Should Use This Workflow
Users with fashion e-commerce brands who want to show clothes on models online better.
It is for those who waste too much time on manual video work and want faster, automatic results. Non-technical users can run this after setup.
Tools and Services Used
- n8n: Workflow automation platform to run the steps.
- Kling API: AI service for virtual try-on image and 360° video generation.
- HTTPS Image URLs: Model and clothing pictures hosted online for input.
Inputs, Processing, and Outputs
Inputs
- API Key for Kling access.
- Model image URL.
- Clothing image URL (either full dress or separate upper and lower parts).
- Video prompt describing the desired movement and poses.
Processing Steps
- Send images and API Key to Kling API to start virtual try-on task.
- Wait and check Kling task status until image generation completes.
- After completion, start video generation with a customizable prompt.
- Poll Kling API for video completion status.
- Handle errors or retries if tasks fail or delay.
Outputs
- Final 360° try-on video URL ready for embedding or sharing.
Beginner Step-by-Step: How to Use This Workflow in n8n
1. Import the Workflow
- Download the workflow file using the Download button on this page.
- Open the n8n editor where you want to use the workflow.
- Click on “Import from File” in n8n and upload the downloaded workflow file.
2. Configure Credentials and Inputs
- Fill in the Kling API Key in the Preset Parameters node.
- Update model and clothing image URLs in the same node.
- If needed, change any IDs, emails, or folder references to match your environment.
- Adjust the video prompt text if you want a different model movement in the video.
3. Test and Activate
- Run the manual trigger once to test the workflow execution.
- Check the execution logs and results for any errors or missing data.
- Once tested, toggle the “Active” switch to enable the workflow for regular use.
For better data privacy and control, consider self-host n8n.
Customization Ideas
- Change generate_video_prompt in Preset Parameters to direct different model actions in videos.
- Use separate URLs for upper and lower clothing for mix-and-match outfit previews.
- Increase batch_size for multiple virtual try-on images per request.
- Add retry or notification logic for task failures using condition nodes.
- Integrate storage systems to save or download final videos automatically.
Common Edge Cases and Failures
- Authentication errors: Caused by missing or invalid API Key. Fix by updating key in parameters.
- Task status stuck: Happens when wait nodes miss webhook IDs or when API does not support webhooks properly. Poll status instead.
- Video generation errors: May occur with bad JSON format or invalid prompt. Verify input payload carefully.
- Final video URL missing: Usually wrong JSON path in extraction node. Inspect API response structure before mapping.
Pre-Production Checklist
- Confirm Kling API Key is active and correct.
- Check image URLs are public and reachable over HTTPS.
- Run manual trigger and verify each HTTP request returns 200 status.
- Ensure Wait nodes resume after task completions.
- Backup workflow before making major changes.
Deployment Guide
Activate the workflow by turning on the switch in n8n after successful testing.
Use manual trigger to start video generation on demand.
Monitor workflow run history to catch and troubleshoot any errors early.
For scaling, automate input data feeding using other tools or databases.
Summary
✓ Saves more than 15 hours every week on manual video work.
✓ Automates virtual try-on and 360° video creation with API calls.
✓ Easily customized video prompts and outfit inputs.
→ Faster product launches with high-quality visual previews.
→ Ready-to-use video URLs for embedding or sharing.
