What this workflow does
This workflow connects Shopify order updates with HubSpot CRM to save time and reduce mistakes.
It watches for Shopify order updates and then creates or updates contacts and deals in HubSpot automatically.
This stops people from entering the same data manually and losing sales info.
Who should use this workflow
This is for Shopify store managers who want their sales and marketing teams to work better together.
This helps avoid spending hours manually updating HubSpot with order details.
No extra staff or hard integrations needed.
Tools and services used
- n8n: automation platform to build the workflow.
- Shopify: online store sending order updates.
- HubSpot CRM: system storing customer contacts and sales deals.
Inputs, processing, and output
Inputs
- Order update events from Shopify via webhook.
- Shopify order data including customer and order details.
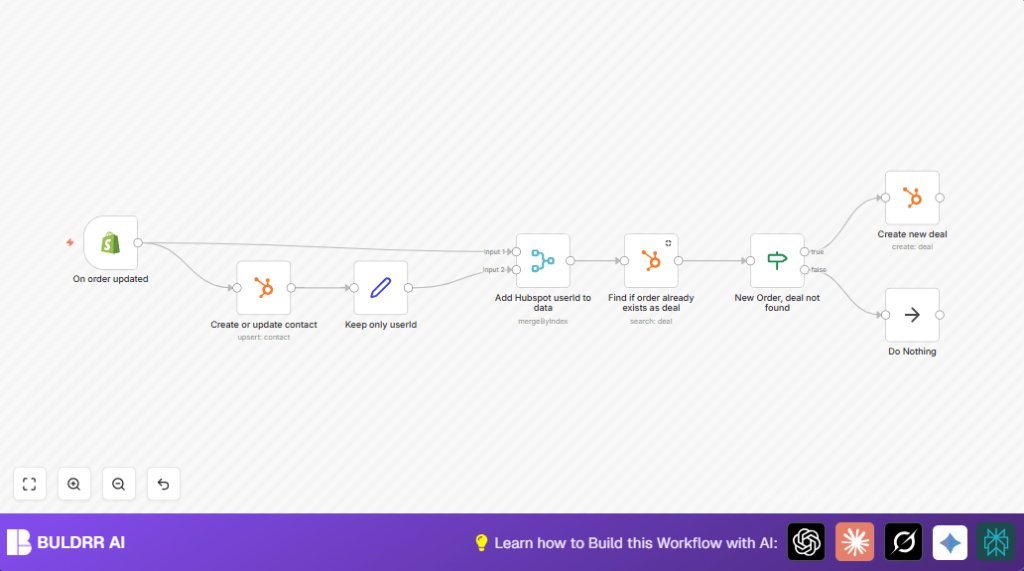
Processing steps
- Trigger workflow when Shopify sends an order updated event.
- Extract customer info from Shopify JSON data.
- Create or update the contact in HubSpot using customer email and address info.
- Extract user ID from Shopify data using a Set node.
- Merge user ID back into main order data with a Merge node.
- Search HubSpot for existing deals matching the Shopify order name.
- Use an If node to check if the deal is new or already exists.
- If new, create a new deal in HubSpot linked to the contact.
- If exists, do nothing to avoid duplicates (using a NoOp node).
Output
Contacts and deals in HubSpot that match current Shopify orders.
This keeps HubSpot data updated automatically and error-free.
Beginner step-by-step: How to build this in n8n
Import the workflow
- Download the workflow using the Download button on this page.
- Open the n8n editor and use “Import from File” to add the workflow.
Configure credentials
- Add your Shopify OAuth credentials to the Shopify Trigger node.
- Add your HubSpot OAuth credentials to each HubSpot node.
- Update any IDs, emails, or channels if the default ones don’t fit your setup.
Test the workflow
- Make sure the Shopify webhook URL is saved in Shopify under Settings > Notifications > Webhooks.
- Update an order in Shopify to trigger the workflow.
- Check if contacts and deals appear or update in HubSpot.
Activate for production
- Turn on the workflow by clicking the Active switch at top right in n8n.
- Use the Executions tab in n8n to monitor workflow runs for errors.
- Optionally add Slack or Email nodes to get alerts if automation fails.
- Consider self-host n8n for more control and security.
Edge cases and common mistakes
- Missing webhook URL in Shopify stops workflow triggering.
- Wrong JSON paths cause empty or bad contact and deal data.
- Search query not matching order names causes duplicate deals.
- Not enabling “Keep Only Set” in Set node passes extra data causing mistakes.
Customization ideas
- Change deal stage in HubSpot node to fit your sales process.
- Add more customer fields like phone or job title in the contact node.
- Use Shopify Trigger with “orders/create” topic to only handle new orders.
- Add a Slack or Email node to alert sales for each new deal created.
Summary
✓ Saves hours each week by automating data entry.
✓ Keeps HubSpot contacts and deals current with Shopify orders.
✓ Prevents duplicate deals and data errors.
→ Makes sales and marketing work better together.
