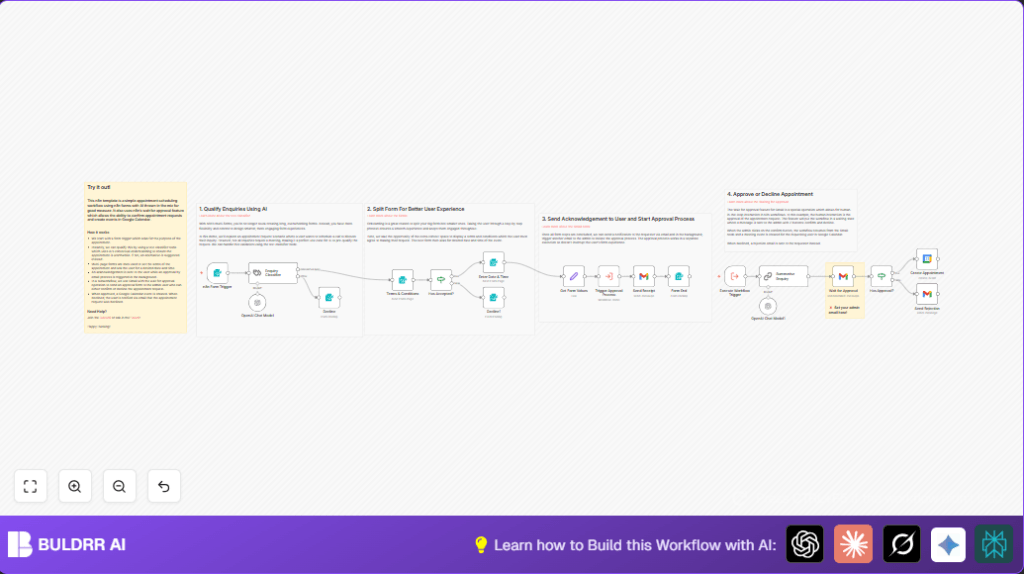
Opening Problem Statement
Meet Jim, a busy consultant who receives dozens of appointment requests each week through email and messages. Sorting through inquiries, qualifying which ones actually need a meeting, and coordinating available times is time-consuming and error-prone. Jim ends up spending hours manually managing this process every week, missing out on clients who get frustrated by delays or double bookings.
Such inefficiency costs Jim precious time that he could spend consulting, developing his business, or resting. Some requests turn out to be irrelevant or better handled via email, but without a good way to pre-qualify, Jim wastes effort on every request. Additionally, confirming appointments and creating calendar events manually adds friction and risk of mistakes.
This appointment scheduling workflow, powered by n8n and AI, solves Jim’s exact problem by automating inquiry qualification, multi-step user-friendly forms, admin approval, and seamless calendar event creation with confirmations and rejection notifications.
What This Automation Does
This n8n workflow automates appointment scheduling from start to finish with these key functions:
- Qualifies inquiries using AI text classification to filter relevant appointment requests from those better suited to an email response.
- Splits the booking process into multiple forms including terms & conditions acceptance and date/time selection, improving user experience and engagement.
- Sends an immediate acknowledgment email to users confirming receipt of their appointment request.
- Notifies an admin via email with approval buttons embedded in the Gmail waiting for approval feature to allow manual confirmation or rejection.
- Automatically creates a Google Calendar event with meeting details and a Google Meet link if approved.
- Sends rejection emails when appointment requests cannot be accommodated.
This automation dramatically reduces manual scheduling time by hours weekly and minimizes human errors, making Jim’s appointment management more professional and efficient.
Prerequisites ⚙️
- n8n account (can be self-hosted; see this guide for hosting options) 🔌
- Gmail account with OAuth2 credentials for sending emails 📧🔑
- Google Calendar account with OAuth2 credentials for event creation 📅🔑
- OpenAI account and API key credentials for AI-powered text classification and summarization 🤖🔑
Step-by-Step Guide
Step 1: Trigger the Appointment Request Form
Navigate to your n8n workflow and add a Form Trigger node named n8n Form Trigger. Set the path to schedule_appointment. Configure form fields to capture the user’s name, email, and enquiry.
You should see a webhook URL generated. This endpoint will accept form submissions which begin the workflow.
Common mistake: Forgetting to mark required fields, which can cause incomplete submissions.
Step 2: Classify the Enquiry Using AI
Add a Text Classifier node connected from the form trigger. Configure it to analyze the enquiry text for relevance.
Set categories such as “relevant enquiry” for topics like AI, automation, or product engineering. Configure fallback to “other”.
This step ensures only relevant inquiries proceed to booking. Non-relevant inquiries branch to a form that advises contacting via email instead.
Step 3: Require Terms & Conditions Acceptance
Add a Form node named Terms & Conditions. Set the form title and description with the booking terms and conditions, including confidentiality and no recordings.
Add a dropdown field for users to accept the terms, set to required and multi-select.
Use an If node Has Accepted? to branch: accepted users continue, others get a polite decline form.
Step 4: Collect Desired Appointment Date & Time
Add another Form node named Enter Date & Time with dropdown fields for dates and times.
Use JavaScript in JSON output to dynamically generate date options for the next 5 weekdays and set fixed time slots from 9am to 6pm.
Common mistake: forgetting to filter out weekends, which this workflow handles elegantly.
Step 5: Extract All Form Values
Add a Set node named Get Form Values that consolidates the user’s name, email, enquiry, chosen date/time, and submission timestamp into a clean JSON format. Use expressions referencing previous form nodes.
Step 6: Send Acknowledgement Email
Use a Gmail node named Send Receipt to send a personalized email to the requester, thanking them for the appointment request with a summary of their details.
Use dynamic expressions to personalize subject and email body content.
Step 7: Trigger Admin Approval Subworkflow
Add an Execute Workflow node named Trigger Approval Process to start the approval process asynchronously.
Step 8: In the Subworkflow, Summarize Enquiry
Use an LLM Chat AI node named Summarise Enquiry connected to the execution trigger node to generate a concise summary of the appointment purpose.
Step 9: Send Approval Email to Admin
Add a Gmail node with Wait for Approval operation enabled. Configure it to send an email to the admin address with approve and decline buttons within the email.
This node pauses workflow until a response from the admin is received.
Step 10: Conditional Logic Based on Admin Response
Use an If node named Has Approval? to route the workflow.
If true (admin approved), proceed to create the calendar event. If false, send a rejection email back to the requester.
Step 11: Create Google Calendar Event
Add a Google Calendar node named Create Appointment. Set the start time from the user’s selection, with a 30-minute duration.
Populate the event summary, attendee details, description including the original enquiry and AI-generated summary, and set a Google Meet conferencing link automatically.
Step 12: Send Rejection Email if Declined
Use a Gmail node named Send Rejection to inform the user politely that the appointment cannot be scheduled at the requested time.
Step 13: Completion Message
Add a Form node named Form End to display a friendly confirmation page once the initial form submission is done.
Use expressions to dynamically show the summary of the appointment request.
Customizations ✏️
- Change Appointment Duration: In the Create Appointment Google Calendar node, adjust
endtime expression to lengthen or shorten the meeting duration. - Modify Terms & Conditions Text: Edit the description in the Terms & Conditions form node to reflect your own legal or business policies.
- Add More Time Slots: Update the Enter Date & Time form’s JSON output to include additional or custom time options.
- Customize Admin Email Recipient: Change the recipient address in the Wait for Approval Gmail node under the approval subworkflow to direct notifications to a different manager.
- Enhance AI Classification Categories: In the Enquiry Classifier, expand categories to fine-tune which inquiries should be accepted automatically.
Troubleshooting 🔧
Problem: “Form submissions not triggering workflow”
Cause: Incorrect webhook URL or path configured in the Form Trigger node.
Solution: Double-check the Form Trigger’s path and ensure you are submitting form data to the exact webhook URL provided by n8n. Use the workflow’s execution log to verify reception of webhook calls.
Problem: “Approval emails not sending or waiting”
Cause: Gmail node’s “wait for approval” operation misconfigured or OAuth2 credentials invalid.
Solution: Confirm that your Gmail node is set to “send and wait for approval” and OAuth2 credentials are current. Test sending a simple email through the Gmail node to verify authentication.
Problem: “Date options include weekends”
Cause: The JavaScript generating date dropdown does not filter weekends properly.
Solution: Ensure the date generation code uses the correct filtering logic as shown: .filter(d => !d.isWeekend), which excludes Saturdays and Sundays.
Pre-Production Checklist ✅
- Test the entire multi-step form submission from start to finish using sample data.
- Verify that the AI text classifier correctly filters relevant and irrelevant enquiries.
- Check emails arriving in both user inbox and admin inbox for acknowledgment and approval requests.
- Simulate admin approval and rejection to validate calendar event creation and rejection email flow.
- Backup your workflow JSON and OAuth2 credentials securely before going live.
Deployment Guide
Once fully tested, activate your workflow in n8n by toggling it to active. Ensure your webhook URL is publicly accessible if you use n8n Cloud or self-host with a public IP/domain.
Monitor executions via the n8n dashboard to catch errors early. You can review logs of successful appointment creations or email sends for auditing.
For organizations, consider setting up alerts by integrating with Slack or other messaging tools for real-time monitoring.
FAQs
Q: Can I use Outlook instead of Gmail for email notifications?
A: While this workflow uses the Gmail node, you can adapt it to Microsoft Outlook by replacing Gmail nodes with Outlook nodes, adjusting OAuth2 credentials accordingly.
Q: Does AI classification consume OpenAI credits?
A: Yes, using the Langchain AI nodes with OpenAI will consume API credits based on your usage, so monitor your account accordingly.
Q: Is my data secure in this workflow?
A: Data is processed within your n8n instance and transmitted to trusted services with encrypted OAuth2 authentication. Use self-hosting for maximum control over data privacy.
Q: Can this handle heavy volumes of appointment requests?
A: This workflow is designed to scale with n8n’s capabilities, but extremely high volumes may require performance tuning and infrastructure scaling.
Conclusion
By following this guide, you’ve built a sophisticated appointment scheduling system using n8n multi-step forms enhanced by AI for enquiry qualification. You’ve automated confirmations, admin approvals, and calendar event creation, saving hours of manual coordination each week.
This workflow not only streamlines handling of appointments but also delivers a professional user experience and reduces errors.
Next steps could include integrating SMS notifications, adding payment processing before confirmation, or expanding AI classification models for richer inquiry sorting.
Keep experimenting with n8n and AI to make your workflows smarter and more efficient. Happy automating!